Please share your opinions and expertise since we need all the help we can get!

Saturday, February 21, 2015

Not feeling the heat

Shortly after coming home from a trip our heat stopped working again. Naturally this happened on a Saturday morning. A Saturday with a high of 25 F. My first hope was that I could just hit the reset button on the motor. But the motor would not fire. I could hear the pumps pushing (cold) water around, but nothing else. I tried turning the boiler power on and off. It was like no power was getting to the motor.

Fortunately our furnace guy picked up his phone that and came over within a couple of hours. After about 10 minutes he had the diagnosis: dead aquastat.


The aquastat is the gray box with the power lines coming out in the above photo. What it does is route power around to the water boiling motor (black box at the bottom) and/or the pumps that push water through the house when asked. While it was sending power to the pumps it was unable to power the motor.

Back of aquastat. See the problem? Probably not.
One little spot was burned out. I asked whether I could just re-add some solder to it, but our technician said that it would probably quickly die again.

Closer in. See the burned out spot in the center?
So for about $250 we got a new one installed. Which was a fair price, since the aquastat alone costs around $150. Especially for a Saturday emergency repair. If you read the reviews in the Amazon link you will notice that most of the complaints are about the solder failing. If it dies again, I may just try slapping some on with my $15 RadioShack soldering kit and seeing what happens.

Saturday, February 14, 2015

Babyproofing, part 2

We've made a lot of progress on the baby-proofing front lately, as our little one has moved up to full-fledged mobile toddler. You may remember that last time, we put in a tension-mounted gate to separate the living room from the hallway, magnetic locks in the kitchen, and TV straps. The most important - and hardest - change to implement was the gate at the top of the stairs. Thanks to a recommendation, we went with the KidCo Angle Mount gate. Unlike the gate on our main floor, this one had to be attached to the wall (accidentally dislodging it on a level surface and falling to the ground is a big difference from accidentally dislodging it and plummeting down the stairs). It also couldn't have a threshold that we grown-ups could potentially trip over. This option seemed like the only one that we could use - especially since with the bannister and having to install into studs, we needed the option to install it at an angle (i.e. not perpendicular to the mounting walls).

This was definitely a two-person install so thank goodness grandpa and grandma were there to help watch the baby and assist. D had to be especially careful because one of the studs was also very close to wiring for our hall light. There was a lot of leveling and measuring and tweaking to get the sizing right. The gate width was just slightly too big at one setting and slightly too small at the other, so we had to try both more than once, and keep adjusting the bolt on the lock (4th picture) to see which fit was better.


It works, and after a week of struggling to get the hang of opening and closing it smoothly, I think I've got it (I sneak out in the morning while it's still dark, usually with things in my hands, so it was quite a challenge). It isn't as easy as our main floor gate that has an easy spring and automatically swings shut, but then again, it is a completely different design with a different purpose.

The annoyance for me is that when it is unlatched, it swings back and blocks the door to the nursery.
When it's closed, you can see that we installed it at an angle to get it under the bannister and into the corner stud on the other side. We installed it above the wood trim and made sure before we screwed it in that the cats can pass underneath (but the baby can't). We didn't want them having to jump a gate that was on the steps - they're pretty coordinated but I don't think they could handle that.
Now we can let her play upstairs while we get dressed and straighten up without fearing for her life. And if she should ever manage to figure out how to escape her crib, she can't get far. Huge sigh of relief.

Saturday, January 31, 2015

A Little Birdie Told Me

Lately our house has been chirping. No we aren't experiencing a bird infestation - it seems like all at once, the batteries in our three smoke alarms were dying.

I admit that we don't follow the rule to change the batteries when we change our clocks. That seems excessive, especially since winter time is only about 4 months now. Usually we try to remember to test the alarms once or twice a year and wait until the chirps. Which, this time around, came all at once.

We realized that our alarms were really old. We have owned the house for over 5 years now and they didn't look particularly new when we moved in. Smoke alarms are only supposed to be good for about 10 years, and, in fact, one even said that it was made in 2002. Time for an upgrade.

Our first upgrade was at a random trip to Home Depot. There weren't many options for the kind that aren't hard-wired in (and ours are not). This was pretty much the only choice that didn't include bells and whistled like talking and CO detection (more on that later). So it came home with us. The battery doesn't need replacing - it has a 10-year battery that starts chirping after a decade in use and then the whole alarm gets replaced.

It went up relatively quickly but not too quickly, because the walls on the first floor are plaster and everything is a pain when drilling/screwing into plaster. The holes, of course, didn't line up with the holes from the previous alarm.
Next we decided to put some effort into researching our options, since Amazon had a much better selection. It turns out there are several ways to detect smoke - photoelectric or ionization. They detect smoke differently and respond with different speeds to different types of fires/smoke. In case you don't want to read the link: Photoelectric smoke alarms are generally more responsive to fires that begin with a long period of smoldering. Ionization smoke alarms are generally more responsive to flaming fires.

It turned out the one we had just installed was photoelectric, so we decided that we should get the other kind, so that the greater variety might make us safer by giving us more warning. And in fact, we were able to find one that uses both kinds of sensors. The radioactivity warning (because of the ionization sensor) is a little scary...

This one uses AA batteries, which is one complaint we saw in the reviews. It might need replacing too often, so we will see. It's in the basement, so at least if it starts chirping, it won't wake us up (obviously we want to noticed the chirp quickly, but the next morning is sufficient).

The old alarm was looking pretty grungy:
That leaves one more to replace near our bedrooms, maybe yet a third kind (the talking kind maybe?).

After reading one of the manuals about where the alarms should be, we think they may not be located in the best places. But rather than move them, we may just add an extra one to the kitchen area. Currently our main-level alarm is inside our stairwell, which has an overhang that would probably stop it from sensing the smoke quickly. But it didn't seem worth having to spackle over the holes, so for now we just replaced what we had.

Finally, a word about our CO detectors. The ones in the house when we moved in were definitely decrepit, so we bought a new one for each floor. But after doing some more digging while researching smoke alarms (and talking to a former volunteer firefighter), I learned that they need replacing every 3 years. And we bought the house 5 years ago....oops. Time to work on getting those replaced. It made me wonder, though: if smoke detectors last 10 years but carbon monoxide detractor only 3, how can they be combined in one unit. Better to keep them separate and working effectively.

Sunday, January 25, 2015

Filing an Insurance Claim

Our insurance company escaped paying for new gutters in the back of the house when ice brought them down. They also saved money when our copper gutter was smashed by a tree. The logic has always been that we'd keep a very high deductible and only use the insurance when we had a large loss. That way we can keep our rates as low as possible. In our (double digit!) years of renting and owning, we have never filed a claim.

Thanks to our recent house robbery, we broke our streak.  My initial instinct, as usual, was to not file a claim because the computers that were taken were rather old and their market value wasn't substantially higher than our (high) deductible. Then I realized we are paying an extra $100/year for actual value replacement. In other words, if a five year old laptop got stolen, we would get reimbursed for the closest brand new equivalent. Also, the stolen bike backpack had a surprisingly valuable amount of biking-related items inside.

So we filed. While it took nearly a month for the claim to be (mostly) settled, we got a fair outcome from our insurance company. Two things really helped our claim:

  1. A police report that listed the items stolen
  2. Proof of ownership of the stolen items

It really helped that we took pictures of our electronics and because we are heavy internet shoppers, receipts could be retrieved for many of the stolen items. In general if we had a receipt or photograph of the item, we got reimbursed. The overall process was fairly straightforward:

  1. Tell insurance we were robbed and give them the police report number;
  2. Fill out a lengthly report detailing exactly what happened to our house, what was stolen, when we bought and how much we paid for the stolen goods, and document any home security updates we had to do to re-secure the house - including having to buy new locks;
  3. Wait for claim resolution.
I was hoping we would get the full reimbursement value for everything up front, but what the insurance company did was give us the current value. Which is is calculated from today's retail price minus depreciation. So, for example our PS3, which cost us $350 years ago, currently sells for $250. Because video game consoles have a steep depreciation we got reimbursed about ~$70. So when we buy a replacement and submit the receipt we can get the $180 extra. That was a unique case, though, because PS3s are still available and cheaper than when we bought ours.

We made out better on the laptops, because the models that were available years ago are no longer available, so we essentially got a free upgrade in the process. As long as we bought something similar (i.e. brand, same hard drive capacity, similar performance, etc.), they paid the whole amount back to us, eventually.

The initially approved amount got transferred into our bank via a online transfer. As we submit receipts for replacement items we will get the remaining money we are owed. Given that we have heard so many horror stories about insurance reimbursement, we are pleasantly surprised at the result. I assume having receipts and photos of our most valuable items is crucial to getting a fair reimbursement. For the future we need to keep documenting our valuable items with videos and photos. 

Monday, January 12, 2015

Another lock, stock, and barrel

In our second blog post ever, we told you how one of the first things we did after buying this home was to have a locksmith come change our locks. We always felt like we'd been ripped off but at that time - due to the speed we wanted the fix AND our complete inexperience - we didn't have another choice. We talked, afterwards, about improving the lock situation, but to some extent, held to the idea of "if it ain't broke, don't fix it."

Well, five and a half years later, it broke.

Or, more precisely, someone broke in.

We might get into more details in a future post, but for now, suffice it to say that because one thing that was stolen was a house key, we yet again were in a situation where we had to act fast. But we had learned our lesson. We were going to do it ourselves.

We already knew what we wanted, having talked about it previously. Kwikset makes a lock system called SmartKey that can be rekeyed in an instant. We'd already installed a few door knobs to know we were up to the task. D headed to Home Depot practically right after the police were done writing up the report.
As noted back in 2009, we have A LOT of locks. The first night, we just focused on replacing all the deadbolts, so that we could sleep soundly. It took a few more days to replace the rest (and even longer given that one of the boxes was defective and the included keys did not, in fact, go with the lock in the box).

Installation was pretty straightforward but involved occasionally having to drill out the hole a little wider. Otherwise the bolt went in, the knob went around it, and the whole thing was screwed together.
Bonus upgrade - now all our door fixtures match in brushed nickel - here's a new bolt and an old knob. Well, most of them match at least - we didn't bother replacing the strike plates because they're invisible when the door is closed and most were so painted-over that removing them would have damaged the paint. We figured we would switch them out if/when we ever repaint the doors.

We rekeyed everything when we were all done, so that they would all match (well, we tested it first, of course). It was indeed as simple as we hoped.
It involves inserting a special dummy key into the lock along with the original key, and then the new key. And that was it. So since we have a lot of extra keys after buying so many sets of locks, we can now easily rekey anytime we must, without calling a locksmith.

Even better, in terms of a bonus win? The door between the kitchen and the breezeway finally swings closed now! The old lock wasn't set right, and so the door would bounce off the frame, rather than glide smoothly into the strike plate. Now it closes without having to turn the knob! This was a huge annoyance for us in grilling seasons, when we used the door constantly but needed to close it behind us to keep the cats from escaping.

So sort of a blessing in disguise....sort of...

Friday, January 9, 2015

Notes from the Underground, part 2

We left off with a painted basement but with the furniture still in disarray. But this revamp was designed to help us organize our things in a way that looked deliberate and clean instead of thrown together in a mismatch on top of inherited furniture. We had a plan. We had been inspired by a blog that J read about a new Ikea piece (yes, Ikea again...) - the Fjalkinge (it doesn't really have the same ring to it as Expedit, but oh well).

And so we bought a couple - one in each size, to make sure we liked them.

And we built.

And built.

And built some more.

We did have a little help:
In the end we installed two of the 23'' ones on the ends and two 46'' ones in the middle. Each has a set of drawers, meaning that we built 8 drawers. And, because we are now baby-proofing as we go, D installed the brackets that attach the shelves with the wall. It actually took almost as much time as building them, because of having to use the stud finder to figure out what kind of screw to use and to get the angle right. It didn't help when one of the holes on one of the shelves wasn't really hollowed out correctly and D stripped the screw trying to install it.
But all is well now and our shelves are filled! Toiletries, cleaning supplies, drinks, and food of all sorts, as well as some generally unloved kitchen equipment. It all fits! And these are so narrow that we still have plenty of floor space. Again in keeping with the "baby-proof as we go" theme, the hazardous or dangerous things are out of reach and the (theoretically) safer things are below. We still wouldn't leave her in the room alone but at least a quick glance in the other direction wouldn't mean she has access to the Draino, for example.

The basement is far from done, but it certainly is getting more pleasant. We are going to install the gate originally intended to block off the stairs on our top floor in the doorway to the unfinished basement, which is pretty much a fantasy play land deathtrap for babies (small bike parts, grease, kitty litter, unstable shelving). It has a pet door so we can at least leave that open so the cats don't have to jump the gate to do their business.

And the other half of the basement is still a mess. We can't seem to part with our first Expedit, but it really serves no purpose now. And the irregular cubbies that are so endearing also seem like a silly luxury when we have so much that we need to store. So we think it has to go, but I haven't given up yet. Let me know if you have any creative idea (we tried behind the futon as a sort of sofa table - it doesn't fit).
Happy New Year!

Saturday, December 27, 2014

Notes from the Underground

It's been quiet on the blog but only because we've been so busy doing stuff that I haven't had time to write. Recently we were inspired to totally revamp the basement. I'm not even sure why, after all this time, we decided to make it pretty. Maybe because the rest of the house was done? It wasn't like we had a lot of free time to work with (in fact, with the holidays and a few other unexpected problems - more on those later - we had absolutely NO free time). But the house was becoming cluttered and we were convinced that cleaning up and adding more storage to the basement was a solution.

The first step was to pain the wall over the fireplace as an accent wall, to cover the dry wall patch from our chimney repair. Since we don't have the original white  - which was painted by the previous owners - we decided not to even bother trying to match the other walls, and to go with something completely different.
After debating from every color of the rainbow (the furniture is so boring that nothing was off the table), we decided to stick to something we already owned and used Mythical from the accent wall in our guest bedroom. But first, time to clean and prime (actually, first step was clear out all the junk at least enough to get to the wall and lay down a drop cloth). I didn't bother to photograph the cleaning process, but we turned to our trusty non-TSP cleaner to scrub everything down.

Well apparently we weren't going to use this primer - the can had rusted and left bits of rust in the paint. That one is now sitting outside with the cap off drying, so that we can throw it out.
Fortunately we had an even better choice - a tinted gray primer. Because the walls were already white and in good shape, we didn't bother to cut in and edge the wall with primer.
But we certainly did with the paint. And there were sooooo many edges. That, as usual, was my job. The fireplace was a particularly "fun" challenge.

I mostly freehanded the edge but I did tape off both corners with the other wall. Partly because we didn't have the white for touch-ups and partly because such a straight edge was quick to tape - quicker in fact than doing a freehand edge.

After a few hours of edging, D came in and spent 5 minutes rolling all the rest - so much more dramatic with so much less time. Sigh...
The good news was that this really only required one coat plus some quick touch-ups. The light isn't great in there, so maybe the paint job is really horrible. But it's definitely good enough in dim lighting.

We've made tons more progress then this, so stay tuned for our next post!

Monday, December 8, 2014

Bright Shiny Data

Well hello. What's that shiny thing on our bookshelf? It looks like a digital picture frame but it is so much more.
Our utility company offered us a slot in their pilot program to track the way we use energy. It's sort of a Nielsen rating of electricity usage. Plus it gives us immediate feedback and awareness to let us determine ways to be more energy efficient. Plus it is, in fact, a digital picture frame. And what new parents don't love to have an unending slideshow of cute baby pictures?

But actually, we're really loving this energy tracking. After a quick h]set up link to our smart meter, this thing was ready to go and providing us with updated energy usage every 3-5 seconds. We'd already been receiving monthly breakdowns of energy use for the last few months. We knew that we seemed to use most of our energy in the late evening after the baby was sleeping, but we never really knew why.

Here's an hourly breakdown for a day when one of us got home at about 1pm. You can see that our energy level went up at that time, with a spike at 4pm. Lights, heat, hot water, and the dishwasher were to blame.
But this is the real story of why our energy usage tends to go up at about 9pm. See if you can guess. Here's a pretty typical power usage snapshot, taken this afternoon - the little blips are heat and hot water usage, i.e. showers, dishes, etc. But that sustained blip at 9pm?
Here's our energy snapshot again, this time photographed at about 9:30 at night. Our energy use for this minute skyrocketed. What are we doing?
Laundry. And lots of it. Not quite every night, but close. Turns out that our dryer is by far the least efficient thing we have running in our house, per minute of run time (since we use the hot water heater more often, that one might actually cost more in the long run). Baby goes to bed, and we start laundry. And sometimes, it's a load that uses hot water! A double whammy. At least now we know why our electricity bill has gone up this year.

The immediate feedback is fun. Last night, we tried plugging and unplugging our Christmas lights to see what effect they had. We have a Kill-a-Watt monitor to check power usage of an individual device, but this gives a more complete picture. Of course, the digital frame itself is using energy, but only about $5 a year or less. Well worth the price! I can't wait to compare with summer when the AC is running full-blast!

Sunday, November 30, 2014

Babyproofing, part one

We are far from fully baby-proofed (is there such a thing) but we made some progress this month, mostly in preparation for her birthday party, which would have a few other children in attendance. Installation is horrible and we're starting to understand why there are services to do this for a hefty fee.

In the strangest underhand compliment ever, we cursed our cabinetry for being made of such quality hardwood that it was time-consuming and frustrating to install locks. Our first attempt was the kind that we have to side together to lock each time. It was a favorite toy for the young 'un back in the summer when we bought it (she looked at it with what seemed like so much wisdom that I'm pretty sure she had it figured out before we did).
But the problem with locks like these is that they rely on us not being lazy and remembering to re-fasten it each time. Plus (and this is just a personal pet peeve for me) they look really ugly.

So we bought a magnetic kit that automatically locks and requires a key to unlock. And they are hidden from view. Perfect, we thought.

Stock photo
They work pretty well on our doors except that the wood is so dense that it cracked a little even when D drilled a pilot hole (apparently it wasn't deep enough). So we had to work very slowly and carefully.

The drawers are a problem. Only 3 of them have enough clearance for installation but the wood front piece is so thick that the more typical latches won't work either. So we installed them on the 3 we could and for the rest, well, we'll just have to watch to make sure little fingers don't get slammed. We moved the hazardous items out of reach, but the drawers themselves remain a risk until we can think of a solution.
We didn't get pictures of it, but we also installed anti-tip hardware to our TV (and plan to install it on some of our more precarious furniture). It was frustrating to purchase, because all the normal brands sell anti-tip straps complete with incredibly cheap and breakable plastic. This model, at least, uses metal.
Stock photo
Our last big project involved our first of two gates. This one is in hallway separating our living room/dining room/kitchen from the bathroom, guest bedroom, office, and, most importantly, the stairs to the basement (which we can't close with a door given the narrow hallway and abrupt incline down the stairs).

We wanted one that could open in both directions, stay open, and fit our doorway and bought this model:
We thought installation would be quick but it took all evening. Our floors aren't particularly level, it seems, and the tight pressure required to install it and align the swing door so that it would lock when it shut just wouldn't match up.

Three hours later, it was mostly up, but still is a bit finicky and doesn't always lock. But it was good enough for one day. And it's obviously pretty solid given that D almost broke his foot when he stubbed his toe on it - it didn't budge.

So that leaves more drawers, some anti-tip straps on the furniture, and a gate for the top of the stairs. Joy joy...

Wednesday, November 19, 2014

Heating woes, again....

Yesterday morning the house was 64 even though we have it set to be 68 by the time I wake up in the morning - and our good old Nest is usually smart enough to have the timing figured out. I thought maybe the cold front had it confused.

Then when I came home from work this evening the house was just shy of 60. But Nest said it was heating so I assumed it had really mis-estimated.

Until I realized the baseboards were cold...

Uh-oh...

Well it turns out there is a reset button:
I was afraid to hit it, but D was willing to take the chance.  Turns out, it worked better than this reset button at least. Unnerving, but at least it seemed to get everything running again.

We actually had already called our local heating guy, who lives nearby and was willing to come take a look. He fiddled with the pressure release valve which was leaking a little water. But otherwise, it seemed ok
I'm worried, though, because my super-sensitive nose has detected a smell of oil in the basement on and off for a few days. And finally D could just barely smell it too, today. We are going to call the person that serviced our furnace this year and ask if he had calibrated the burner because maybe it's not burning efficiently, or something.

I don't know, but it's definitely a scary sign as we begin the winter heating season.
The guy who came to look at our heater today didn't charge because, as D says, 1. he's nice and 2. he is trying to convince us to convert to natural gas (and have him do it). He mentioned today that converting to gas, which would include a water heater and furnace, would cost $11,300. D did the cost/benefit analysis a few years ago and decided it wasn't worth it with the savings in oil and electricity. We do use a lot more heat now, post-baby...Decisions decisions. Well at least when the heat is working, it works in every room of the house.

In other basement-related news, we took advantage of one long nap from the baby to rearrange our furniture. We really like it - it gives us some extra floor space that is more or less "baby-safe" and a good spot for taking photos. Our next goal for the room is to paint the accent wall and then buy new shelving. Maybe we can get it done before the New Year!
This is a really old "before" picture but it's the only one I could find - fast forward to where we have the extra storage shelving, a treadmill where that Nordic Track is, the Elliptical on the other side of the sofa, no TV, etc. But it gives you an idea of how we rearranged everything.


Thursday, November 13, 2014

Still here, consuming power

Updates are pretty sparse this month because we've been spending all our free, non-baby time trying to baby-proof. And let me tell you I'm starting to see why some people hire professionals. It is hard and time-consuming! It took us all evening to sort-of install a gate (the sort-of is a long story for another post). I have pictures and stories ready, but I really want to get it done first.

In the meantime, a quick look at our energy consumption and how it (may have) changed post-baby. Our utility company has just started providing us with some stats and read-outs about our monthly energy usage. There's also a glimpse of our yearly use: it has definitely gone up this year, but that's no surprise. Without providing much by way of specifics, it says that we used about 4500 kWh between January and September of 2013, and almost 7000 kWh for the same time period this year. Of course that also included my maternity leave (staying home with the lights and heat on, how indulgent). And generally more time spent at home, more temperature control, more laundry, etc.

Nonetheless we got a "good" rating compared to similar homes for the month. We were not the most energy efficient but we were better than other similar, nearby dwellings. We used 744 kWh, 27% more than what they consider the 20% most "efficient" similar homes. Other similar homes used 1049 kWh.

What I found interesting was the graph charting our times of day (nope, no time to show it to you in pictures). Keeping in mind that the month being tracked was largely before our heat really cranked up, it seems our energy usage starts to go up around 4 or 5pm but really peaks from 9-11pm. Interesting, since I feel like most of our lights are on while baby is awake (but again, this is before Daylight Savings ended, so the need to have the lights on was not as great as it is now). Apparently, frantic laundry, dishes,cleaning, and some TV time (but I thought LED TVs were efficient!) seem to be gobbling up most of our power.

When do you use most of your energy? Do you get similar information from your power company? I'm not sure if this is going to become a regular report, but I like the information.

Monday, October 27, 2014

Drips begone

Our sink has gotten to be an increasingly wet place. The guy who replaced our disposal noticed that our faucet was a bit leaky. Apparently water was dripping down our hose, from where the nozzle attached to the hose. This probably has been happening for sometime. The bottom of our sink cabinet is very bumpy.
I tried replacing the washer that connects the hose to the nozzle, but the drip still was going. Home Depot did not have a suitable replacement hose and I did not want to order one online only to discover that actually something else was the problem. So I bought a new faucet, the Kohler Barossa. It is a Home Depot exclusive, which makes me a bit nervous, but again, I needed a faucet NOW.
First, I cleared everything from under the sink (again...).
Second, I took a picture of our old faucet before I ripped it out.
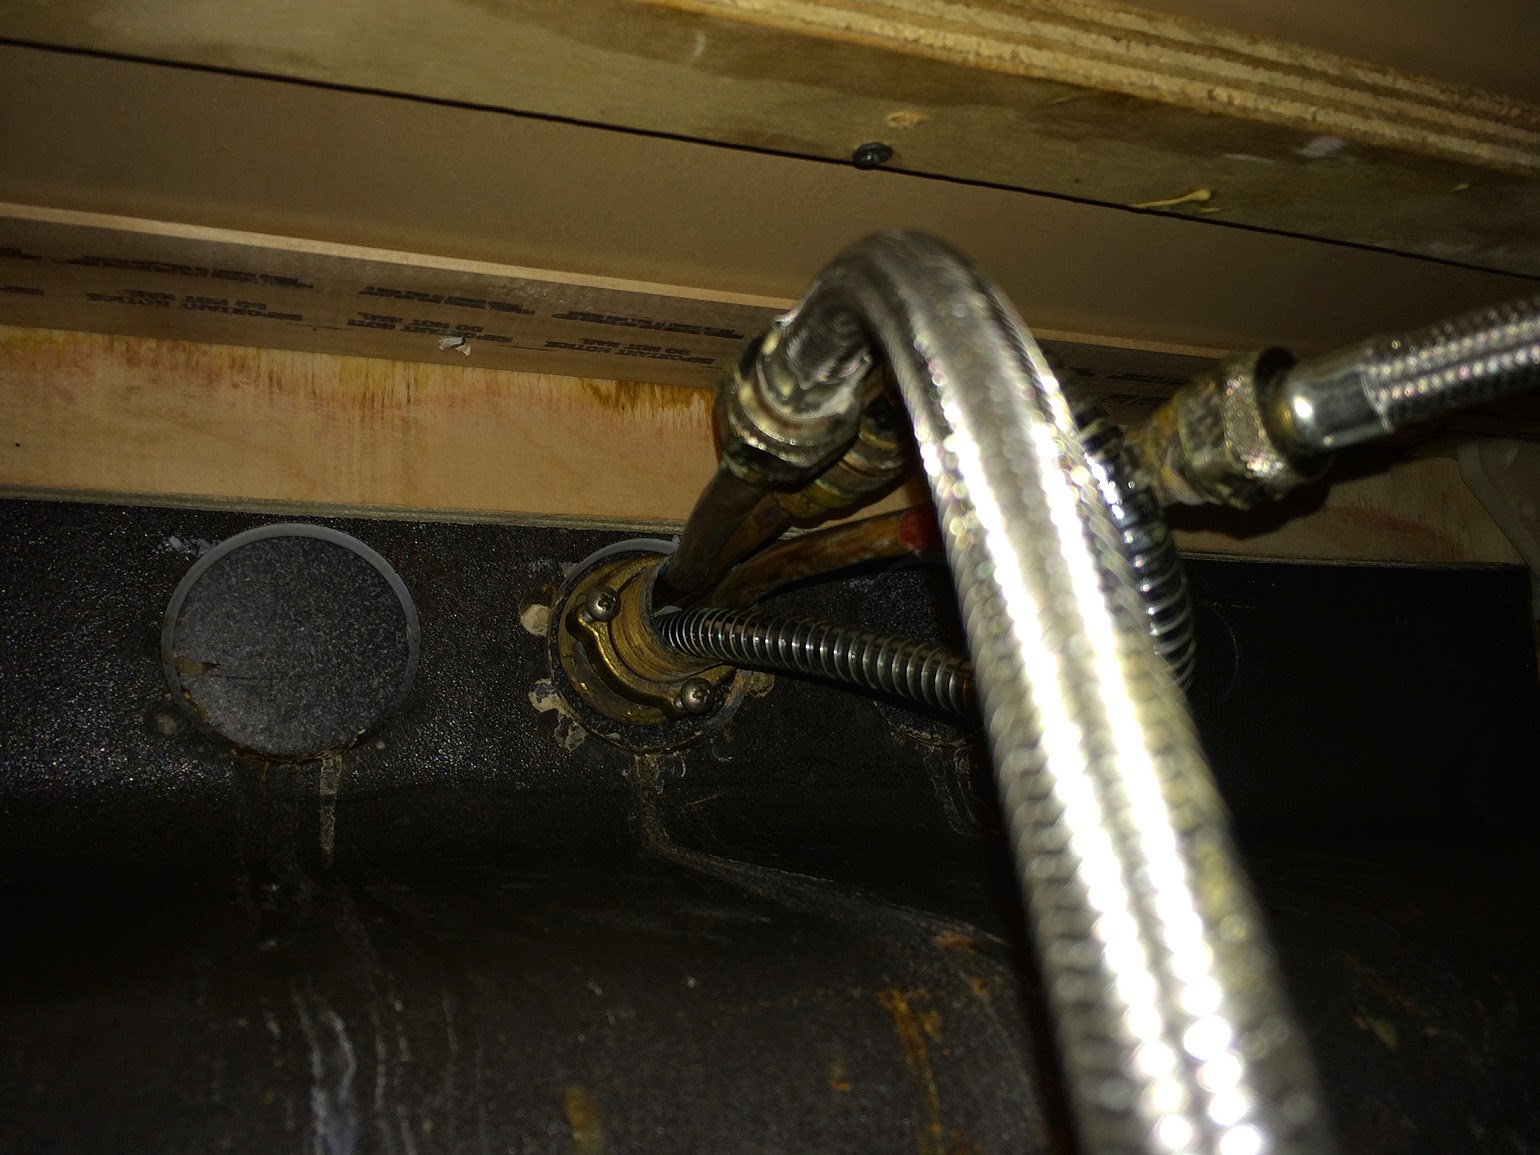
Then, the old one could come out. First, I had to disconnect the hoses and unspin the brass ring that holds the faucet in place (pictured below, with the two screws at 5:30 and 9 pm). Which wasn't too hard, but it was a VERY tight squeeze to get the ring past all of the hoses. I got so desperate I pulled out the dremel to cut it off, but it was too tight to fit the cut off disc behind the sink, so I resorted to lots of swearing to get it apart.
Yay!
With this off, it was fairly quick to attach the new faucet. Just drop it through the hole, attach the hoses, and snap some stuff together. 
Of course, a few days later, I discovered a new drip, where the dishwasher water supply hose attaches to the hot water faucet. Tightening the connection did not help. I imagine the best fix would be to replace the hose, but that would require getting access to the back of the dishwasher. Which is bolted into the surrounding cabinets. So I just slapped on some waterproof sealing tape and well, a week later it is still dry in there, so I am declaring "Mission Accomplished".