Please share your opinions and expertise since we need all the help we can get!

Thursday, January 26, 2012

The Bathroom: Highlights Edition

You know, Highlights. The children's magazine where you have to figure out what's different about two almost identical pictures. But don't worry, these work for kids of all ages.

Our first picture--the bedroom wall:

They replastered, sanded, primed, and repainted beautifully!

Next, a more challenging one:

Yes, after a couple of days with the new shower, we decided that despite our contractor's recommendation, we really wanted a second shelf. So they came back to put a new one in (we paid extra, since by then we had already agreed that one was better and they were already done the job).

And finally, let's end on an easy one:

We have curtains, both of the window and shower variety!

But we still have work to do--the wall behind the toilet is still completely empty. Most of the drawers and the medicine cabinet are still mostly empty. And I still haven't figured out an elegant solution to our toothbrush chargers. Any suggestions?

Monday, January 16, 2012

We Have a Bathroom!

Thank you all for your patience! Our bathroom guys came on Saturday for some retouching and they finished so late into the night that the light for pictures was all wrong. And then yesterday I thought it would probably be better if I actually used the shower before I wrote a blog post about it, so that delayed me a bit as well. But at long last--three weeks, to be exact--I can show you our finished bathroom.

Just a quick note--we have a shower curtain on order but we still have no idea what to do about window treatments (we're leaning towards sheer white cafe curtains) and definitely have no idea what kind of pictures to hang on the wall, so even though it's "done" it looks a little empty and lacks character. Feel free to make suggestions in the comments on what we can do to really own it (besides leave dirty towels around, dirty the sink with dried toothpaste, etc.).

First stop on our bathroom tour, the sink and toilet area. We now have a toilet that doesn't leak--after redoing the whole bathroom to replace the awful leaky pink toilet, we got a defective one right out of the box and had to return it to Home Depot and get another. Thankfully, because it's a two-part toilet, our contractors didn't  have to unseal the base part, just replace the tank, so it wasn't too much trouble to fix. (All details on brands and models for those who care are down below.)
For a teeny tiny bathroom, we now have a fair amount of storage space. The medicine cabinet is particularly spacious. I am definitely putting liners in those lovely, wood, dove-tailed drawers before loading them up with supplies, so we can keep them in nice condition.
Now that we have two lighting choices (this scone below, plus the light/fan combo on the ceiling), we realized that our paint choice isn't as purple as we first thought. The bulb on the ceiling is a very cold light, bringing out the cooler purple tones in the paint. These bulbs are warmer, making the walls look appropriately blue-gray. I guess it all depends on the lighting.
 Our fancy switch controls both lights independently of the fan, which is on a timer:
And now the tub area, with all the fixtures in place. It will take some getting used to, because our low-flow shower head in our main floor bathroom seems to have a lot more pressure than this one (even though it is much much cheaper both in price and quality). We are trying to figure out if that is at least partly related to being upstairs, because the water pressure from old shower head in this room, as I recall from the few times we used it, was pretty weak. Our company had recommended a much more forceful shower fixture, the Kohler Flipside. But at 2.5 gallons per minute (rpm), we turned it down and opted for this one at 1.75 gpm. Maybe we miscalculated? We're currently trying to decide if we will get used to it or not. In any case, it's certainly not the remodelers' fault.
I'm not sure if you can tell from these pictures, but we have one of those curved shower bars to give us a little more space. I think I'm glad that we went for an actual attached bar instead of a tension rod, even though it means that we will have holes in our tiles if we ever want to take it down.
Other than some concerns over water pressure, we enjoyed our showers in the new spaces (though we will feel much better with a curtain on the window--toweling off inside the shower was a little tight...).

Last view is of our doorway. Our only space issue is where to hang our bath towels. We have this tiny hook on the door but even with the fan, I'm not sure it will do a good job of drying out everything. We will probably have to rely on the shower curtain bar too, just to spread everything out.

A nice detail they installed is the door stop, to keep the door from slamming into the tub. We didn't ask for it, but once we saw it installed we realized it was a necessary addition. Oh, and I love that they used new door hardware--brushed nickel everywhere!
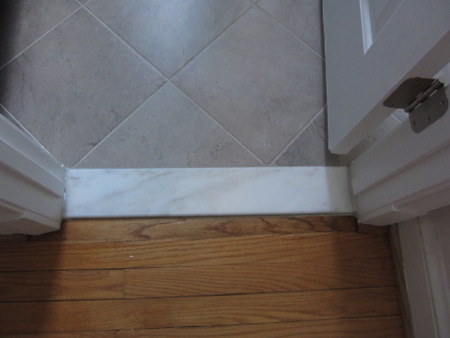
And now the threshold in front of the door. Looks great! The bathroom floor is lower by at least an inch, so they needed to put in a new threshold and paint and blend all the surrounding trim.

I committed a blogger sin by forgetting to take a "before" picture but trust me when I say that last week, this view did not make me very happy--the wood plank just outside the bathroom looked incredibly damaged and gray. We complained and they sent a guy over who spent over an hour sanding and treating the area and then staining it to the warm honey color of the rest of our floors. It's not an exact match but it's not noticeably different, especially given the variety in some of the planks on our landing.
Because of the height difference between the old and new floors, we have a large clearance under the door. D was not a fan but actually, I'm glad it's there. The bathroom is so small that the door has to clear any bathmat or rug we set out. With this added space, it can actually do that--any lower and it would get stuck.
Now the nitty gritty details for potential shoppers. First the stuff we bought--toilet is Kohler Cimarronsink faucets and tub spigot are Kohler Forte from Home Depot, toilet paper holdertowel ringtoilet flusher, and towel hook are all Moen Banbury. Home Depot didn't carry the Kohler Forte line for these small details and from a design store, they would have cost at least 3 times what the Home Depot Moen line cost. They're pretty similar, so we didn't think the price was worth ordering the Forte just to match minor trim details. Tile is Marazzi Ghiberti. The accent glass is something from the Tile Shop.

Next, the "exclusive" design store stuff--shower head, hose, and slide bar are fancy Kohler products not available in places like Home Depot (the hose at HD is plastic and this one is metal, for example). Same with the sconce (too many plastic, cheap parts for the HD version). The granite is from a local stone place and it's called "Blue Pearl." The vanity is Merillat. The soap dish, shelf, and towel bar inside the shower are Lenape. The vent fan is Panasonic.

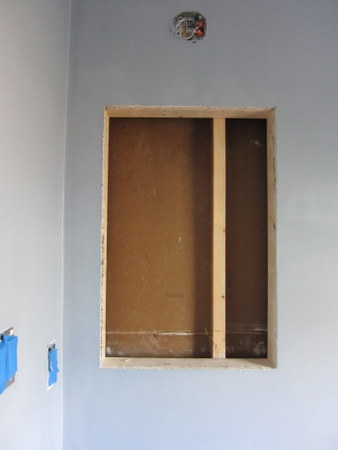
Psst...they're not quite done. Back when they demolished the plaster bathtub walls, they did some damage to the adjacent walls in our bedroom. They made good on their promise to patch it up, so they plastered everything on Saturday and are coming back tomorrow to sand, prime, and paint.

Tuesday, January 10, 2012

Days 13 and 14: Mystery days

We're close to the finished bathroom now, so I feel like any more pictures are just going to ruin the big reveal. Plus we have a few final "issues" with the contractor. So while we're getting everything worked out, I thought I'd amuse you with some CAD drawings for our bathroom. Last night we confirmed with our designer exactly where all the little odds and ends would be installed. I'm guessing they get a lot of complaints from customers not liking where the towel rack or toilet paper holder was put, so he spent a lot of time making sure we knew what was going where and that we were in agreement. It's pretty important, since some of this was going into the tile, so while we can move a towel rack on the drywall,  some of the fixtures are pretty permanent. He gave us measurements over the phone while we used painters tape to mark everything and confirm the final location. Then he sent us drawings to further confirm everything. And today, like magic, everything was in the proper place. I just like the drawing program images. So enjoy!

(For the detail oriented among you--we did go through a couple of drafts and changed some things, so there is some variation in these pictures. Not all of them reflect the final version.)


Sunday, January 8, 2012

Days 11 and 12: Major progress

I'm just going to skip yesterday's "in progress" photos since basically all add up to what took place today. Yesterday, Roberto fixed the bullnose tile alignment like we asked and then pretty much spent the day grouting. I took pictures but today's complete overshadow them.

Today when Roberto took a break for lunch (that guy works really hard, putting in a long 9 to 5:30 with a short break for lunch on a Sunday!), we snuck up to find that our walls were painted and there was a hole for the medicine cabinet. We had been wondering about when that hole was going to appear--I am at a complete loss as to the correct order of operations here, so I would have expected the cut sooner and was getting nervous that it had been forgotten. But I should not have worried--when he opened the wall up, I saw that the framing was already there and that the stud had been shaved back to make room (move visible in the second photo):

And now, some eye candy as the room actually begins to look like a bathroom again:


The toilet isn't actually hooked up yet, and there's no sink or any shower fixtures, but it is definitely beginning to look like something! D regrets his paint choice just a little. When we put the sample up on the wall, we were working with very poor lighting conditions. Now he sees (what I was telling him all along) that the blue he preferred was a little purple and not quite as gray as we wanted. For those keeping track, it's Behr Flat Enamel in Russian Blue. But we definitely don't hate it enough to try painting over it any time soon. I have dreams of being able to master the "linen" or "raw silk" effect from the Martha Stewart Decorative Painting Tool Kit to add a glaze top coat. (It would help if I actually started practicing. Hard to master something when you've never tried.) If I do, I'll use a slightly grayer tone.

Regardless, we're really getting there. We have a fancy shmancy timer for the fan (rightmost switch), a gorgeous heavy-duty medicine cabinet, and finally some lighting. There was a small problem with the sconce lighting for on top of the cabinet. Namely, that it never actually arrived. We have the invoice. And we have a box that has a shower head in it and a label on it that says 100W Sconce. So the company our contractor buys from made an oopsie. Fortunately, this is their problem, and it will be fixed tomorrow.

Also tomorrow, this pretty baby should finally get a permanent home. Ain't she something?!
A brief cat update--I think both of them are relieved that the noisy tile cutting is over. This is how our more nervous cat has been spending his days: camouflaged to look like laundry (we actually deliberately left him a small pile of things that we don't mind getting wrinkly and hairy because we know how much he likes to hide on/in it).

Saturday, January 7, 2012

Days 9 and 10: Venting and Tiles

This post on Thursday would have complained that progress was slow-going. The walls got a coat of primer, so have begun to look almost normal.
Plus the fan installation began...and maybe got completed. We're just waiting for a call from our roof guy to explain exactly what was needed and how far he got. Oh, and what we owe him, of course. See, when we realized that any ceiling fan would vent directly into the attic, our bathroom remodelers proposed just hooking the fan up to a hose that would vent somewhere into the middle (high portion) of the attic and then, at our convenience, we could hire someone else to cut a vent in the roof and attach the hose. It sounded logical, but as we did more research (i.e. read things on the Internet and talked to my much more knowledgeable parents), we became uncomfortable with the idea of leaving this unresolved to build up moisture in the attic.

Fortunately, we have an awesome roof guy who agreed to work with the contractors to at least make sure they used a hose with a diameter he could work with and leave it positioned where he could reach it. He explained that he was busy this week but would come next week to actually construct the vent pipe. Oh, and he quoted us a very very reasonable price. (Deep breaths all around.) So we put him in touch with our bathroom people and hoped that they would talk amongst themselves and reach a conclusion.

Then Thursday we came home to discover that not only have he contacted our bathroom contractors but he had come by to work with them, went up on the roof, and installed a vent (we can't actually see it from the ground because of the roof angle and height at that point). So we may be all done. But since we haven't actually talked to him, we're still hanging on the final details. But, in the end, we have a fan. And a fan that actually blows things somewhere that isn't harmful!
Otherwise, that was it for Thursday, so it was pretty anticlimactic to come home to. Well that changed on Friday. Roberto had finished all the tiling! The walls look beautiful and go from the bathtub clean up to the ceiling.
The floors are cut exactly like we asked, in a diamond pattern to offset the up and down lines of the shower area.
We did end up finding one thing that we asked to change. I'm not sure if you can tell from this picture, but the tile and the bullnose grid lines are all in sync below the glass accent tiles. Once our tiler got to the glass tiles, he just kept laying bullnose tiles straight up, so the lines get out of sync (they actually get offset by exactly half a tile, since our glass tiles are 6'' and our square tiles are 12''). We didn't care if they were in sync or not (completely staggered, random looking or exactly lined up to the mid-point or exactly to the gridlines) but it bothered us that they weren't consistent the whole way up. So we called our designer last night and requested that he ask the tiler to remove the last 3 bullnose tiles (6, really, since the same thing is on the other side of the tub) and cut new ones to line up exactly with the squares. Now I feel like one of those whiney home owners who micromanages every detail...Oh well, even though the shower curtain will block the bullnoses anyway, that misalignment would probably bug us over time, so it's worth fixing now.
No one can claim these guys aren't hard working. They were on such a roll yesterday that they called to ask if they could please work the weekend, which could result in finishing as early as Tuesday. Today they are going to grout and paint, which is good because I really want to peek in and learn about grouting (next step for us, once this bathroom is done, is to regret the downstairs shower ourselves). Hopefully the tile adjustment won't put them too far behind.

Wednesday, January 4, 2012

Days 7 and 8: Tile, slowly

New year, new bathroom. Well, almost...Our walls are starting look like something! Yesterday I cam home to tiles separated by spacers for a little under 4 feet of wall on all 3 shower walls.

I had expected more progress today, but I guess placing tile is slow-going. But the glass accent tiles, also known as the listello, are in place, as are the bull-nose tiles along the edge. It's starting to come together!

I happened to open up the door to the spare room, which the contractors have been using as their work space. I'm glad I did! Check out the giant contraption they brought upstairs! I guess it's the tile cutter--pretty scary looking. I'm glad we have the pros doing this job. A giant mixer drill (for the mortar I assume?) was resting alongside the cutter, also looking pretty intimidating.

We learned that our exterior shower wall is apparently at a strange angle from the floor. Our designer called to tell us that with the current arrangement, we probably could never get a glass door, because the frame wouldn't fit properly. I don't know what would have happened if we did plan to get a door like we originally considered. Maybe they would have had to strip back to the studs again and do something weird with the way they put up the cement board with spacers? Anyway, it's not a visible flaw, so at least everything looks pretty.

Oh, and we may have a relatively inexpensive solution to our ventless vent fan problem. But I'll wait to reveal that when a few more details get ironed out. I don't want to jinx it.

Our designer thinks we could be done as early as next Tuesday! It still looks like we have a long way to go, but maybe all the rest is the easy part.