Please share your opinions and expertise since we need all the help we can get!
Showing posts with label shed. Show all posts

Thursday, September 26, 2019

Shed Tour

Time to take you inside our new shed and show you how we arranged things. At this point, we are pretty much done finding a home for our garden supplies out there, and the garage has exclusively become a zone for tools, bikes, and other non-yard-related things. Most significantly, there is no more dirt in our garage (topsoil, compost, potting soil, etc.), which were in giant containers and bags all over, contributing to a very dirty--literally--floor.

The left side of the shed has built-in shelves. We asked for three, though if I'd stopped and considered how they were attached to the wall (with giant triangular mounts), I probably would have only gotten two. Fortunately we can work within the spaces between the mounts. This wall of shelves has all our gardening supplies. You can see we have gardening tools, pots, trays, gloves, and seeds. Up high and definitely out of child reach (not that we're leaving them in the shed anyway unattended), are the chemicals, many of which we no longer use but are waiting for the right opportunity to through out. This includes Roundup, Weed and Feed, and other various pesticides and fungicides. It's funny, now that I see this photo I noticed that our poison ivy killer is on a much lower shelf. Time to go out and fix that...
Above the shelves is a loft, which gives us an attic space for longer things. Here is where we are storing our ladders, some garden edging, and things we do not use often like our grass seeder.
Moving to the opposite wall, we have all our longer garden/yard tools, neatly corralled in a stand. The kids have their matching sets there as well.
Then, above that, are the joists that we can put hooks into. Right now, we're not really in need of this space (besides the single hanging wagon you can see). This high ceiling also gives us the ceiling clearance we need to actually pull the rakes out of the stand.
We have our lawn mower easily accessible on the floor, as well as our little garden cart. In all, it's the perfect amount of space for the things we needed to put in it (which is good, since the size of our shed was all based on the size of the existing concrete pad).

Now if only the weather would cool off so we can go out and garden.


Saturday, August 31, 2019

How many people does it take to...deliver a shed?

One. The answer is an amazing "one." Seriously. Just watch.

First, here's the big reveal on D's amazing job clearing the pad and laying down pavers. You can see it's not quite done, but the rest can be completed any time because it's not under the shed and just there as decoration and to make the whole pad look even.
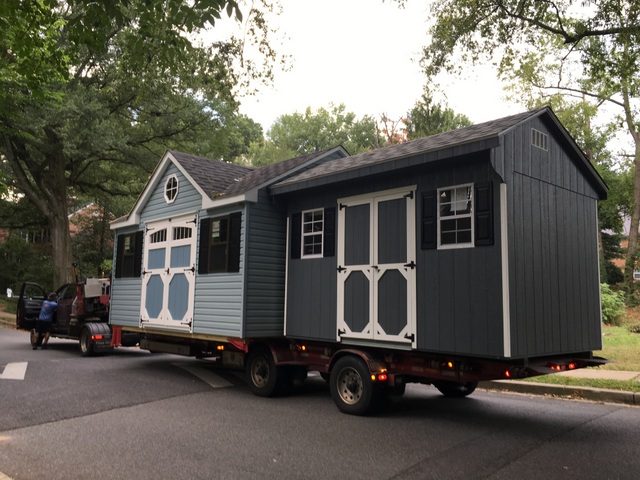
 Here it is, the big day! Can you guess which one is ours?
We chose a dark gray with no special dormer on top--or, if you're thinking logically, the one on the edge that can be unloaded. See that guy there? He was the only person on this delivery. We waited, expecting to see a small team emerge from the pick-up truck. But nope.
One person and a remote-controlled "mule" is apparently all it takes. It was pretty magical to watch. He started by picking up the side with the mule, fork-lift style, and bringing it off the flatbed slowly. The flatbed started rising so that it created an incline. Then he added wheels to the other side of the shed and eased it off the flatbed completely.
 After that, it was just like a video game, watching him maneuver the shed around various obstacles.
Here it is, going through the empty lot. I guess sometimes it's good that it's no longer full of beautiful old trees, sort of.
Then it was a tight fit between our Japanese snowbell and our patio. We had to move a pot of mint to make room as it made its descent from the patio. This thing really seemed to be able to turn on a dime.
 Here it is making the turn to the concrete pad.
Parallel parking this beast is apparently easier than parking a car. Despite us leaving almost NO extra clearance next to the log pile and sand box, he put it exactly in the right position between the crack in the concrete and the other edge. The poor guy was smooshed up against the sandbox when he removed the tires. Oops.
And here it is, in all its glory. Since it arrived earlier this week, we've been busy loading it up. Stay tuned for the tour inside our shed next time.
Edited to add this beautiful artistic rendering:

Spoiler alert--it holds everything perfectly and our garage is starting to look amazing as we clear out yard stuff and sweep out the dirt. Spoiler alert part two--we realized we forgot to take "before" pictures either inside the empty shed or inside our disastrous garage. Trust me, the garage looked awful.

Thursday, August 15, 2019

Getting Sheddy

We got our permit! So now it's time to get ready, or, as the title says, sheddy (it's really remarkable how much I hate puns in real life but seem to love using them in my blog titles). Here's where we are at in the process. First, to get our permit, we gathered our plat information and filled out the necessary forms and also created this super technical architectural drawing of our shed plan:
I know, it's beautiful. So given the fact that our concrete pad only extended 7.5', we needed to gain some extra space. We did that by planning to put 16''x16'' paver stones around the front edge. We also planned to put it on the exposed side to make it look even. Not much of floor support joists will actually rely on this paver stone, but it will extend a few inches past the shed and look much better. We are also limited by a big crack in the pad. Rather than have to deal with leveling it with a rebar--a process that looks awful--we went with a shed that will fit into the space before the crack. So with this plan approved by our permitting department, we were on our way.

Now we just had to actually implement the plan. D went to Home Depot for supplies and then spent the better part of a day putting pavers down along the long edge (the minimum we need to have done before we can have the shed installed). I did my part by watching the kids all day. He used an edger to mark his line:

Next he used a shovel to scoop out the grass and dirt from the area. He even managed to treat the grass like sod and move it to some bare patches in the yard.
Then he used a tamper (in the final picture), dirt, and sand to get a level and firm ground to put the pavers in, followed by more sand around it to help keep it in place.


I'm saving scene pictures until it's all done for a big reveal. In the meantime, we've also been selecting our shed and features and putting down our deposit. This is happening!

Tuesday, April 2, 2019

First steps to a shed

So we know we want a shed (though we're not totally sure anymore if we're getting one this year - thanks taxes...). And we know we want it on the already existing concrete pad at the back of the house. The problem is, there's a brick oven back there, firmly rooted in place. I was loath to get rid of it because it really is cute and something I always said we would use "one day." But approaching 10 years in this house and no plans to ever make something of it, D was not so sentimental. He considered it an obstacle to getting our long-desired storage. So down it came.

Over the course of the last three weeks or so, he took it apart piece by piece. This was the starting point:

With a chisel and a mallet, he managed to free large blocks of masonry. At first, he tried to go brick by brick, but realized that they would never break down so neatly. So instead, he went for manageable chunks:
 The chimney/tower part, down on the ground:
 More of the base removed:
 As the brick oven came down, the debris pile went up...
 Until finally the debris pile was all that remained.
Here's another view, with the oven scraped away, including the masonry at the bottom that glued it in place on the concrete. We still have the debris and may slowly bring it to the curb on trash day. We considered building up the walls around our soon-to-be vegetable garden, until D did some reading and learned that these blocks could have asbestos in them - at last the inner ones that contained the hottest part of the oven. Better safe than sorry - certainly not something we want as a retaining wall holding in the soil that is growing our summer veggies.
Next up, deciding if we are going to buy this year or not and working on the permitting if so.

Spring is has arrived, slowly but surely, and we're getting in lots of time outside in the yard. First up was our snowdrops, well after the last snows but still arriving while it was quite cold. Our neighbor gave these to us and they really cheer up the area at the side of the house where we keep our garabage bins.


Thursday, February 28, 2019

Shed-ding our Stuff

One project we've toyed with that I forgot to include in our outdoor goals for 2019 is constructing a shed. Even though I forgot to mention it, it's actually the thing we are most likely to do this year. Especially now that we're going to have a vegetable garden, it would be nice to have access to our gardening tools without having to go all the way to the garage at the front of the house. We have decided nothing at this point, and are looking to our reader (all one of you) for suggestions.

First, placement. We already have this concrete pad that seems perfect. We would have to destroy the wood burning stove (that we never used) and move the sandbox, but otherwise, it's ready. The problem is that it measures 7' x 15' and a common width for sheds seems to be 8'. We don't know enough about what kind of base a shed entails, so we are trying to figure out if some of it can overhang off the pad (i.e. put the foundation blocks about 6-12 inches back under the base).  Adding to the concrete pad sounds extreme (rebar and stuff we don't really want to do). We know we want something a bit sturdier and more "house-like" than the fiberglass one-piece ones from Home Depot or Lowes, but that's all we know so far. To our surprise, from what we can figure out, it doesn't look like we will need a county permit, and maybe not a town one either (locals, feel free to weigh in**edited to add that I found our town permitting forms at last and we do indeed need at least a town permit.**) based on the size we're looking at (8' x 12' probably). Beyond that, we're clueless.
In a related matter, our yard is under water like never before. We have had so much rain that the ground everywhere is muddy mush, and some of it, like here, actually has standing water on it. I'm relieved our yard is graded away from our house. (This further convinces us that the shed has to be standing up above the concrete pad, that's for sure.)

The last time it was this wet - and windy as it has been on some days - we had the big tree fall on our house. I feel like I'm holding my breath these days every time we get..."weather."