Please share your opinions and expertise since we need all the help we can get!

Saturday, December 31, 2011

Days 5 and 6: Walls and a Floor!

Two more days of hard work (8 to 5 every day!) but we're still not to the particularly exciting updates. On Thursday, we came closer to having walls up. They seamed and plastered the water-resistant board for the non-shower walls and cement board for the shower walls. They removed our old insulation and stuffed the exterior wall with new stuff. We noticed that we may have made a misstep here--the old stuff they removed was labeled R-19 and the new stuff they put in was R-13...Hmmm.... Our contract stipulated that they put in the insulation with the highest R-value that would fit appropriately, between R-13 and R-19, so we're going on faith that they know what they're doing. It certainly looks in better shape than the crud they pulled out. But then I guess 60 years behind a wall is bound to result in some wear and tear.
The floors in this picture, from Thursday, is still our original plywood. You can see they've sealed up all the seams in the wall.
Friday we came home to cement board on the floors and, more exciting (because it means we might get a working toilet soon), a new toilet flange.

The flange is the part that seals the toilet in place to the floor and the sewer pipe. We knew our previous one was going to need replacing because it was old and cracked and didn't seal well and because the height of our floor will be a little lower than before.
Photo courtesy of Monkey River Town
Finally, Friday the last of the wall was sealed up. Monday or Tuesday, the tile work begins!
Yesterday I came to to the annoying realization that all our Christmas storage boxes are hidden in the spare room behind the plastic that the contractors put up. So in addition to having a living room cluttered with tile, a vanity, and a toilet and fine layer of grime in the hallway landing, we are going to have Christmas decorations up until the end of the remodel. Bad planning on my part--Oops!

Have a Happy New Year! See you in 2012!

Wednesday, December 28, 2011

Days 3 and 4: Plumbing, Electric, and Backerboard

Two noisy days later and we're still in the early stages of the remodel. Yesterday they moved the GFCI outlet away from the switches, closer to the vanity, and they put up backerboard on the vanity/toilet wall.
Today they plastered the seams on that wall and pulled out the old insulation from the exterior wall.
We also got our first hint of what the bathroom will look like when they brought in our pretty new tub! No more pink!
There was a tiny setback last night when we noticed some new copper plumbing extending up to where a typical shower head should be installed, despite the fact that we are getting a special slide bar system with the water hose offset to the side. A quick call to the designer to check in and today the plumbing was rerouted to its proper location off to the left:
One additional (more costly) setback--the vent fan on the ceiling has been removed to reveal that there is no duct work venting to the outside. The fan is just pulling the humidity into the attic. Building a pipe to the outside was not included in our contract but it was something we anticipated we might need, so now we just have to find out how much our crew will charge for the additional labor and materials and decide what to do.

By now our team of contractors have almost completely taken over the extra room to store materials and cut them to size. They put up plastic to protect the few pieces of furniture we have in there, but I'm really glad we've kept that room mostly empty and unpainted..
*******

On a completely unrelated note and in response to a comment from this post, here is my adorable King Kong kitty doing his best beached whale impression. You can see how the fat rolls completely envelop the poor villagers.

Tuesday, December 27, 2011

Days 1 and 2: Demolition

Well, here we are at last--the epic bathroom remodel has begun. I promised regular updates so this is the first of many. The crew came last Thursday to prep, making sure that the floors were covered and the doors that weren't in use were taped up so that dust didn't get in.

The workmen were surprised to discover that even though we all thought the walls were drywall, they actually were laboring against sturdy plaster and lath. It was going to take a lot more power and a lot more time than we anticipated. They didn't get very far that day:

One of the side effects of having to use power tools on the wall is that we now have some cracks in the plaster on the bedroom walls adjacent to the bathroom. They've promised to fix them before the job is done...

They did manage to remove the toilet before the weekend, which in retrospect was rather bad timing--a weekend with very little demolition except a messy plaster-filled bathroom and no toilet. We probably should have asked them to wait until Monday for that.

Monday was more fruitful (though unfortunately very noisy on our day off). By late morning, they had removed most of the plaster and lath:


A few more house-rattling hours and the tile floors were gone, as well as the rest of the walls.
This is where the bathtub used to be:
Then they spent a couple of hours on plumbing. They said that, fortunately, the cast iron pipes were all in good shape and didn't need to be replaced. However, they did need to reroute the vanity and shower pipes to work with our new fixtures (see our shiny new copper pipes below). We asked why they preferred copper over PVC but didn't get much of an explanation. Oh well, whatever. As long as it works!

Stay tuned!

Friday, December 23, 2011

Decorations Montage

Happy Holidays!
(Too busy enjoying some yuletide cheer for a real update. Hope you like the way we decked the halls.)


Sunday, December 18, 2011

It begins (almost)

We had our final "pre-tear-down consultation" yesterday and are ready to begin the bathroom remodel. Our designer, Francisco, did a whole mock-up of our bathroom on the computer, down to the littlest details of exactly where our decorative tile will go in relation to our soap dish and tub faucet. We approved the drawings and our team is going to start on Tuesday! Meanwhile, we've been finalizing the little details like what kind of toilet paper holder/towel hook/wall plate to get, what grout tint we want, and what color to paint the walls.

I'll spare you the tiny details but I thought our paint swatch lay-out looked pretty neat.
D and I took turns pulling colors that we didn't like until we were left with two sheets. We decided to try the Blue Fox (the bottom on the left swatch) and Russian Blue (the top on the right swatch).
It's hard to tell in the evening light, but we are pretty sure that Russian Blue, the rightmost of the two wall splotches, is our final decision. Plus it will keep with the theme of the Samovar Silver from our guest bedroom (not that names matter, but it's fun when they are quirky enough to stick in my head). You can see that the crew already had a little fun in the bathroom. Our foreman, Antonio, asked if he could check whether or not we could recess the medicine cabinet. Turns out there is space back there, but also a stud, so we'll see what happens...
Stay tuned! We'll do our best to "live-blog" the remodel. Wish us luck!

Monday, December 12, 2011

From Gold to Blue to Gray (part 2)

When last we left our story, we had a gray dresser. You'd think that would be the whole story. But I was only just beginning. The next step was to transform the hardware. I rubbed all six handles down with steel wool, washed them in non-TSP cleaner, and mounted them to cardboard, a trick I learned in some handy man magazine or other. It helps to get the spray paint exactly where it's needed without having to rest the handles on something. It's a great trick!

After several coats of a shiny white all-in-one spray paint, I had pretty, glossy hardware. Also a white, sore finger. Spray painting is hard! I see why spray can triggers exist.

The hardware got some time to dry and cure while I went back to the dresser itself. You may remember that my inspiration was two-toned. The original yellow and gold piece was actually tri-tone (two tints of the gold metal paints around the edges).
I wanted to stick to that effect. After a lot of research, I decided to buy Modern Masters metallic paint. After a little hunting, I found it at an independent hardware shop not too far away and bought pewter and platinum (I actually could have sworn I bought silver but when I got home, lo and behold, I had grabbed platinum. I doubt anyone would ever notice--I'm not sure I even could.)

It didn't take long to realize that this was HARD! Tiny paint brush, controlled hand, and slow, patient brush strokes. I abandoned the tri-tone idea and stuck to just going over the scroll-work in platinum. I say "just" going over the scroll-work but actually the final result took three pain-staking coats over a week. Each coat took about an hour or more. It was hard, but I think it was worth it.
Next should be the big reveal but first let's take a detour and discuss protective coatings. I had considered using Minwax polycrylic or wax on the whole thing but finally decided just to do the top surface, since that was the most likely to get wet, stained, etc. Before I could start, I had to wait two whole weeks for the paint to cure before starting (if you cover it while it's still wet, it can bubble and do all sorts of horrible things). It was a tough wait--as long as the process had taken up until that point.

Finally, after 14 days, I whipped out my trusty sponges and started applying a super thin layer of polycrylic. I waited two hours and then, as the instructions suggested, got out my super-fine sand paper to just barely rough up the surface for the second coat to adhere better. And that's when it happened...

Despite using 300 grit sand paper and a very light touch AND despite having put down three nice coats of gray, the surface started turning white! I actually had chipped and sanded the gray off in a few places with no effort at all! I guess that layer of polycrylic was a little TOO thin.

Pause for a short temper tantrum and some weeping.

The next step was to wipe off all the sand paper dust, wipe the whole thing down, and do the surface in gray AGAIN! Three more coats (plus a few touch ups to the platinum around the edges where I accidentally got some gray paint) and then ANOTHER two weeks. And then finally, FINALLY, I carefully tried the polycrylic again. This time though, there was no sanding. It adhered, layer after thin layer, just fine. I debated sanding the very last coat, just for some sheen. And then gave myself a stern talking to and decided that it was really truly done and to just STOP TOUCHING IT!

If it seems like I'm using an awful lot of caps, it's so that you can begin to understand my frustration of having spent more than 6 weeks on this project (1 week prep, prime, paint + 1 week platinum trim + 2 weeks curing + .25 weeks of paint + 2 weeks curing + .25 weeks polycrylic). Fortunately, I learned some valuable lessons (trim is hard, sanding is bad) and LOVE the final results. So here, at last, is the big reveal:


And one more time, the before and after side-by-side, just for kicks. Because I earned it!

Thursday, December 8, 2011

From Gold to Blue to Gray (part 1)

This project has been a long time in project and I'm so glad to finally present it to you. So glad, in fact, that I'm spilling all the minute, gory details and splitting this into to posts!

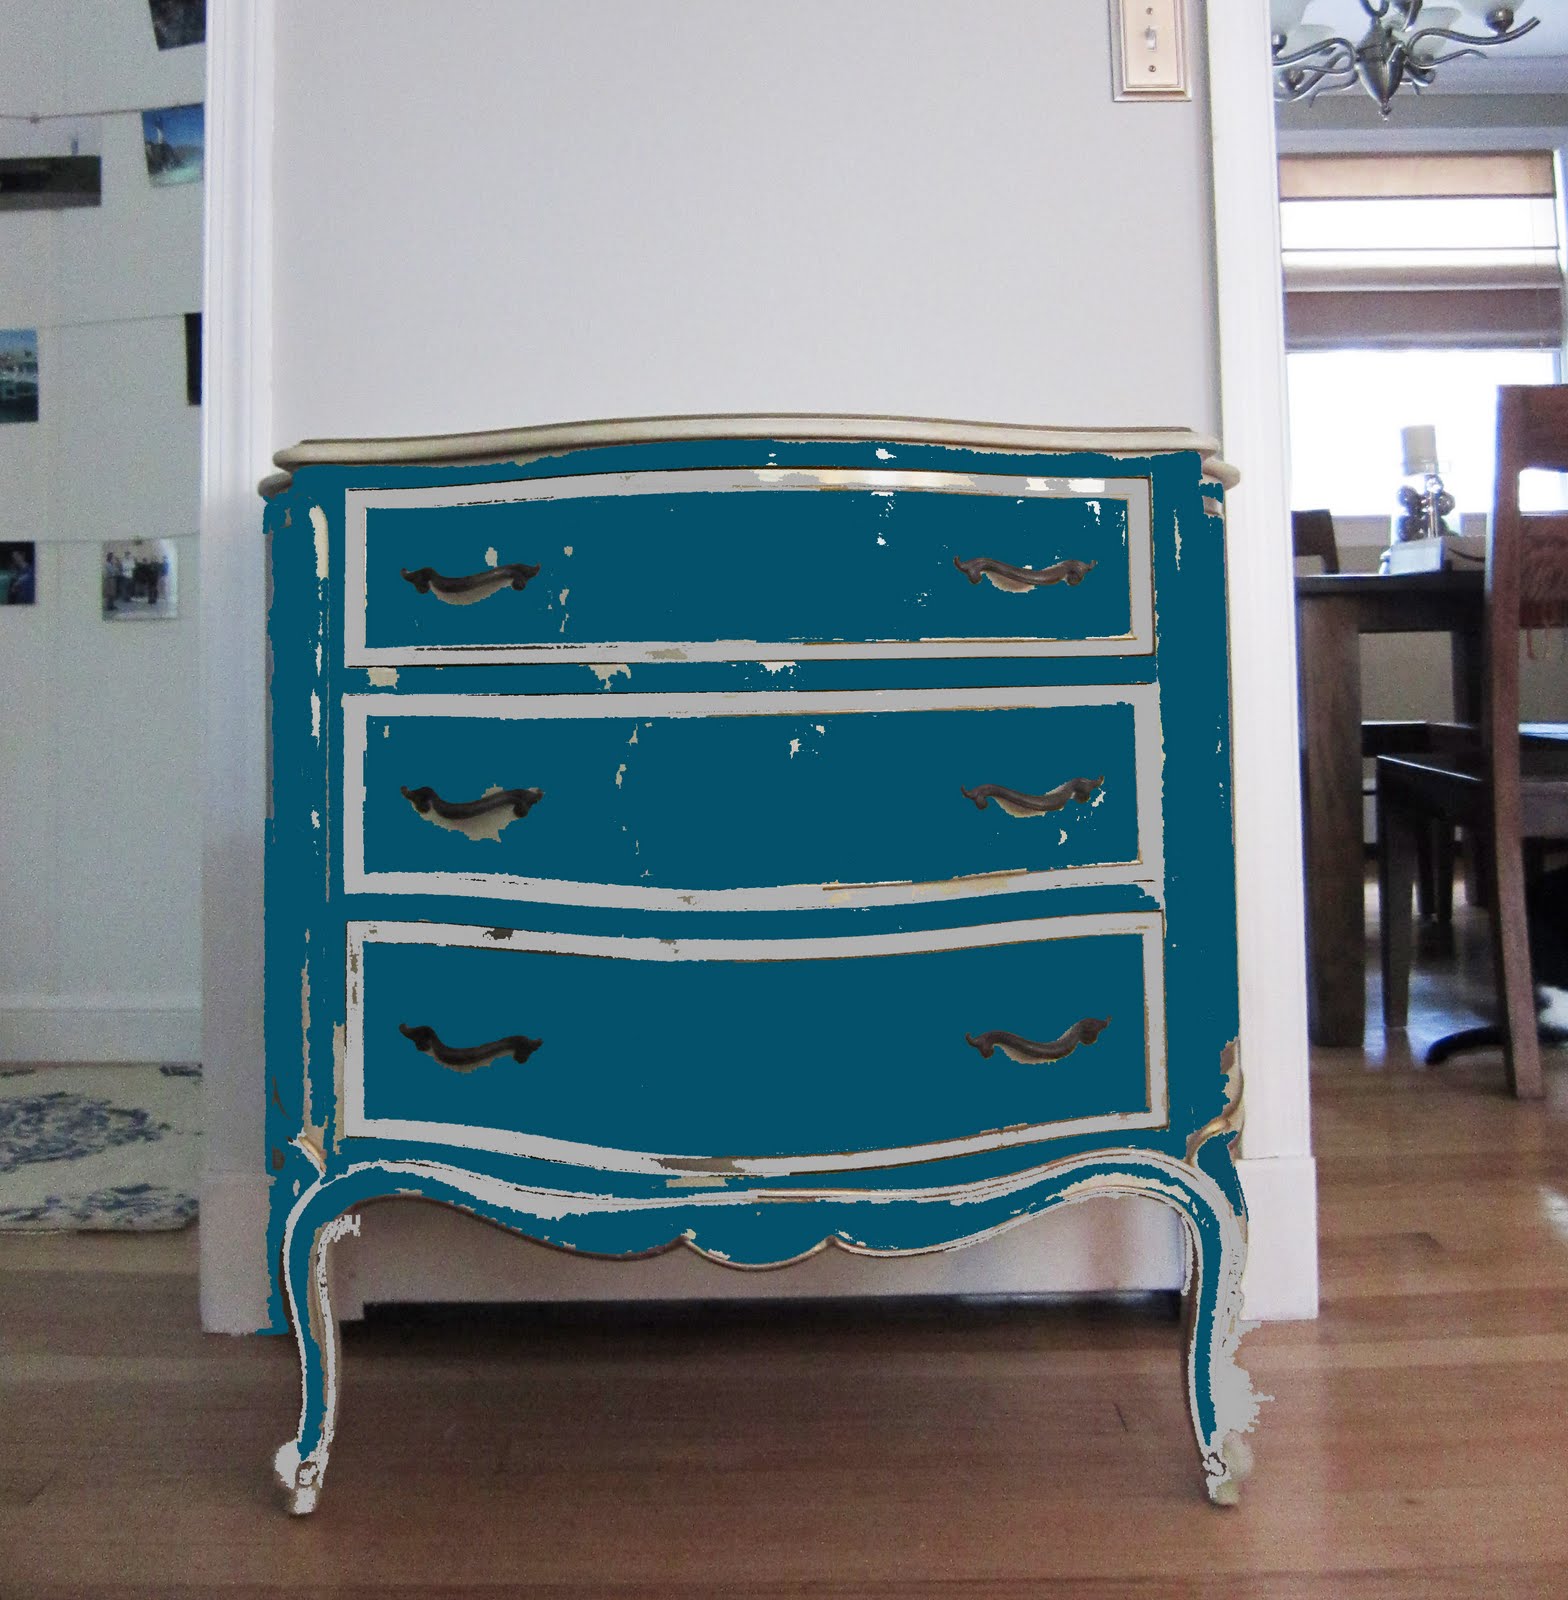
Remember this guy? I fell in love with the style and shape but found the color hideous in our gray, blue, and brick red living room.
With the help of photoshop, we decided to see what it would be like to paint him turquoise:
I even came close to hiring someone to do it. I'm sure she would have done an amazing job, but the price was a little too high and my sense of pride made me think that I could do it myself and then have something to really show off.

After considering what shade of blue to use, I came across a few inspirational photos that made me think that gray was the way to go:
Found here (original source unknown)
Design by Primitive and Proper
Aren't they just amazing? I decided to use Sherwin William's Duration in a satin finish in Peppercorn--the same color as the darker dresser above. I really liked the dark gray with the white hardware. I took another recommendation from the wonderful Primitive and Proper blog and decided to start with Kilz Clean Start. Both are relatively environmentally friendly and give off less noxious fumes. This was also a perk because I decided that I was going to complete the whole project indoors.

Well, except for this first step--roughing up the glossy surface to make sure the primer adheres.
I may have gone a little overboard on the protection (yes, that's ear covers, glasses, and a face mask, as well as a hoody to protect myself from the last of the mosquitoes). But after last time I sanded something and noticed colored, snotty sawdust in the tissue every time I blew my nose the rest of the day, I decided to play it safe.
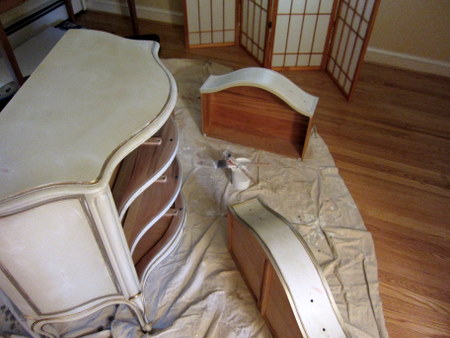
From there we moved everything into the house so that I could work "round the clock." I scrubbed off the debris with non-TSP cleaner, laid everything out on a drop cloth, and got to work.
Round 1: thin coat of primer (you can still see the color underneath a little):
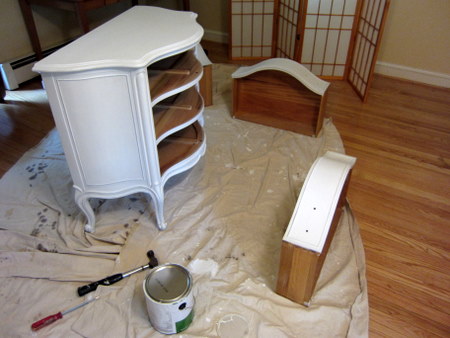
Round 2: another thin coat of primer (it looks totally white now). Round 2.5: One extra coat of primer on the top for good measure, because I could see some color just barely peeking through.
Round 3: Peppercorn! A thin coat of paint.
Round 4: A second coat of paint (this would look a lot less dramatic if I took these pictures at the same time of day, but the evening lighting exaggerates the color). Still, a beautiful and rich finish. Round 4.5: A third coat of paint for the top, just in case.
I'll leave you with that for now with a hint of what is to come: the hardware! (I read somewhere that it was easiest to handle the hardware by screwing it into a piece of cardboard and let me tell you--that is a good trick to know because it really works!)