Please share your opinions and expertise since we need all the help we can get!

Sunday, April 28, 2013

Gardening baby steps

After our massive efforts to remove our invasive border grass and really clean up our gardens, I hoped that one day it would be easier. That blossoms would magically spring up when the weather warmed and the plants would spread out and fill in the empty space. We haven't actually become green thumbs yet, but this year I started to see the light at the end of the botanical tunnel.

Spring started off with leaves covering our flower beds "for warmth." Each weekend in March, we picked a bed or two to clear. We picked up the leaves and weeded. I tried particularly hard to remove lingering liriope plugs.
They were cleaned and ready to go. So when the compost and mulch were delivered in early April, we spread it down and crossed our fingers.
Our efforts started to pay off. Anemones that we planted last fall are blooming. Our irises, the one flower that seems to have loved our garden from day one, look even happier than usual. We even had hyacinths starting to bloom until I accidentally stepped on them when spreading mulch, severing the flower and ending its too-short life (oops!).
 

I'd given up hope on the clematis after last year when it seemed to fail to root. But this spring it couldn't be happier. Stay tuned for more pictures soon when all these buds should turn into brilliant pinkish purple flowers.
Even the spiraea vanhouttei, that looked exactly like a twig in the ground for two years, sprang to life and even flowered (it's about 20 inches high, so it's still pretty pathetic - do a google image search for spiraea vanhouttei and you'll see truly how pathetic, since these plants grow up to 6' tall).
Our phlox doesn't look thrilled, but finally some started flowering. The others aren't quite dead...The thyme is very happy and has even started flowering pretty white flowers. We also planted a few other things in this bed this year, since the phlox were taking a while to spread out. So they've been joined by Blue Star Creeper and Veronica peduncularis "Georgia Blue".
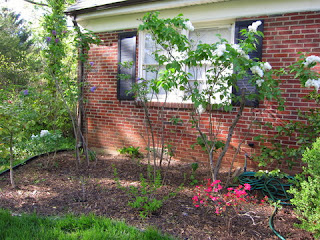
Our lilacs continue to do their thing as well. They've lived here now for two years but, annoyingly, have not grown evenly. The white-flowered one on the right is producing a lot of blooms.

 The new white-flower one on the other end, brand new as of last fall, also looks happy.
The purple-flowered ones in the middle don't seem to be doing well at all. They produce blooms, but only a few each.

I can't decide if I should uproot them and plant new baby lilacs, but then they would take a long time to grow and provide height to our garden (and privacy to our guest room). Having one big bush and then a bunch of teeny ones, especially given how slowly plants grow at our place, doesn't seem like a great solution either.

But either way, I'm calling this a success because this is what I see (and smell) when I step outside, right outside my front door.
Now I just wish I could make my plants flower with better timing. Some of our plants are in full bloom, others are about bloom, and still others are past their prime. Our camellias were colorful a few weeks ago and now all their pretty petals are dying at their feet (our neighbor's camellias still have flowers on them, so maybe we could have done something differently to make them last longer?).
We're really striving to have a yard as colorful and filled in as this one nearby. Isn't it beautiful.
We're still waiting for some things to come up that should technically be "spring blooms." Last fall to prevent the squirrels from eating the fruits of our labor, we tried to surround our plants in chicken wire (we're never doing that again - it was such a pain, both literally and figuratively). The May Night Salvia and verbena we did that for still haven't woken up. Hopefully the Black-Eyed Susans will, later this summer.
Stay tuned as the weather continues to warm up. Hopefully the things that are alive now will continue to spread out and fill in the gaps. And new things will continue to come up.

Tuesday, April 23, 2013

Garage Spring Cleaning

It's no exaggeration when I tell you that our garage made us look like we were hoarders. We didn't even manage to get a proper "before" picture because we honestly couldn't walk inside. The front half was filled with giant flower pots for our container gardens, bags of potting soil and mulch and seed, the weed wacker, and the mower. Our "things on sticks" (i.e. rakes, shovels, thrasher, hoe, etc) were all supposed to be leaning against the right wall, but since we couldn't always get there, we mostly just threw them vaguely in the correct direction and let them land wherever. We were saving our old window sashes because "one day" they might make a cool craft activity. We still had various old paint and trim and junk the previous owner had left.

This picture is actually from after we'd already spent about an hour or two clearing the back wall. Imagine it about twice as bad, at least.
It's still far from perfect, but fast-forward two days and we can now walk in (a huge improvement!) and find what we're looking for. We'd planned to donate a lot of what we cleared out to a local non-profit building charity but unfortunately the list of things they would accept did not match the things we had to give (we had a lot of light fixtures and ceiling fans, but not necessarily in their original boxes, for example). So sadly most of the items we cleared out went to the trash can.

Even actions as minor as folding the tarps and stacking them, really improved the way it looked in there. Plus we finally cleaned out the dozens of drop clothes the previous owner left. Many were such thin sheets that the paint seeped immediately through them and onto the floor, making them totally useless. So we saved some as rags and ditched the rest.
Going through the paint was a much-need update too. It had been stacked against the back wall of the garage since we bought the place. There are still a few cans we need to open and evaluate (for example - they still have our dining room/kitchen paint! So if it hasn't dried out I want to pour it into a jar and save it, inside the house, for some touch-ups) but we were able to get rid of most of it. It took them a few days to dry (some of the cans were almost full) but they finally solidified so we could toss them.
(Notice anything else about the driveway??? The piles of mulch and compost are gone! We've been very busy.)

We have bigger plans for the garage, like possibly removing one of the shelves and installing some kind of hanging system for our rakes and shovels. We still have more shelves to clear out, too. And some random hardware like hooks, nails, and screws that can now come inside to be closer to the tools. But at least everything is off the floor and grouped together.

Friday, April 19, 2013

Here We Go Again

Last fall's expensive attempt at calling in professional landscapers didn't seem to really help the yard. So this spring we decided to try again on our own, in earnest. Instead of going to Home Depot where we never can find knowledgeable help, we went to a local garden supply center and explained our needs. They recommended laying down garden lime in the front yard to increase alkalinity of our soil and hopefully eliminate the moss (we get plenty of sun, so the moss wasn't just due to shade). They sold us some starter fertilizer and also some grass seed better calibrated to local soil. Plus I can never leave a garden store without some pretty flowers in continuing attempts to make the garden full and colorful.
D spread two bags of lime and the starter fertilizer, making the lawn look gray and chalky. Then a few days later we got a delivery for 2 cubic yards of compost and 1 cubic yard of mulch (for the garden, not the lawn).
Time to spread it. Yay...(that's sarcasm, if you couldn't tell). You can seem some of the lime that hadn't absorbed yet, still making the ground look whitish.
After getting the compost in piles all around the lawn, we raked it into place. Then we spread the new seed. For a couple of weeks, we really couldn't see any grass at all.
Slowly, thanks to frequent watering and April rain, the compost absorbed and the grass perked up, making the lawn look less black and more green.
We have some new grass coming up from the seeds but also our old grass is looking a little happier. We're not sure how much of that is due to the compost, fertilizer, and lime and how much is just due to the fact that it's getting warmer and wetter. We have a lot of weeds and clover but honestly, at least it is green. Maybe we'll wait until fall to do some more weed and feed type stuff - it is too aggressive to be applied just after grass seed anyway, and by summer it is too hot to do much of anything outside to improve our lawn, especially because that's when we're least willing to water.

A couple of our neighbors have complimented us on our effort. So at least they see we're trying. I think that counts for a lot in the end, even if it doesn't look dramatically better. We don't want to seem like slackers.

Tuesday, April 9, 2013

Greased Lightning!


So a fact about our systematic, hydromatic, ultramatic microwave and vent - it gets greasy! Sure, we swipe a dishcloth over the vent every day or two, but the grease just builds up from our various adventures with sautéing, simmering, and stewing.

One Sunday morning, when I realized a dishcloth and some detergent wasn't going to cut it, we decided it was time to take more dramatic action to avoid causing a grease fire in our kitchen. It was sort of a spontaneous choice, so please excuse me for forgetting the "before" pictures. But our in progress pics should give you some idea of now gross the vents were. Here's the naked microwave - vent removed from the top and (you can't see it in the picture) the bottom

After two baths in hot water and detergent, the water stopped resembling the color of raw sewage. The top vent didn't quite fit in the sink, so we moved it around periodically to soak the whole piece.
While the vents were off, we wiped off the permanent fixtures - dish soap was the clear winner here. That stuff does definitely cut through grease, just like the ads all say. Here's everything drying, all clean and shiny (relatively). It took almost all day before they were dry enough to reassemble.
Fortunately everything snapped back into place (we were nervous something would snap off or not fit or something). Now that it's a lot less dingy, I've had a much easier time wiping it down to keep it clean.
Who knows...maybe we'll be brave enough to clean the oven one day soon. It has a self-cleaning setting but we aren't quite convinced we won't set the house on fire.

(Excuse the short, rather random post. We've been spending almost every waking, non-working minute out in the yard, so I've been gathering up information to post on that. But the yard and garden spring clean-up is taking forever and I didn't want to keep you waiting longer than I already had. And anyway, I made up for the delay with some 1970s musical kitsch, so it's not all bad.)