Please share your opinions and expertise since we need all the help we can get!
Showing posts with label cleaning. Show all posts

Sunday, August 28, 2022

New Ceiling

We really haven't been left a whole month with a big hole in our ceiling, I just didn't get around to posting an update. You may recall that when last we visited the bathroom, the pipe was fixed but the ceiling looked like this. We were understandably eager to get rid of the giant hole.

Well it was definitely one of those instances where things have to get worse before they get better. So much of the drywall was damp and swollen that the handyman said it made more sense to just remove the whole ceiling. It's not a very big room, after all. He also did the ceiling inside the shower stall as well, It didn't suffer any damage from the leak but it had always had a strange paint bubble that couldn't really be fixed, potentially due to some old water damage. So one day into the repair (and after removing everything from the room like curtains, towels, shelves, wall hangings, etc, here was the view:
The next day, it already looked much better:
After that came four days of quick visits by the handyman for layer upon layer of skim coating and priming. It was good confirmation that no matter how skilled you are at drywall installation, there are no ways to take shortcuts on this step Also based on the time each layer took, it confirmed for me that we made the right choice in hiring someone else.

The progress made through al the skim coating days seemed so negligible that we didn't take incremental photos. After a few days of that and two layers of paint, we were back in business. Well, sort of. Not pictured is the full 2-3 hours I spent in that tiny room cleaning all the drywall dust and debris from every ledge, crevice, and grout line. But then it was finally time to move the things back in. As good as new. Kind of crazy that after all that, the best we could hope for was that it looked the same as it did before. Guess that's the nature of a repair compared to a remodel. The paint bubbles are gone at least, and the ceiling is nice and smooth.
I never did get a before picture, but above this light is where the paint bubble has been since we first painted in 2009.
And here is the view inside the shower stall, also bubble-free.
A note about the paint. When we painted, we used Sherwin Williams in Grand Canal. We still had some of the original can. Our handyman preferred Benjamin Moore so he took our can, with the color composition, over to be paint matched. It really does look the same, so either he did an excellent job painting, or they truly were mostly identical (at least enough to cover one up with the other invisibly).


As I'm writing this post, I'm realizing that he never told us what the ceiling paint was. When he asked for our preferences, we simply said we didn't want optic white out of the can (like we mistakenly had used the previous time). But he didn't leave us the can so I probably ought to send him a message and find out what it was, just in case.

Edited to add in the paint color for the ceiling: Benjamin Moore Regal Select, eggshell finish in Brilliant White (if I'm reading the label correctly).


Hopefully that's the last we hear from our pipes for a while...

Sunday, December 1, 2019

Giant Dust Rabbits

A whopping 10 years ago, I wrote about various strategies to hunt dust bunnies. The kind of bunnies I hadn't accounted for were the hidden, lurking kinds. A few months ago when we flipped our mattress, we discovered an entire warren of dust bunnies. They were so big, I'd like to think of them as dust Flemish Giant rabbits. These must have have been growing under our bed for...years? Our bunny warren was lurking underneath the drawers in our bed frame, which meant we had to open the drawers and pull up the bed slats to see them. I guess that's why we hadn't noticed even when we flipped the mattress other times--it was just luck that one bunny was visible enough to prompt us to explore further. The sight was so gross that I forgot to take a picture before grabbing the vacuum, so the pictures below show much less dust than we originally found.
Thankfully, with a little awkward hopping over the drawers and between the frames, we were able to vacuum up most of the bunnies and wipe down the floors with a damp cloths.

Knowing this has been under our bed for who-knows-how-long is gross, but at least now we know to attack this space every time we remember to flip the mattress. I wonder what other hidden dust warrens are lurking in our house. Most of our furniture is up on legs to help our baseboard heaters be more effective, so usually we can see (and clean) under them. So I hope that while we definitely collect some dust along our baseboards, we don't have quite the giant dust bunnies found here in too many unknown warrens around the house. Because EWWWWW!

It's been a bit quiet around here lately but stay tuned for a few posts we have lined up. We might not be blogging but we're busy around the house, as always.

Friday, June 21, 2019

And it was all yellow

It turns out that construction paper, when wet, is great at transferring dye. It makes sense, in retrospect, but definitely was not something I would have thought about when my kids went for a cup of water while coloring last weekend. But oh yes, there is quite a lot of dye in that paper. An hour after said coloring, we walked into the sunroom and see sopping wet construction paper on the wood floor. We life it and see...
Now this would be bad in any instance, but you may remember the saga over the floors in this room and how we fought hard to make it look perfect. And in an instant, two small children had ruined our efforts. OK, I'm being a bit melodramatic - I know it will sand out if we ever were to refinish the floors, but that is most definitely not on the horizon.

Various websites provide options of varying degrees of confidence. Both of us agree that Magic Eraser seems like a bad idea, since it actually sands away some of the finish. So we opt first for a vinegar solution and a cloth. That removes a lot of the blue and a small amount of the yellow. Next, it's on to a baking soda solution. I have to warn you, keeping a consistent white balance with these pictures was pretty much impossible, so you'll have to use your imagination a bit to compare between pictures.
Even with something as gentle as baking soda, instructions across several websites seem to suggest that gently rubbing it, rather than aggressively scrubbing it, was the way to go. Even baking soda could pull off some of the shine. So we put some elbow grease into it for a while.
 And in the end? Well, you tell me. What do you see? Here's the "finished" picture, from two angles (and evidently two very different light sources?).

Do you see it? We do. It's a lot better but the yellow is still there lurking. We're hoping that no one else will ever notice it and that, with time, neither will we. Our wood floors are generally a honey color, so maybe it will just look like variation in the wood. Or we might go back and take another stab at it with something more aggressive. Do you have any ideas? We've read so many things on the internet that we'd prefer to try something that one of you, dear reader(s) has actually successfully used in a similar situation.

We were surprised that a color as light as yellow lasted more than the blue, until D reminded me about the constant problems we're dealing with on our counter when I make my new favorite drink, a golden milk latte. Getting turmeric on the counters keeps requiring me to pull out the big guns of a countertop cleaner, rather than just our normal dish soap and water. I didn't take a picture because I didn't want to let the color sit for even a moment longer than I needed to, once I realized that I'd gotten some on the counter (I usually make my drink on the stove, AWAY from the new counter). Not that we think turmeric is the source for yellow in construction paper, but who knows...

Until then, well, we're feeling a little yellow.

Saturday, March 3, 2018

Family of Four

There are indeed four humans living in our house now but this post isn't about us (this is a house blog, after all). It is about how we managed to acquire yet another vacuum, bringing our total number up to four. Of course, the fact that we also have four humans (including two particularly messy young ones) probably has some connection to our growing family of vacuum cleaners. Though we have struggled to find ways to keep the floors clean ever since we moved here.

Our vacuum family consists of a Roomba that makes its rounds twice a week, a Miele canister vacuum that we rarely take out now that we have a cleaner come weekly, an old Dyson animal that lives in the basement from back when we lived in an apartment with wall-to-wall carpets, and a hand-me-down Black and Decker dust buster that had outlived its usefulness despite being our most used vacuum.

Thanks to a toddler who likes to walk around with bowls full of cereal, crackers, goldfish, and other small things that go crunch underfoot, the dust buster has become our go-to floor cleaner. Step on an oatmeal sure? Go grab the dust buster. Ride-on toy scooter roll over some cheerios? Time to dust bust. But that thing did not have the suction power, nor was it doing our backs any favors bending down to the floor cleaning up the crumbs.

And so, a couple of weeks ago, we acquired a refurbished Dyson V7 Motorhead vacuum, also known as a stick vacuum.  It lives in the hallway right near where we had parked the (now departed) dust buster. It's not that noticeable from the living room (second picture below) and is very centrally located to all our usual messes. I am also partial to what Dyson calls purple and I call magenta color.

It comes with a few attachments and the stick feature means no more bending down to vacuum. The fact that it has an actual motorized brush bar means it can pick things up from carpeting pretty easily, and it has two power settings depending on how much needs picking up (plus a "trigger" button that somehow is much more intuitive than having to switch something on).

It is so thin that I had high hopes it would fit under things like this sofa, a home to dust and crumbs (and toys and plates??) that get kicked or brushed under  while the kids are playing. Alas, it does not.
Nonetheless, in the two weeks we've had it, we are finding that we love having it around. Here is the haul just from this morning - crumbs, cat hair, dust, and play-doh.
It's not what we would use for when we have to vacuum the whole floor (that's what the Miele is for, or the Roomba if we can wait an hour for it to do its thing). But it's great for the almost constant little messes caused from a house full of people.

Sunday, May 28, 2017

Painted House

We decided it was about time to give the outside of our house a new coat of paint. It wasn't going to be a very dramatic change (and usually I paint BECAUSE I want dramatic change) but was going to require a ton of prep work. We know because we tried this before, and never got very far.

Of course a lot of the worst parts were covered up with vinyl flashing when we replaced our windows - most new window installations now include vinyl and aluminum capping to cover the whole exterior sill. But still we needed a lot of scraping and rebuilding.

Here's an example of a spot we tried to build up that still needed a lot of work:
And here is paint to be scraped. To the left next to the rough patch is where we tried to fix 7 years ago. Even after all this time, I can still see the "ultra" white right out of the un-tinted can and how it's different from the color around it.
In the back, you can see the difference between our older "new" windows (not as old as the originals but installed before we moved in, sometime in the 90s or early 00s, where there is still exposed sill in need of help:
Versus the ones we replaced in 2014 where the sills are fully covered:
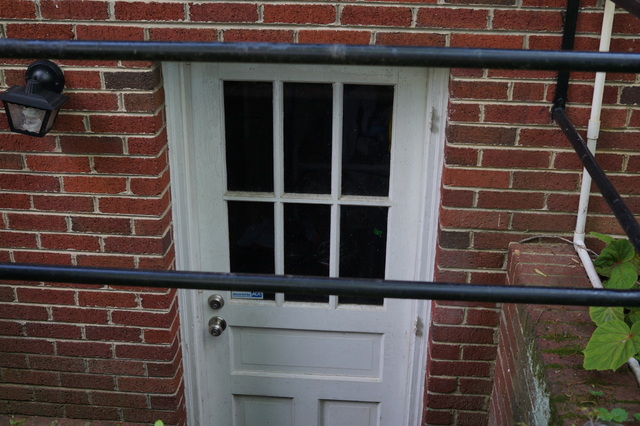
Here's the basement door, that I desperately want to replace, but that we figured was worth painting for the time being (at least it will match until I finally get a new one - especially since I've wanted a new one for years and so who knows when I'll actually get around to it):
This blog post has been mostly delayed while I go through old photos trying to find a "before" picture for the garage, which I apparently forgot to photograph before last week's painting. It was the most dramatic transformation but you'll have to take my word for it since it seems like I have no photographic evidence. Here's my thousand words, in place a picture - a cream color that matched no other exterior color, a lock that had been removed and had the hole filled in with peach-colored putty, and a door panel that was bowed out and cracked. In short, a pretty ugly sight to see (but not one worth replacing, based on the high cost estimates for a new door).

And now the afters:

A garage that actually matches the white color of our new addition, with no weird peach-colored putty. The bottom left panel is still bowed out, but the painter was able to fill in the cracks and leave it mostly unnoticeable (and at a fraction of the price of a new door):
Rebuilt, primed, and painted area under the soffit:
Scraped and painted picture window:
Freshly white area around the front door (he's actually coming back this week to give our blue front door a fresh coat as well):
 Back window sills:
 Basement door (when he comes back to do the front door, he'll go over the panes with a razor):

Since we were giving the house a nice whitening refresh, it seemed like a good time to power wash as well. We have one power washer that needs the O ring replaced, and we borrowed a neighbors that also didn't have quite enough oomph to safely get to our upper floors. So since the painter had to scrub and clean the wood areas to prepare them for painting, he also was willing to power wash the siding areas as well. Here's a before and after. Obviously his power washer had a bit more, well, power. Also he actually used some detergent, which we didn't. Green slime:
No more green slime:
A nice, relatively cheap refresh for our house that has been much needed all these years. We probably should have done it sooner! And now we have a guy to call for similar jobs, and who we'll be recommending to all our local friends.

Saturday, March 25, 2017

Artificial (un)Intelligence

In addition to relying on professional help to keep our lives a little saner, we also turned to robotics to eliminate some of the boring chores that needed to get done. Enter: iRobot's Roomba 805, a Costco-only model in the 800-series. That means improved suction, scheduling (run on Tuesdays and Thursdays at noon, for example), the ability to identify and concentrate on particularly dirty areas, a bumper to stop it from damaging anything it bangs into, and a sensor to say when the bin is full. It does not hook up to wifi or "learn" your house, but its bumper and sensors are supposed to make it smart enough to trace the walls, clean the middles, and no what *not* to do (like wedge itself onto or under something where it can get trapped).

Having used it for a couple of months now I can say that we are not particularly impressed. It has reduced the need for me to vacuum, so in that sense it has succeeded. However, its stupidity and repeated failures, along with its very loud noise, makes us consider whether or not we really want to keep it around.

An example:
The Rock N Play, we decided, is Roomba kryptonite. It finds it every time and can't resist trying to hop the rockers. We've have to move it to the hallway on cleaning days (we only have the Roomba doing the main square of the main floor, i.e. kitchen, dining room, living room, sun room), stick it on top of tables, anything to get it out of the way. Fortunately by now, baby has transitioned away from it so we won't have it around as an obstacle anymore.

We do, however, have no intention of getting rid of our sofa...

It seems to either wedge itself in and get stuck or make its way underneath (if the sofa is pushed far enough back from the rug) and then find itself unable to get out. Either way, it means cleaning has ended.

There was also that time the "invisible fence" got turned off and it really tried to make a break for it, though really Roomba isn't to blame for that one:
And then there's the permanent wood stain damage from when a (brand new) battery leaked out of the other invisible fence while it was sitting up on our cabinets. Ugh! Again, maybe more the fault of Duracell than Roomba:

Another complaint that I have with Roomba is how many "rug turds" we get on the floor after it finishes vacuuming. I think this is because we have a new rug in the sun room that keeps shedding, but I still don't understand why it just drags those little things around everywhere on its bottom brushes and can't suck them up like, you know, a vacuum:


Finally, my perhaps most significant complaint is how annoyingly noisy it is. We can't really watch TV or have a quiet conversation while it's running (though it is so oddly hypnotic to watch that maybe we don't need to). This shouldn't be a problem since we set it to run during the day when we're out. But once it gets stuck on or under something, it stops. If that happens early enough in the cycle, then the house doesn't get cleaned. And so we have to run it that evening (or, *gasp* take out the real vacuum).

So what to do? We like the idea of having a robot cleaner, but I'm not sure we love our actual Roomba. Upgrading would get us a few smart features, but for quite a bit more money AND wouldn't solve the noise issue. We're considering taking the advice of our favorite home review website The Sweet Home and buying a different brand that is significantly cheaper and quieter. Even if it's just as stupid, the $200 smaller price tag and the fact that we probably could run it at night means it might be worth it.

Do you rely on robots to clean your house? What are your experiences with them?

Saturday, May 21, 2016

That's how you get ants

This year has brought a new pest to the neighborhood - tiny black ants. We first saw them in the kitchen, walking along our stove to points unknown.


They seemed to be entering from the door to our breezeway. I first tried a combination of ant traps and generous amounts of cinnamon. It seemed moderately effective, but the ants soon found paths around the cinnamon, since it can't be applied to vertical surfaces.


Finally I got tired of wiping up ants every few hours, so I applied insecticide to the door frame, which mostly stopped them. I later found another trail of ants leading from the dishwasher, so I applied some around (not in) the appliance. As long as we don't leave any sticky food out, the ants seem largely under control.

Unfortunately ants keep appearing in other parts of the house. J found a trail of ants and their larvae swarming our door frame. Another application of bug spray around the door frame took care of them.


At this point, they were just an occasional nuisance.

Then they upped their horror level to max.


In case the videos don't work, here's a picture. The little jerks have built a nest. Inside the switch. In fact, they were so successful they ran out of space inside and started storing larvae outside the switch. After looking in horror at them for about 10 minutes, I figured out a course of action. I couldn't just nail them with insecticide because the switch and power plugs were mixed in with our pantry. Fortunately none of the food items were open, so the ants were just attracted to the electrical charge or something.


So, step 1: vacuum. It was pretty freaky to watch the ant population suddenly triple in size as they tried to flee when I started sucking them up. About 30 minutes later I had vacuumed up 95% of the ants. It was pretty satisfying. Especially since the Dyson suction is powerful enough to kill them by the time they got to the canister.
White is kitty litter. Black/cream is ants/larvae. About 1 inch worth.
The network switch was the most problematic, since most were inside. No matter how many times I hit it, more ants came out. I eventually put it in a zip lock and took it outside to disassemble it.
Contents of the switch after I cracked it open.

I think the ants were coming in from the fireplace trim in the basement, so I aggressively sprayed that and the entire fireplace. I also wiped the switch, power adapters, and power strip in insecticide. When I plugged everything back in (just a few things at a time, just in case they came back in force) I ran the cabling a few feet above the floor to make it harder for the ants to find it.

A week or so later, the ants haven't returned - but it is really nerve wracking because they apparently could swarm anything that is powered. Since we enjoy stuff like lights, internet, and TV, we have to keep the power on, which is a problem because that's how you get ants.