Please share your opinions and expertise since we need all the help we can get!

Monday, August 8, 2011

Drywall repair

Boring title for a boring job. The repair of our chimney required putting a sizable hole through our basement wall. Since the chimney people seemed hesitant about their ability to fix the hole, I decided to do it myself (they did knock $50 off the bill in the end). I may not know anything, but I'm more motivated to do an acceptable job.

After doing a lot of Google searching and Youtube video watching, I felt I knew what to do.


Above is the hole. It's roughly 16 inches wide and 10 inches tall. I made a test cut on the right edge. It's simple to cut drywall - you just take a sharp knife (or in my case, box-cutter), score the drywall several times, and then you can punch out the piece.


Now we can see clearly how they cut through the (strangely spaced) studs, which needed to be fixed.


I cut the jagged hole into a nice rectangular 22x16 box. I cut intentionally to the stud on the left, but decided not to go all the way to the stud on the right since it was another 6 inches away. This was a good idea because Home Depot sells little pieces of drywall that are 24x24 in size. It would have been extremely annoying to work with a full-size piece. While I was at Home Depot I also picked up a 10 foot 2x4. I cut it into smaller pieces and screwed a couple of them into the existing studs to give support to the  new drywall.


Here we go! As per the random online instructions (this time from Lowes), I cut the new piece slightly larger (with some beveling) than the hole. Which made it impossible to fit in. Cursing Lowes, I then had to cut an 1/8 off of two sides. Not easy. But I eventually got it to fit.


Drywall screws installed, including one securing the "old" wall to the "new" stud (on the right side).


Then I started adding the drywall mud with some big plastic trowel things. It would have been easier with proper metal tools but it didn't seem worth spending another $30+ on something I don't plan on doing (ever again?).


First I laid the mud down, nice and thick (about 1/8 of an inch), then I put the drywall tape on all of the edges (which we already had, thanks to the in-laws with foresight!). 


Here it is 90% done. At this stage all I'm doing is laying down a light coat, sanding, then repeating until it blends with the old wall. I can see a little bubbling of the tape in one corner, but I doubt anyone else will ever see it. I hope. The next step is priming and painting. Ugh. 

There's no way we want to try to match the white of the rest of the walls, so it's going to be an accent color. Since the basement is white with nondescript furniture in it, we are free to paint this wall whatever we want. Any suggestions?

Sunday, July 31, 2011

Chimney capping complete

Partially thanks to our former uninvited house guest, we became aware that we needed some semi-serious chimney work. In short, we needed a new liner, new mortar on the top, some height adjustments on the three holes, and a couple of new caps.

After a few weeks, I managed to get our chimney guys to come out and do the work. On a 100+ degree Friday. I originally thought they would do just the indoor work (cutting a big hole in our wall and chimney to create a drip pan) and install part of the new liner. But I guess they were on a roll, so they proceeded to do the mortar and height adjustments along with installing the liner. I spent the day trying to do work and feeding the workers ice and water.

After day 1, our house had the following changes:

1. Shiny new pipe:
2. Tarp on our chimney (mortar is stronger when it cures at a slower pace):
3. Finally, a big gaping hole above our basement fireplace:

The following Monday they came back, pulled the tarp off, removed their ladders, added the chimney caps, and took a picture for us:


They adjusted the heights of the openings to improve the flow of air. In a strange coincidence(?) our master bedroom closet (right next to the chimney) got a lot cooler. (Around the same time, we also had to fix the AC intake pipe that ran next to the closet, so honestly we have no idea what is making the closet cooler. Not that we're complaining.)

Hopefully we can ignore the chimney (besides yearly-ish cleanings) for a LONG time.

Sunday, July 17, 2011

Veggies (Eventually)

This year we decided to try our hand at a little vegetable and herb gardening. Back in April, we sowed some seeds into one of those Burpee growing kits and crossed our fingers. There was basil, cilantro, parsley, scallions, and tomatoes.

Right off the bat, I wasn't impressed. I watered everything to the exact specifications and put the pots somewhere dark and under their little biodegradable cellophane greenhouse. It must have been too humid or something though because when I checked to see if there were any sprouts, I saw that everything was totally covered in mold! It was so nasty! Because there were some sprouts too, we decided that the pots had lived in the dark long enough and we moved them to our picture window where they would get lots of sun (and have to compete with the cats for real estate--the cats were not too happy to have to share). The mold didn't go away completely but it got a lot better (you can still see the white fuzz the white spots on the pots):
Fast forward about 4-5 weeks. The scallions never really took off but we did end up doing pretty well with the tomatoes. I didn't have the heart to throw out all the ones that I had thinned from the original pots, so whenever I could (i.e. when I didn't break a root too badly when pulling it up), I repotted those too. We gathered all the flower pots we could for temporary transplant. We moved them into a protected outdoor space (our breezeway) for a little over a week so they could acclimate to the outdoors.
Finally it was time to pot them in their permanent homes. Looks pretty pathetic, eh? It was hard to decide how much space to give them because I knew that if they survived, they would grow pretty high. But they all looked so lonely in there. A last minute addition was some white cucumbers that Burpee sent for free with our blueberry order (that's another story...). We planted them directly into the big pots without germinating them indoors.
Sometime in June, a switch got flipped and these guys started growing what seemed like several inches a day. Here they are on June 12. They got so big that we had to tie them to stakes to keep them from tipping over and snapping:
Here they are two weeks later on June 26. They had grown at least 6-8 inches!
The cucumbers in particular took off like crazy. They didn't have the head start that the tomatoes did and check them out--equally huge. And with giant prickly cucumber leaves and tendrils.
We still didn't see any flowering until about July 4th weekend. The plants by then were so tall that they have overgrown their 6-foot high stakes. We tried pruning back but I wasn't sure if we were supposed to prune veggie plants so mostly I just hoped for the best. I had expected them to stay pretty dwarfed in their tiny pots. Of course now I'm reading that the tomatoes we bought (Sweet 100) actually often grow up to 7 feet tall. Yikes! It got so bad that yesterday we took all the stakes and tied them together in the center, because the weight of the plants cause the stakes to lean very badly. They looked like they wouldn't be able to take it much longer.
But the good news is that we're getting close to harvest! The cukes are tiny (about 3 inches) but getting there.
We're nowhere near the 100-yield for our tomato plants, but we have our first delicious few of the summer this morning with breakfast.
The basil has been going so well that we had to make a double batch of pesto just to keep up (no complaints there...) and the parsley has grown at least adequately enough to save us from having to buy it a couple of times to use in some recipes. The scallions never really took off at all and we don't have a single successful plant (bunch?) so now we know they may not be worth the space and effort next year. 

As for our decisions on where and how to garden, having them in containers has made it much easier to make sure they are getting enough water (much easier to water a few pots than an in-ground garden). I think it has stopped the hordes of bunnies in our yard from being able to decimate them, as well. And being in the front of the house where all the sun is probably accelerated their growth. The only negative is that they got a lot bigger than expected, so they have become a bit of an eyesore in our front yard (and are way too big to move now). I never expected them to cover most of our front window. 

I think the cats like being able to hang out in the window and feel like they're in a forest though...

Tuesday, July 12, 2011

Waiting...

It's been pretty quiet here a la Brave New Home. Things just seem to slow down in the summer, lumbering about in the thick and humid air. We have a lot of things in the works but for now we are just...waiting.

First, we're waiting for the chimney guy to get around to scheduling us. He's playing a little hard to get, so that's annoying. I'm |this close| to starting over again to find new estimates, but I get the impression that this guy is good, just absent-minded*. Plus neither of us are excited at the prospect of taking time off for work just for some guys to stop by and tell us a price.

*Now it's in here for posterity. So when the project is over and I'm really angry and curse this guy out, I can look back on my adorable naivete.

Second, we're waiting on our garden. I have lots of pictures of our plants as they've been growing up but we have still yet to have any victory on produce (except basil--lots and lots of basil), so I would rather not post about it until I can sum up our experience.

Third, we're waiting on the weather. We have a big plan for the yard, but there is no way we're going out to work on it now. Between the heat, the humidity, and the mosquitoes, we wouldn't last an hour.

Fourth, we're waiting on time. Life has been a little hectic but I decided that eventually, I would repaint the new chest in our entryway. Eventually...

More long term, we are waiting on the finances to catch up to my desire to remodel the upstairs bathroom. But that's not happening for some time.

One thing that didn't wait? Our new house plants. They didn't waste any time in dying. I thought I must be getting better at the whole gardening thing, since I have some violets and an orchid growing in our kitchen. And vegetable plants that are thriving. The plant that we had in the living room originally was doing pretty well too, but it turned out that it was toxic to cats. As was nearly everything that was being sold at Home Depot or Lowes. So you can imagine my excitement when I found a few plants at a local farmers' market that came up on the toxicity list as being safe for pets. One is either a Boston Fern or a Feather Palm (it says Boston Fern but then gives the scientific name as Nephrolepis exaltata, which matches up to a Feather Palm online). The other is a Peperomia. We potted them in something pretty (really loving the new Skurar pot from Ikea on the left) and went about our merry way. Here's a picture of them from May 15:
And here they are last week:

Yeah, let's mark that down in the FAIL category...

Thursday, June 30, 2011

Almost Perfect

We found the coolest dresser to put in our entry way--it was everything we were looking for! We'd been wanting to replace this piece for a long time:


We wanted something with legs high enough to allow the heat to escape, enough storage to let us hide our junk, and character. And last week, lo and behold, there it was:

The size is perfect and the shape is definitely something unique to break up all the somber dark brown squares that make up most of the living room furniture.

My problem is the color. You may remember that my first loves looked like this:


Cream and gold are just not doing it for me--it really doesn't work with the grays, reds, blues, and browns we have in the living room. And while I have refinished some furniture before, I'm not sure I have the time or inclination to tackle this rather massive project (massive thanks to all those beautiful French provincial scrolls). So for the first time ever, I'm debating hiring someone else to do it. It would about double the price (but we did get the piece for a steal) but my do-it-youself nature is really conflicted. Thoughts?

D got busy with Photoshop and here is a mock-up of what we are thinking we want:
We like how glossy it is and we like that the trim is a different color from the main color (it's gold now, so we're thinking silver, but there's no reason it needs to be metallic). So anyway, let us know your thoughts on color and on whether we should splurge and get someone else to do the dirty work for us.

Sunday, June 26, 2011

Rocky has left the building

Rocky, as my friends have affectionately names our little houseguest, seems to have moved on. We played loud rock music all day right into the fireplace where he'd taken up residence and that seemed to do it. However, that doesn't mean we're getting off cheap here. Ooooh no, not by a long shot.

We had two different chimney companies come out (and one more than once) and give us estimates for what needed doing. These were in addition to the guys who came last year and told us we needed a new liner.

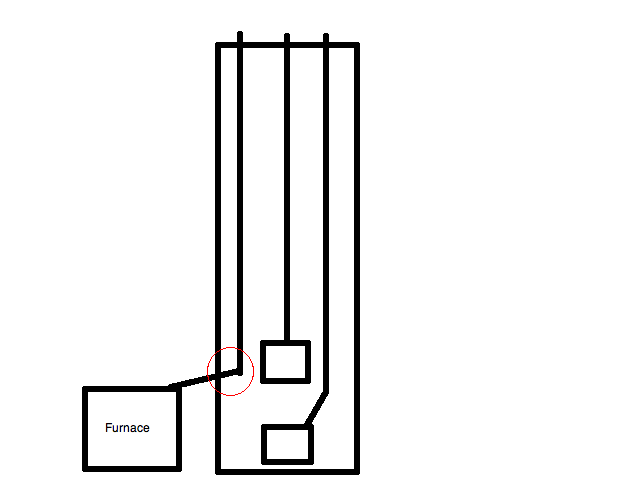
For reference, our chimney has three different flues in it--the one to the front of the house goes to the basement fireplace, the middle one goes to the upstairs fireplace, and the back one goes to the oil burner. I had no idea they all fit in there like that! We have one cap installed on our upstairs fireplace (middle flue) but that was all. Rocky had settled into the lower fireplace, just above the damper. So here is the breakdown:

As a refresher, Chimney Company 1 said last summer that we need to immediately replace the liner in the furnace flue for about $2000. Masonry work around the top of the chimney was also necessary. We didn't really trust them and decided that we would look into getting some additional opinions this year. The raccoon was good pretext for having chimney folks come out.

Chimney Company 2 came out a little over a week ago to have a look. They said that we needed caps put on two flues and masonry work at the top, but didn't feel we needed the chimney relined. They quote a price of $800 to $1000, which also included spooking Rocky out if necessary.This company was recommended to us by some people who live in the neighborhood.

Chimney Company 3 said we did need to have our furnace flue relined, as well as the masonry work and caps. The guy even took a video with his phone:
The problems with all these videos and photos is that it is clear we need masonry work but totally dark down the flue, so it doesn't prove one way or another that we need a liner. But anyway, their estimate included relining one of the flues because they claimed the terra cotta liner was breaking off. Price? $2400. Ouch!

So now we were comparing apples to oranges between the two companies. We called Chimney Company 2 back and asked how confident they were that we didn't need a liner and were told that they only looked around the top and it didn't seem too bad. If we wanted, they could come back and run a camera down, so we said yes.

The owner himself showed up to take a look. While he was up there, he put some temporary caps on the chimney so the raccoon (which he confirmed had left) couldn't easily get back in. After some digging around on the top of the chimney as well as in our basement, here's what he had to say:

Yes, the chimney liner was cracking off and would need relining. BUT THERE'S MORE. Because the furnace flue makes almost a right-angle turn behind our wall to get between the furnace and the chimney, the chipping terra cotta was actually falling to the bottom and clogging the pipe. Here is my rudimentary drawing, reflecting the situation as described to me:
The red circle is where the clog is happening. The chimney guy explained that because of this clog, which he said was 2/3 (i.e. only 1/3 free), the carbon monoxide wasn't venting out the chimney fully. He said that in addition to the complicated job of cleaning out and relining the flue around that bend, they would need to install an access point from inside our house to that corner to catch oil drippings that would collect there over time (right now the oil is presumably absorbed into the terra cotta but the new liner would be steel). Yay, another hole in the wall... He hasn't emailed us the estimate yet but said the whole job would be aorund $3000. The price keeps crawling higher!

But boy let me tell you that is one way to scare someone into spending money! He wasn't pushy at all or unnecessarily scary, but mention carbon monoxide and you've got yourself a deal. Good thing this is summer so we don't need our heat on. This might also explain why our energy auditor noticed some higher ambient CO levels even though the furnace company, with less sophisticated tool that only tested immediately around the furnace, didn't. Fortunately these are not incredibly high levels. We have CO testers on every floor of the house and nothing went off, but still, not something we want to continue.

But here's the part that worries me a little: why didn't anyone else notice this problem? This guy seemed pretty trustworthy and comes recommended, but I hope he doesn't just figure that we're suckers just begging to spend money. I almost want to get yet another estimate, but I am sick of having people wandering around looking without doing. Just fix the darn problem already. So we will probably just hire this company to do all sorts of work we never even anticipated when we saw Rocky up there on that fateful day. Please, as always, share you thoughts--we're clueless on this one and $3000 is not something to take lightly

Wednesday, June 22, 2011

Pssst!

So I uncovered a secret but you can't tell anyone else. Remember that amazing bombe chest I fell in love with on Pottery Barn?
Well look what I found on "O.co" (aka Overstock.com):
Product page here (for as long as it lasts)
The same exact piece for $289 with shipping of only $2.95 (Pottery Barn wanted something like $75). Plus no tax. And it really is identical--same measurements, materials, hardware!

The funny thing is that I don't know if I want it anymore. It almost matches too well with its dark brown finish--I was hoping for something a little quirkier. Probably if Overstock had it in the red I would buy it. But on the other hand, it's quite a bargain. We'll see...

Friday, June 17, 2011

Little Details

While we battle the raccoon (more later) and wait for a few things to grow outside before documenting them, I thought I'd entertain you with a few pictures of some of the little decorating touches we made to our bedroom.

A recent trip to Italy resulted in two beautiful Venetian masks that I deliberately chose in colors that would compliment our room. We hung them up with some invisible nylon thread across the bridge of the nose and through the eye holes and a tiny nail. I love that they look like they are floating! Also in this picture is a beautiful paper rose strand that we got at a wedding. The white and green really match our decor. We are also using a few other strands of it as tie-backs for our curtains.
The same wedding had strands of little paper birds, which we took to decorate this corner of the room, using tiny nails barely tapped into the wall (to leave minimal holes if we ever redecorate).
Next was an exciting find from a local home decor store: two blue birds as door pulls for our closet and some blue and silver filigree pulls for some drawers.

The bedroom is definitely my favorite room in the house and truly exudes a sense of calm--a nice sentiment for a room where we spend so much time relaxing and sleeping. The only project we have left is to mount some shelves under one of the windows. And of course whenever we find new pictures and other decor elements we will add them wherever we can.

Sunday, June 12, 2011

Unexpected Houseguest(s)

We stepped out of the house yesterday and felt like we were being watched. It wasn't just our imaginations! D finally spotted something on top of the chimney, peering down at us:

Here's a closer look:

Yes, your eyes do not deceive you--we apparently had a raccoon on our chimney. Not just on. In. After it considered us for a couple of minutes, down it went. We have no idea if there's a family in there or just a lone raccoon who thinks he's hit upon a very nice place to live. Whatever the reason, our unexpected houseguest had better start packing.

Tomorrow I'll call some chimney people to come and put a cap on. Theoretically we should be able to bang on things in the fireplace to scary this little guy out first. I have no idea what we're supposed to do if there is indeed a family. We're hoping that we get some advice when we call chimney companies for help--we're not sure if we're supposed to bring in pest control, but well figure that out too. This can't be the first time something like this has happened (in fact, the wonders of the Internet indicate that this is common enough to warrant lots of web advice), so I'm sure they'll tell us what to do.

I want to be freaked out and appalled and worried about how much this is going to cost and what damage is being done to our chimney. Mostly though, I just keep looking at the picture and thinking "oh how adorable!"

Tuesday, May 31, 2011

Bye Bye Pine Shrub!

We had an ugly piney ever-green shrub outside our guest room window. It bugged me from the moment I first took a critical look at my yard. D was doubtful that we would be able to remove it by ourselves and figured we would have to hire someone. Fortunately, I also have awesome parents.

I don't have any good "before" pictures but you can check out the picture of our house from the top of the page. All you really need is the "after" picture, which is basically the sight that greeted me one day in April when I came home from work.
Obviously I knew my parents were coming to visit and even that they were going to come help us remove the shrub. And do other odd jobs related to making our yard prettier. They are good landscapers and took pity on us after this post.

So anyway, they got to the house before I made it home and got right to work--there was practically no shrub left by the time I arrived. Most of it looked like this:
The plan was to remove the lilac bushes from the back of the house, where they were languishing in the shade, and move them to where the shrub had been. Again, I anticipated a struggle. But my parents made it look easy, uprooting and moving 4 bushes (partially thanks to our neat little garden cart).

Of course I took this picture and then one week later, the azaleas bloomed (and have now since died again). But if you can't tell, there is liriope grass, then azaleas, then a lot of mulch and then lilac bushes. And then space so that I can FINALLY get to the darn hose faucet, which was always so buried in pine shrubs and spider webs.

Given this arrangement, we need to find a nice mid-height flowering thing to go in between the azaleas and the lilacs, so please suggest some hearty things that could go in there.

Clearing the lilac bushes from the back also gave us the space to continue ripping up ivy. We really are slowly taking back our backyard from icky ground cover, but that's a post for another time.

Finally, check out these cool irises! My friend dug some up last fall and gave them to us and they came up beautifully. I love the stiff, precise-looking leaves. Not every one of them flowered though--I assume they're still adjusting to their new habitat.

Hope you all had a lovely Memorial Day!

Thursday, May 26, 2011

Clean and Cool

It's gotten too hot to ignore anymore and we broke our unspoken rule of not turning on the air conditioner before June 1. This year we decided to increase our AC's efficiency and lifespan by giving it a good cleaning. It turned out to be pretty easy, though obviously we have no idea if it did any good. Most websites seem to recommend a cleaning every 2-3 years and we didn't do it last summer, so it seemed like we might as well. Plus it costs next to nothing. The only thing we needed to buy was a can of specialty cleaner, which is sold at any Home Depot for $5.


We didn't buy any fin repair brushes, because most of them are for 8-15 fins per inch. It was hard to get in and measure because of the outer grate, but we had at least 22 fins per inch and just a quick look made it clear that they were too close together to be able to push into shape.

Here's the before picture. I'll warn you that the after picture isn't all that dramatic. One thing we did was move the azalea bush on the right. It's not really a good idea to have things right beside the AC, since it needs air flow and also because it can create dust and pollen that will get sucked right in. We kept the hosta because it does a good job of camouflaging the AC and also because it doesn't create any pollen.
The first step in all the guides was to unplug the unit. Seemed like a good idea:
Next D took the screws out of the top and lifted it off, so that I could get in there with our shop vac and suck up all the leaves and debris. I didn't take an "after" picture, so just trust me: no more leaves down there.
Then it was time for the foaming cleaner. It says it doesn't need to be hosed off, but we wanted to take advantage of the water pressure to remove more gunk. So I sprayed it on (we only used one bottle but I could imagine needing two on a slightly bigger unit) and let it do its foam thing and then we hosed it down. The fins are so close together that the water didn't really permeate, so we did the inside and the outside separately.
At first I was worried about getting the inside wet. Until D pointed out that the whole thing is open and exposed to the elements. Oh yeah! But we still tried to keep the water only to the fins and not to the condenser bag or near any of the wires.

Here is the after picture, still foamy from all the cleaner that we rinsed off. As I said, there's not much difference except that all the greenery has been cleared away. The fins definitely are a little cleaner too, though its too small a difference to tell from a photo.
In all, it took about an hour, not counting the azalea transplant. It definitely took two people, because someone has to hold up the top (which is still attached by wires to the rest of the AC) while the other person vacuums out the inside. Otherwise though, a very easy project--especially if it means extending the life of our AC! Step two of the project, still on our to-do list, is to replace the filters inside the house. We need to figure out the right size though and keep forgetting. But anyway, that's for a different post.

Monday, May 16, 2011

Our Eastern Pavilion

No posts lately as we've been spending all our time outdoors doing yard work. All our time. I'm sick of the outdoors and getting more and more tempted to hire a landscaper. But one outdoor activity that we'd been looking forward to all year was putting up our super-cheap gazebo that we bought at Plow and Hearth late last fall. It was packed into an itty bitty box and we were skeptical that all the parts were there, but we were hopeful.

It became evident quickly that we might need a few extra hands. The gazebo is made up of a 6 rounded horizontal bars with 6 vertical poles and then 6 more pieces to extend the ceiling. Nothing was very stable until it was all assembled, so there were some fun moments trying to stabilize and build at the same time.

But once we had the bars up, zipped on the roof and the screen walls, and put in the supports, we were pleasantly surprised both by how stable it was and how cute it looked. Our lawn furniture, courtesy of Kmart and a mishmash of things we already owned, looked really good in there.

Note the hammock in the back--also another haven to relax in, at least until the bugs come out. I was hoping it might fit in the gazebo so I could hide from things that bite, but no such luck.

My only complain was how empty the roof looked. I searched high and low online for hanging votives, candle chandeliers, and other random decor without having much luck. I almost settled for these on Amazon but they still weren't quite right. I was looking for something a little more eastern, like Turkish or Moroccan. I tried searching google images and stumbled on this website: http://www.thisnext.com/. I'm not usually a fan of aggregators that have no real content but this was the lead that brought me to World Market, which never occurred to me. Even better--we have a World Market not too far from home. So off we went in search of lanterns. Did we succeed? I think that's a resounding YES!


I scattered 6 lanterns on each of the ceiling beams, anchoring them in place with a tiny piece of sticky felt that we usually put on the bottoms of our furniture. I bought fake candles to put inside them, since using real candles near the fabric roof made me nervous. We're having a party on Saturday and I think this will definitely help set the scene. Even if they did cost almost as much as the gazebo (I told you--it was really really on sale by late fall).