Please share your opinions and expertise since we need all the help we can get!

Sunday, November 26, 2023

Raise the roof

In trying to think of how to talk about all the components to our addition, I thought I'd break it up into a few different topics to make more manageable blog posts. This is where I'll walk through our decisions from the early phase to today (and by today, I mean the phase where we are literally in the final approval before it all goes off for permitting! Eek!).

I figured the best place to start was at the literal top, so here's the post where I'll talk about our roof--the planned roofline, the materials, and everything related to the top view of the new space. For several reasons, we knew pretty quickly in the process that we didn't want a traditional gabled roof (a gabled roof is the roof that comes to a point at the center. It's what you probably think of when you think of a "roof" --the leftmost one below):


Why not? Well, first, and a common theme that will come up with this addition, is that we don't want to attempt to match our current house too closely, and, most likely, fail miserably. Our house was build over 70 years ago, and trying to make an addition that looks original is going to fall short, probably in a really ugly way. "Matching" brick and slate and other components will make everything look just slightly...off. So we don't really want to try. The other reason is this:

Here's the view from the back of an addition with a gabled roof (ignore other things like the covered roof/porch--that's a different post). Now take a look at our three upstairs windows (here's the current view, to refresh your memory):


See how you can't see two of the windows once we add the new addition? Yeah. Imagine what the view likes like from inside...Who doesn't love a view of a roof?

Now check out the same view, with a shed roof. See how much more visible the upper story windows are? But we weren't done yet...


That shed roof was the planned designed for a while, since last spring when we came up with our "let's pause this for now" plans. But one of my main concerns was how bright it would be in our future bedroom, and how expensive the window dressing would be that we would need to block that extra light. In addition to that upper level of slanted quadrilaterals on the edge you can see from the above view, there was also this set of extra windows above the doors that look out onto our patio. It seems silly to pay extra for more windows when we want the bedroom to be relatively dark and would therefore have to find expensive solutions to cover them. Enter: the final roof design!


We arrived at this after a few more attempts to find the right way to angle the vault:

This one still had enough space on the porch side that we had to include windows there, defeating some of the point of the new drop. It also just looked ugly.

This one looked fine but by moving the high point so far into the room, we felt like we would lose some of the airy/lofty effect of the ceiling opening up from the bed wall, since the ceiling starts descending before it gets as high, and right over the bed rather than past it.


Here's the finally roof design from the patio view, as well (you can tell it's from much later in the design process, when we're getting into the nitty gritty for permitting). Yet another reason we liked angling the roof back down a little was to get some roof line back into view here. Otherwise it was just a rather imposing wall of (many) windows:
And so with a final roof slope for the addition in mind, let's talk materials. We've now gotten to the point where we have a "spec sheet" with brand names "or equivalent" to price out with contractors. So we already know our roof will be a Berridge Tee-Panel standing seam metal roof. It's hard to talk roof color without talking about siding, and we're not there yet, but I think based on our siding choices (next time, maybe), we're going to go with a lighter gray roof, maybe Zinc Gray or Cityscape. The hope is that a lighter color might get less hot and and ideally, we'll get a pretty close match to our current gray house siding. We'll hopefully get to see some swatches in person. We've asked for it to be well insulated both for energy and also sound purposes (rain on a metal roof--peaceful? or deafening?).

A note on the part of the addition where the bathroom and hallway are--what the architects are calling "the hyphen": that part will match the addition in material (i.e. be a metal roof) shaped in a traditional gable centered over the middle. The only CAD view we have of that is from above:


Friday, November 10, 2023

The Start of Something Big

 I'm honestly not sure how to start a post that is months in the making of our new planned addition. We've gone through so many iterations of our idea and I want to go step-by-step through them, but I also don't want to wait forever for the final reveal. So excuse me if I seem a little scattered.

The background to this project was the inspiration we got from visiting family last Christmas. They had gutted the inside of their home, remodeled it, and added on a beautiful primary suite. While we were absolutely certain that any major project for us had to factor in us continuing to live in our house during construction, we thought there were probably some things we could do. There was just no way we were willing to rent a place and move out for a few months--that felt like too much. That meant no major additions in the main living space, especially since the kitchen and dining room overlook the backyard above the walk-up basement stairs (meaning a pop-out in that direction would require somehow rerouting the basement). So while we would LOVE a completely new, larger kitchen (rather than the cosmetic refresh we did 5 year ago), it wasn't something we would want to live through.

We realized that the office and guest rooms could easily be avoided for a few months if necessary, and decided to focus on what we could do in that area. We consulted a few design experts and arrived at the idea that expanding into the backyard through the office would offer us extra space without totally disrupting our lives during construction. We are only doing one floor of construction, rather than build up a second story, again to avoid having to totally move out of the upstairs for a while. 

And so, I present our current plan: a primary suite (bedroom and bathroom) off the office, expanding into the backyard. It will have a small deck that steps down to connect the space to our current patio.


Here is the zoomed-in view of the new part:


You can see from this picture that we're really getting into the structural design phase, so ignore all that extra stuff. The main idea is that from the office, you step down into a hallway (the step is because our yard slopes downward, so this reduces how high they have to build the foundation) with a bathroom on one side and a toilet/powder room on the other (more on why we did that in a future post). Then the bedroom is at the end of the hallway. It has wardrobe-style closets built into the wall, set off from the main bedroom by a floor-to-ceiling partial wall, then a large open room (king-sized bed, here we come!) that opens up onto a small deck.

Here's what it will look like from the top. I'll write a whole post on the roof angles soon, but this just gives you an idea of the overhead view.

And here it is looking at the house from the back yard. 

With this giant addition in square feet (516 sq. ft.!), it's funny to me that we don't actually get to say we're adding a bedroom, since the office (which currently counts as a 4th bedroom), will become an antechamber/sitting room/whatever into our new suite, so it can't continue to count as its own bedroom. This doesn't matter to us, but is annoying for if/when we ever sell. Still, we'll gain an extra bathroom and a huge new, modern addition, even if it will still be considered a 4-bedroom home.

The addition opens up lots of other follow-on possibilities for us, which we'll certainly be documenting in painstaking detail over the next year or so. Most importantly, and one of the reasons we're doing this addition, is that the kids will each get their own room upstairs, essentially taking over the top floor just in time for them to become moody tweens who don't want their parents around.

A word on timelines before I close this post out--we started talking with architects and came up with our initial designs last spring. Then we paused the discussions as we worked out our financing plan and just because of other life priorities. That turned out to be a good idea because it gave us the summer to rethink some of our design ideas and come back in the fall with some new thoughts. As I go room by room in more detail, I'll show you some of our early ideas and how we arrived at what we think is mostly our final decisions.

And get ready for tons and tons of pictures of bathroom tiles and paint swatches.


Sunday, October 29, 2023

Autumn Petals

When we bought our house in--oh wow this is becoming the far distant past--2009, the gardens were all very spring-bloom heavy. We had mostly azaleas, rhododendrons, and camellias. Oh and LOTS of "decorative liriope grass, of course." Over the years as we've replaced some dying plants and reshaped our flower beds, we've made a point of attemping to plant native pollinators and a three-season garden with lots of food for bees and bugs that make it to fall. When the azaleas, camellias, and our newly planted irises died, the coneflowers, black-eyed Susans, cardinal flowers, milkweed, and bee balm came out. We had made it through summer!

But fall still left a lot to be desired. We had some beautiful volunteer goldenrod that I've cultivated (cultivated as in "didn't cut down"). The bees were clearly happy about that.

Then this spring, in planning for fall, we bought a few varieties of aster that seem to be pretty happy so far! The hot pink ones in front are "vibrant dome" aster. The light purple ones behind are "October skies" aster. In the background, you can also see some unevenly growing mums (they never seem to take off--I think it's too shady there for them). It's so nice to have some color in our fall garden, finally.


It wouldn't be a fall post if we didn't take a quick tour of some of our fall foliage, specifically with our newer trees. After bunnies nibbled a willow oak we'd planted in this very spot in the front yard two years ago, last year (May 2022), I planted this northern red oak, which was already starting out much bigger than our free 6'' willow oak. Based on the description here, it sounded hearty with good odds of survival (I feel like our tree survival rate is about 50%). It was a little floppy so you can see here that a bamboo stake is holding it up--the actual trunk is still just a skinny stick. But even young, this tree seems to be willing to put on a fall show. Here's the tree in early October:

And here it is two days ago. It's like someone flipped a switch and the tree decided it was officially time.
It would be so great to get a big shady oak tree in the front yard, if this fellow survives. It claims to be fast-growing, but I'm not convinced yet. Or at least it doesn't compare to the willow I wrote about in my last post.

Finally, we have an October Glory maple in our back yard, a replacement for the one that the deer got to in 2018. Planted in 2021 at the same time as the sycamore, dogwoods, and the willow, it seems to be doing ok so far, moving from this:

To this:
We were a little worried about its health for a few reasons. First, deer seemed to be nibbling all its lower branches (but, fortunately, aren't rutting its trunk, which we wrapped in chickenwire). Second, this spring we dug it up from its original location and relocated it about a dozen feet away. That always stresses a tree out. This picture, taken in June, shows where the tree is now, closer to the back of our lot. It used to be between the sad magnolia and the house.

Why did we relocated our maple? Well, here's the big news for those that made it to the bottom of the post. We're in the planning stages for the biggest project we've yet taken on: a new addition that will expand the house into the back yard! Now that I've more or less caught you up on the state of the yard, I'll write a series of posts bringing you up-to-date on a completely new addition that will expand our footprint all the way to the magnolia. We're so excited!

Sunday, October 15, 2023

Giant Willow

I'm so excited to come inside and tell you some big plans we have for the house, but I feel like I can't leave the yard yet until I document a few more details there. It has been pretty uninspiring, but bear with me. So in on our back rock garden, things have progressed beautifully  this year. All the things planted there appear to be happy and growing. After the landscaping crew installed all of the things in the linked post, we made a few changes, adding some cardinal flowers and, most notably, planting a fast-growing willow hybrid in place of one of the red chokeberries, to provide some privacy from the parking lot in the back:
They were not kidding when they said it was fast growing...here is a picture of it in March 2022, right when we planted it:
Here it is again in June 2022, three months later:
Fast forward to August of this year, and it has long surpassed the shed height and is giving the trees a run for their money:
I feel like if we watch this tree for a few hours, we would *see* it growing...
I mentioned the cardinal flowers, so I can't get away without showing a picture of them--here they are with the rest of corner, looking all pink and pretty:
And a close-up, because they are so lovely. More important, the pollinating bugs love to hang out on them:
A short distance from the rain garden, next to the shed, another garden is blooming. First--a blast from the past, when D. put pavers around the edge of the shed to give it a bit more protection from splashing mud and just to make it look nice (you can see this picture is from before we had the rock garden):
Then this spring, after we'd taken down the vegetable garden and returned it to grass, oldest kid asked "can I have a garden?" So we made her a little one, cautioning her not to bother with veggies because, as we'd all learned, lots of animals will eat them unless they're well protected. So she opted for flowers. D dug up a portion of the grass next to the shed ramp, put in some brick edging, and added some soil. The rest was all child labor. Lots of annuals and a few perennials planted, and even regular watering:
It started filling in and looking great:
Here it is in early fall, with some very happy zinnias and a new iron border as well to help frame it. We definitely plan to pair it with another small plot on the other side next spring:

We still have a quick fall plant recap to go and then we move indoors for a while!

Monday, August 28, 2023

Hybrid Hot Water

Our water heater came with our house when we moved in 14 years ago, and kept chugging along, sucking up electricity and turning it into, more or less, enough water for 3-4 consecutive showers (the last one was always a little iffy). We never drained or serviced it, though we did wrap it in a coat of insulation way back in 2012. That was pretty much all the attention it ever got. In 2015, we confirmed through a smart meter that it really was sucking up a ton of our electricity bill.


The energy guide sticker made it seem comparable--even "better" than other hot water heaters. But considering this was early 00s technology at the latest, it really didn't compare to what was available now.
We wanted to get something more efficient. And more important, to me, we wanted to do it on our terms and our timeline, rather than panic-buying something when the water heater inevitably decided to give up the ghost one day (probably in the middle of winter, too).

D did a lot of research and decided we should splurge on a hybrid hot water heater. This went against the opinion of the experienced HVAC guy who installed it, who insisted we were wasting our money. A hybrid system can heat the water 2 different ways. It has an old-fashioned immersion heater, just like our old hot water heater (albeit far more efficient 20 years later). These heat up water relatively fast and are a tried and true, decades' old type of technology. 

The hybrid part comes from the fact that it also heats the water with a heat pump. Now I didn't really know what a heat pump did, though D has bemoaned the fact for years that we don't have one along with our AC (combo units weren't really when we replaced ours in 2015), since they create heat so much more efficiently than standard heaters. The whole story is here (specific to water heaters, though the principle works the same for heating). Here is the key:

Heat pump water heaters use electricity to move heat from one place to another instead of generating heat directly. Therefore, they can be two to three times more energy efficient than conventional electric resistance water heaters. To move the heat, heat pumps work like a refrigerator in reverse.

They require that the room they be installed in stay above 40 degrees (there needs to be some heat in the air to pull from), with a lot of air (they don't work well in closets). Our basement satisfied both those requirements. Because they pull end up pulling moisture out of the air along with the heat, they also tend to dehumidify a room. Considering we run our basement dehumidifier constantly, that seemed like an amazing twofer.

What makes our water heater "hybrid" is that it can do both. Since heat pumps can take a while to heat the water, we didn't want to commit to having a very slow system with four people who all take showers within about an hour of each other. The heater lets us pick how we want to heat our water:

Efficiency means "only use the heat pump" and we're trying that out to see if we can manage with just the most efficient system. So far, so good, at least in the warm summer months (more heat to pull out of the air, cooler showers, etc). The electric setting would turn our unit into a standard water heater. And hybrid, of course, lets the heater pull from both heat sources as necessary.

We also got a bigger tank. The new heat pump is 67 gallons, while the old one was 55. This gives us more ready-to-go hot water. We discovered that once the water reaches the right temperature, it can hold that temperature for a while. We know that because the heat pump is quite loud, blowing a fan sort of like an AC unit. So we can hear when it's running, at least from in the basement. When it got installed, it ran for about three hours nonstop and then didn't start running again late in the evening after two showers.

This new AO Smith is taller but it's actually quite sleek and nice looking. Because of the way it pulls heat in and dehumidifies, it has to drain. Our HVAC plumber installed this rather hilarious/awful piping out the bottom, to the wall under the utility sink, and into the drain. We wanted to drain it there since our rightmost utility sink has a crack in it.

But the pipe was so awful that we decided to risk it, assuming that the amount of water generated by the heat pump won't be enough to be a problem for the sink. Now the pipe doesn't stick out awkwardly into my laundry area.
Here's the whole scene, after some decluttering yesterday as we moved around some shelving and purged some unnecessary junk (hampers we never used, the drying rack to our older dryer).
The system was expensive (our HVAC guy certainly thought it was pointlessly expensive) but there are state and federal rebates for upgrading to this kind of water heater, and we're seeing about 5kWh used each day, which equals about $1. Not a ton, of course, but it adds up (and probably will add up to more in the winter when we use more hot water). More importantly, we (hopefully) have a water heater that will last us another decade or more without concern.

Bye, old faithful!
Old water heater loaded in a truck to be removed.


Sunday, July 23, 2023

Lawn and Murder Bees

Last summer, we (well, mostly I), continued to tend our vegetable garden. After protecting the garden with chickenwire and closing it off like Fort Knox to keep the rabbits out after they decimated my snap peas in 2021, we did manage to keep out most of the yard herbivores and harvest some things. Here, for example, is one of our tomato harvests. (I have many more harvest pictures from 2022 but this post isn't really about that, so imagine radishes and cucumbers too.)

The fact was, however, I didn't really enjoy gardening (at least not after it got about 75 and the mosquitos came out) and the kids did not want to help and, well, it was much easier just to buy those veggies from the store. Things had become a little wild by the end of the summer as I went out less and less to avoid being assaulted by biting insects:

So last fall, we made the rewarding decision to give up on veggie gardening and turn it back into yard:

This summer, it was a lovely patch of grass (and not even the weed-filled grass of the rest of the yard, yet). Though we tried to level it as best we could, it is still a little mounded, but hopefully as the tilled ground compacts, it will mostly be level with the rest of the yard. And really it probably is only noticeable to us.
All was well. We spent our limited gardening time in our flower beds along the front of the house and the back fence line, slowly trying to build out our pollinator-friendly spaces.

Until...the yellow jackets came...D noticed some activity in the lawn while watering the back garden a few weeks ago. He had mildly angered...some buzzing things...and went over to investigate. About 10 feet away from the activity, he got  a stinger to the neck and turned tail and headed indoors. After asking some neighbors and doing some research, he learned that they were most definitely not ground bees, which are solitary (and usually stingless, which these assuredly were not), but likely a yellow jacket nest. Yellow jackets are aggressive and really not something you want to mess with. And while they can excavate their own hole, they will often find space where the ground is looser or even dug out by something like a groundhog. Like the soft earth of our former veggie garden! UGH.

They had moved in right at the edge of that new patch of grass. Here are a few pictures of their nest location, from a safe distance away (including inside through a screened window--I was taking no chances):


The holes can be incredibly small and they can possibly have multiple entrances, but the primary suggestions for how to eradicate them included pesticides and suffocation. D figured out that they were dormant/sleeping at night and that it was possible to attempt to cover up the hole until pest professionals could come and take care of it. He covered up the (main? only?) entrance with a bucket and a brick. Here is a zoomed in video, taken from afar, of the angry yellow jackets the next morning:


That was a lot of NOPE right there. A couple of weeks after D made the painful discovery, professional help arrived. Wearing a bee-keeper hat and thick clothes, he widened the hole that served as the entrance put chemicals in.


He warned us to be on the lookout for holes created by other animals that can serve as a starting point for yellow jackets, and to fill them in and stomp on them. Two days later, we've seen no activity from that nest, thank goodness. 

Edited, one hour after originally posting, to add:

We found another. Fuuuuuuuuddddggggge. Since it's in the median, we're checking to see if it's our municipality's problem or ours. (Further edited to add - the town will take care of it, yay!)

Sunday, June 25, 2023

One-Year Storm-i-versary

Last year, a big storm blew through that took our power out for over 24 hours. Funny enough, at the time, I waited to write a post about it because of a lingering issue post-storm that, it turns out, is still lingering. A year is long enough--let's get on with the post!

Having the electricity go out is not, in itself, much of an update. We've been pretty lucky due to the fact that our electrical circuit leads into the commercial part of town, so the few times we lose power, it usually comes back fast and is not worthy of a post. This time, however, we lost it for a while and we were READY! A few months before, we had purchased an electric vehicle (EV), as you may remember from this post about installing the EV charging station. At the time, D--in what turned out to be amazing foresight--also bought an adapter to allow our car to utilize its bidirectional charging capabilities. Meaning that power can also flow FROM the car to other things at 120V. This, it turned out, was fabulous timing.

A few hours into our black-out, we started to worry about how long our fridge would keep our food cold. Four hours, it turns out. A freezer will keep food safe for 24 to 48 hours, but a fridge (even without opening it and having it be pretty full) won't last long. That was, obviously, not great. But bring power in from the vehicle parked in the driveway and we were in the clear. The hardest part was pulling the fridge/freezer out from the wall. After that, we sent the charging cable from the driveway through the garage into the sunroom and then into the kitchen. 

Using a power strip, we also powered a small lamp and could charge our laptops and phones. It really felt like magic.
After charging up the fridge/freezer overnight and with no end to the blackout predicted, D rerouted the cables to go out the dining room window and drop down to the basement and through the door to give our basement chest freezer a burst of energy too. 

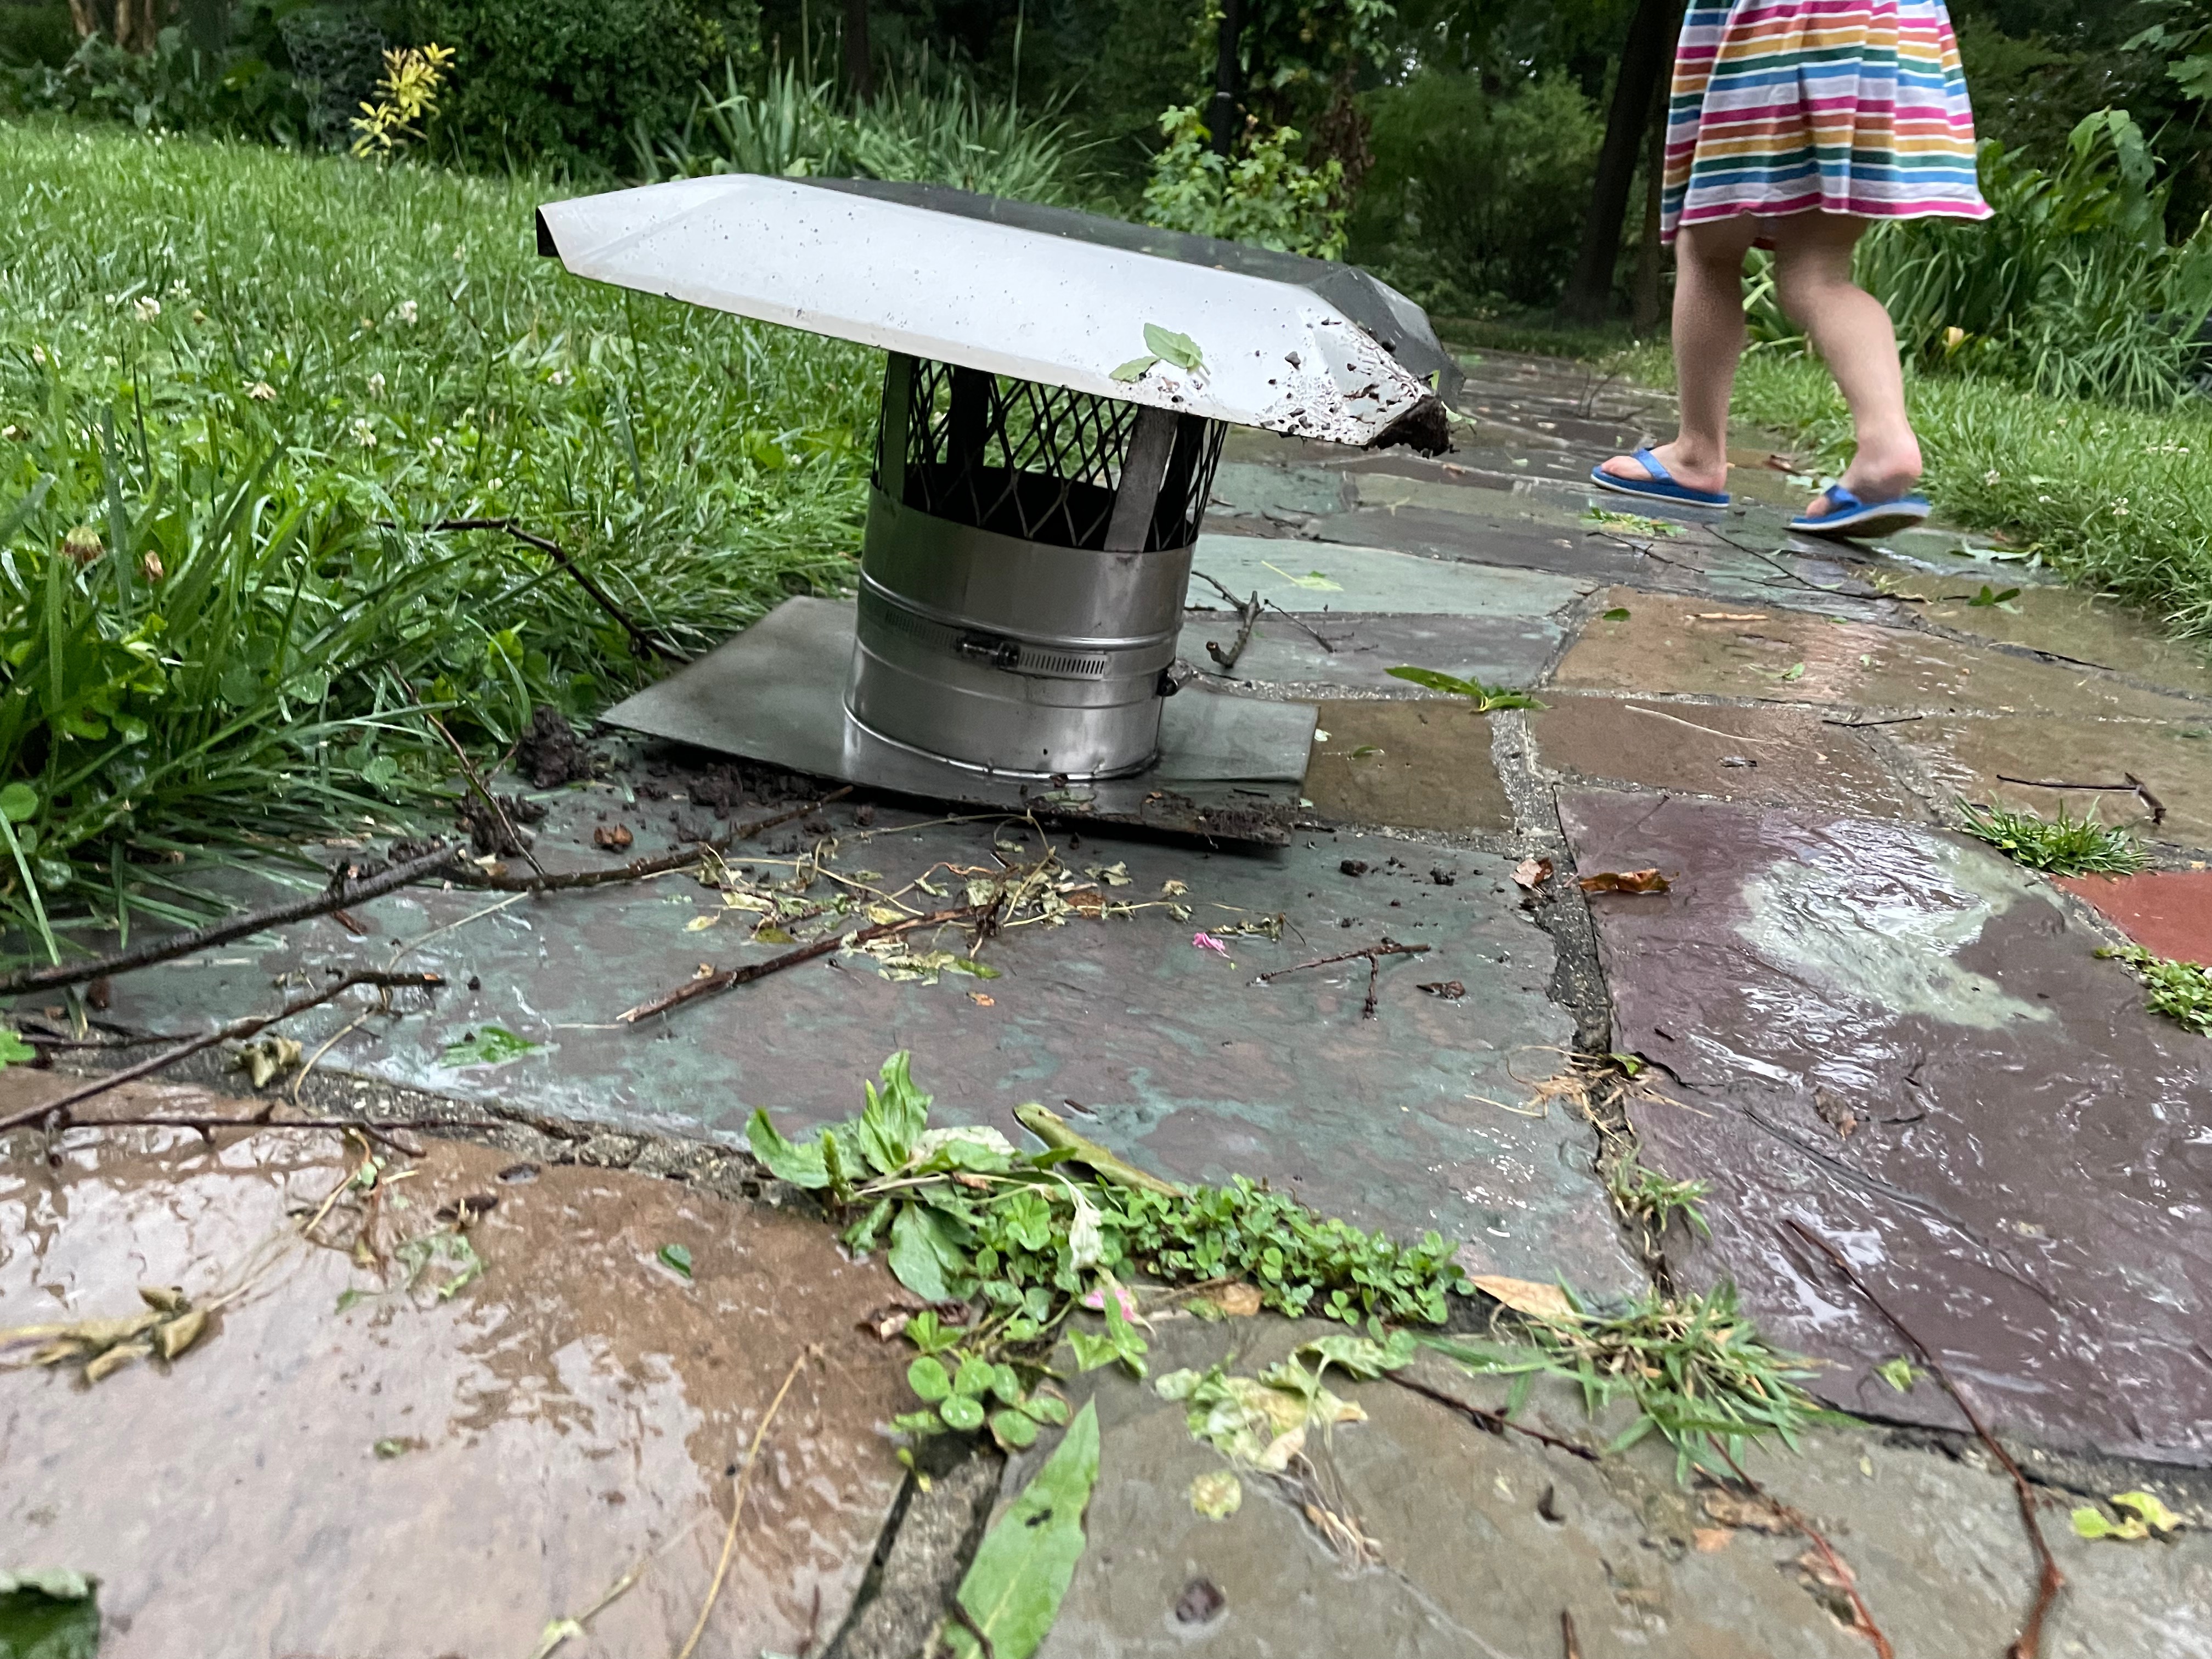
We were lucky that we got out of last storm season relatively unscathed but the heavy winds (or perhaps a flying branch) did manage to knock down one of our three chimney caps. We had them installed after a run-in with a raccoon more than 10 years ago, to make sure that no one else could decide to move in. The one that came down was the one mismatched one of the set of three, and we are pretty sure that it's the one that leads to the furnace, based on our drawings and understanding from that time period (I always swear I'm my own best reader!).


You can see from this picture (as storm clouds continued to roll through) that it's the back-most cap):

The problem is that our chimney sweep, who came to clean our chimneys last fall, said he couldn't get up there to replace it. He did say it was a good-quality cap and suggested it would be possible to paint it (presumably with something heat proof?) rather than replace it with a darker color to match.

All the chimney people look at our slate roof as a huge liability that they simply do not want to deal with and risk breaking. It doesn't help that the cherry tree in front of our house, exactly where they would want to put the ladder, has grown as well. Two companies later, we still haven't found anyone who wants to replace the chimney cap. We're not trying particularly hard, but any time we see someone working around town, we get them to come by and give a quote (a quote that remains: "no thanks, we can't do that job"). So here we are, approximately one year later with no resolution. Fortunately no critters have tried to move in yet.