Please share your opinions and expertise since we need all the help we can get!

Friday, August 31, 2012

Chips, Dents, and Cracks

Wow, I got some of the highest page count number ever on my last post, so I guess interest rates and arithmetic actually are interesting to some people. Cool! But back to our regularly scheduled updates on repairs and remodels, for now.

When we remodeled our bathroom this winter, we went with a company that claimed to offer a "guarantee" of workmanship and said that we could call them if anything went wrong that could feasibly be their fault. They even warned us that the caulk line between the tile and tub might crack and to let them know if it did. And lo and behold, about 6 or 7 months later, this was the line. Note the slit running the whole length of the picture (but don't note that it's a little mildewy--I haven't wanted to scrub too hard and get water/cleaner into the backer board, so it's a little grimy).

Something that wasn't necessarily their fault but that was also bugging us is this little chip in our tub--see it all the way on the left?
We have no idea how it happened--neither of us remember dropping something onto the tub. But it wasn't there on our final project inspection, so obviously one of us must have done something stupid. Nonetheless, it took away from the whole newness of the bathroom. Also it made the tub look dirty because it looked more like dirt/grime then a dimple, so that bugged me too.

With the refinance finally behind us, we made time to contact our remodelers and ask them to come out and fix stuff. They were a little slow to come pay us a visit, but true to their word they did indeed come and not charge us (at least we don't think they charged us--no bill has arrived yet). They decided that instead of using the sanded caulk in light pewter that they had used before to match the grout, they would use something with more silicon that would be more flexible and less likely to crack. We were fine with that, since white silicon is what surround our soap dish, towel rack, and shelves anyway. So after about an hour of removing the old caulk and putting on new, here's the new view:
Notice that our tub chip is missing as well. This wasn't really due to our contractor. We had already purchased this stuff below and were just waiting to get both steps done together so that they would both cure at once when we switched to the downstairs shower for a few days.
It worked pretty well, as the picture shows, on the upstairs tub. So we decided to apply it to a chip in our downstairs sink that's been there from before we moved in. That, however, was not such a great success. I guess the porcelain is more of an off-white than white. You can see it in the bottom left corner of the picture below--a bright white spot that is much more noticeable than the chip itself (we forgot to take a before picture, but the chip wasn't black like the one in the tub--more like a yellowish dent).

Oh well, something we will just have to live with. Turn out that this stuff is pretty permanent. Guess we should have tested it somehow to see if it matched. Not that there are more color choices available anyway.

Saturday, August 18, 2012

Un-interest-ing

I don't usually talk finances on the blog and prefer to stick to tales of home improvement and repair. But then, it's not everyday that we "rebuy" our house--i.e. refinance. The title refers to interest rates but also to the fact that this is one of my longer and more boring posts. Bear with me if it's not up your alley.

It's no surprise that we refinanced--after all, interest rates are at record lows and even though we didn't buy too long ago, we'll have significant savings with our shiny new rate.

There's a bit of a story to this refinance, though (isn't there always?), because it was actually our second try. About a year and a half ago, we tried and failed to get a new mortgage. It made me so angry at the time that I didn't want to vent here, but now that some time has passed and we actually did get through the process this time, I thought I'd share.

The problem was, as is probably the case with most failed refinances, that our house price had declined. We'd been owners for a little over a year and felt pretty confident that our area had pretty solid sales and prices, but the appraisal process didn't go very smoothly. Appraisers are selected at random and completely independent from the bank offering the new loan. Not everyone's application requires an appraisal, but if the sale is relatively new and not very much has been paid into the loan, it's pretty typical. These are pretty big changes from the last decade when I think all you needed was a pulse to qualify for a loan.

We had all our paperwork in and just needed to make sure that the home value didn't drop low enough that we wouldn't clear a 20% downpayment. Because even standard (non-interest-only loans) pay down very little principle upfront, after about 15-16 months we still had almost the same amount of principle paid as when we closed, so the house value had to stay almost the same for us to make our number.

Here's a math example, not using our real figures: Say we had a $300,000 house and put down our 20% of $60,000. We'd have a loan of $240,000. Then say our house appraises for $280,000--a loss of $20,000. When we try to refinance, we'd have to clear that 20% of the new amount, i.e. $56,000. 280,000 - 56,000 is $224,000. But after a year paying down our 240, we've still got a loan for, let's say, $234,000. We'd need an additional 10k downpayment to make up the difference between 234,000 and 224,000 to be at that new 20% point.

So, in a nutshell, we weren't there. Our house value declined about 8%, which would have meant putting down a significant new downpayment or incurring private mortgage insurance. We might not have minded, except that the appraisal (and appraiser) was a nightmare and we didn't feel like the number accurately reflected our home.

First, he decided that our 4 bedroom home only had 3 bedrooms. He told us there was a law on the books that said that a room with no closet didn't count as a bedroom. Fair enough--maybe. Except that he wasn't obligated to show us the law and couldn't demonstrate to us that we weren't "grandfathered" in (usually laws like this apply to homes built after the law passes, but not to older homes). Neither of our real estate agents had even suggested this was an issue (and ours was pretty good about pointing out places that identified "bedrooms" that couldn't qualify as bedrooms legally).

Second, he told us that this call was at his discretion and that even though it might not technically qualify as a bedroom, he would call it one for the appraisal (which already suggests to me that the law is not very clear cut). And then he LIED by not counting it on the paperwork. So that's just a jerk thing to do. At least be upfront with us.

Third, the comps he used reflected only the worst on the market that could possibly compare with us. Most had 2 bedrooms (not even the 3 he was willing to count), some had only 1 bathroom (we have 2.5), and most have fewer square feet. Some were over a city boundary in a lower-income area with fewer town amenities. There were better examples, but he didn't use them.

Another problem that we realized in retrospect is that this attempt was taking place in December. So even though we felt he had some good comps to pick from, it was not exactly the height of the housing season (comps are usually pulled from a 3 month window). That was our bad.

I was pretty livid--the paperwork process was intense and we'd spent a lot of time working on it. I felt like we didn't get a fair look so we appealed the appraisal with his company. Unfortunately, they backed his numbers and we didn't have time left on the validity of our paperwork and credit checks to hire a new appraisal company, so we were in a take-it-or-leave-it scenario. We left it. Not just because our home value declined but because we felt it wasn't an accurate decline.

Fast forward another 18 months or so. By now interest rates have dropped even more, so we're actually glad we didn't put money into refinancing last time. A few months back we looked into applying for the government refinance program, HARP, which helps homeowners whose home values have declined. Unfortunately, we bought our home just a few months too late to qualify.

We started the reapplication process again in April but after some missed calls and other delays, didn't really get the ball rolling until June. The appraisal was in July--a factor which I think helped us given all the recent home sales in our neighborhood (much more volume than the December time frame).

We also were guaranteed that we wouldn't have an appraisal with the same company, though I didn't know that until afterwards. The appraisal form has a spot for the appraiser to verify that they have not appraised the home within the last 2 years.

But the one thing we did that I think had some impact--besides the luck of the draw of getting a nice appraiser--was actually prep the house to make it more presentable. Even though an appraiser should mostly consider the "bones" of a house, I figured it wouldn't hurt to stage it a little bit. It prompted us to clean out the breezeway and transform it from a cramped storage space to a pretty seating area. It also prompted us to finally install a light in the "non-bedroom" and straighten the room up from what was my furniture refinishing space to something that at least approximated a real bedroom, in the hopes that might influence the determination on whether it counted or not. So we went from this:
 To this:
We thought having an inflatable bed made up might help too.

We also put together a print-out on all the improvements we'd made since we bought the house (this blog made it nice and easy to go back and remember what we'd done). And since the last attempted appraisal, we had done some major work like energy loss mitigation, the bathroom remodel and chimney relining and capping.

In the end, our house appraised for exactly what we paid for it!!!! That might seem bad, given decades of rising values--especially given the money we'd put in--but it was all we needed! We had our downpayment in place and didn't need to put any extra money into the refinance except closing costs. Plus we got our 4th bedroom back! In this case, it paid to be patient and try our luck again. And I think it was a good thing that we didn't ask the county to update our tax form to record the loss of a bedroom. It meant one more year in taxes on a room that at least one appraiser didn't think counted, but it kept us on the record as having the bedroom. The appraiser also noted how lovely our breezeway was, saying it was a shame how many people let those rooms just turn into ugly storage spaces (if he'd only seen it a week early...) so I do think that the staging worked to our advantage. Whatever the causes, we now have a shiny, new mortgage with lower payments and a chance to pay it off faster. Yay!

Wednesday, August 8, 2012

More Electrical Confusion

Long-time readers may remember from this post and this post that the wiring in our house is a little strange. Not just because the house is over 60 years old and the wiring isn't modern--it is also suffering from a past owner or two that liked to rewire things and clearly didn't know what the heck they were doing. First of all, we have GFI outlets all over the house. For the kitchen and bathrooms, that's ok. But we also have some scattered around the walls, like in our dining room and office.

We had a strange incident last month when something we had plugged in the dining room went out all of a sudden, and at the same time as something plugged into the shared wall in our downstairs bathroom. We decided to try to tackle the bathroom first. I tried resetting the GFI but, oddly, the button wouldn't depress. It was as if something were blocking the button. We checked the volt meter and, sure enough, no power. We headed to the circuit breakers but nothing was tripped.
We went back to the dining room, totally stumped as to why both plugs died simultaneously and, after a quick consultation with our electrician friend P, checked the plug to the dining room. (Yes, in retrospect that was the totally obvious next thing to check, but it was behind a piece of furniture and it never occurred to us that the problem could be there.) Sure enough, the dining room had a GFI box too. We were able to reset it, which fixed electricity and unstuck the button in the bathroom.
This wiring scheme doesn't make any sense at all and even P can't figure out exactly why these two plugs share a circuit and two GFI plugs. As I said, some crazy electrician lived here before we got the place.

And in what I truly hope is an unrelated electrical problem (because that would be even crazier wiring if it was related), the light at the end of our walkway went out. We figured it was the bulb, but no. Neither D nor I have a clue how to fix it, since the wires aren't accessible. Might be time to call in the pro again. Fortunately, we don't really use the light anyway, so we don't miss it much.

Wednesday, July 25, 2012

Another unwelcome present

I mentioned on Monday that we planned to let the cats into our breezeway to scare away mice with their scent and presence. Little did I know how effective their presence would actually be. Last night after work we let our cats out. One wanted to come in immediately but the other, more of a hunter, decided to hang around. Five minutes later we heard some noises and then got this little show outside the door to our kitchen:
 He could not understand why we wouldn't open the door and let him in to show off his prize:
It took a little work getting him to drop the mouse (we had to sneak in from a different door and tempt him with lots of treats) but he finally let go. He was so proud of himself the rest of the evening. We were proud of him too, though a little disgusted.

Not exactly the humane trap we planned, but it sure worked...

Monday, July 23, 2012

Unwelcome Presents

There's no "before" picture, but trust me when I say that our breezeway has turned into a disgusting mess over the last few months. It held all our gardening supplies and soils; our lawn furniture; the cooler that we were too lazy to carry into the garage; some wood stain, sponges, and rags I was too lazy to put back in the basement; a dismantled tent; and various other things that didn't belong there.

With our appraisal date approaching, we realized that the room would look a lot more impressive (impressive=valuable) if we cleaned it out and made it look more like a, well, room.

We started clearing out the furniture and putting the messes away. There was a lot of dirt on the ground, which wasn't too strange since this room is almost just as much outside as in and because we work in there when filling up our potted plants. So we got out the push broom to sweep it away. Until we noticed that it wasn't dirt...It was mouse poop! It seemed we had one or more long-term residents in our breezeway, perhaps cousins to this poor little guy. Again, this room isn't exactly inside and the presence of mice doesn't answer the question of how one got into the house, but it was still horrible, nasty gross.
When we really started to look around once we realized it was poop, we noticed it everywhere. I couldn't believe we'd let this room get so disgusting.
Fast forward a few hours (and then again a few days later)--lots and lots of Clorox wipe downs on every major surface and then several rounds of bleach and water on the floor.
We wore masks and gloves and did the best we could to remove any trace of mice. More importantly, we cleared away all the junk and made the place a lot less welcoming, with fewer places to hide.
We also noticed a few stray hooks on the ceiling and so we got to bring our cute little lanterns out of hiding and hang them up inside, since we're not putting the tent up this year.
Our best strategy right now for keeping mice out? Making the place smell like cats (cat perfume...ew...). No, but seriously, we hadn't let the cats out into this room since it had gotten too cluttered and dirty. But now that it is cleaned and disinfected, we're letting them out to play and sniff around. We're hoping that their scent (and occasional presence) will keep the mice from making any permanent homes.
Best of all, after all the work we put in to making this room look neat and tidy, our appraiser complimented us on it. He commented that most times he's come across 3-season rooms like this, they've been used for storage and look messy and cluttered, and seemed pleasantly surprised to see that ours was a nice space to relax with chairs and tables. If he only knew what it looked like one week earlier...

Sunday, July 15, 2012

Wacky Wiring, Fabulous Friends

It's inevitable that a house built in the 1950s is going to have some electrical quirks. Old wiring plus years of owners jerry-rigging new outlets and switches are bound to cause some headaches. Our first clue that something wasn't right in the extra bedroom was last year when we were getting insulation blown into the attic and have to call in an electrician to find a splice before we sealed everything up. The electrician stopped the problem but told us to throw out the lamp and light switch, since they were old and partly causing the problems. So for over a year we had an electrical box with capped wires poking out from the ceiling. It was a mostly unused room and when I worked in there to refinish furniture, I just brought in a standing lamp. Recently we decided to refinance and decided that we had to get a lamp up there before the appraiser came to judge us (the refinance itself is another story for another time). We took for granted that everything was in working order and all we needed to do was to install a new lamp. We had plenty of practice at this, like in our dining room, bathroom, and bedroom.

We had a cute little sun lamp, Smila Sol, from Ikea (yes, it's a kid's lamp, so what?) and it was pretty straightforward to install, though, as usual, it's more of a two-person job than something to do alone. We got it ready to go, put the bulbs in, switched the circuit back on and....
Nada. No light at all. We realized then that we'd never tested the electricity with a volt meter before assembling everything. Back down goes the lamp and off went the circuit and then we took a good look at the wiring in the box. We noticed a lot of stuff that didn't look right, even to the amateurs we are. Whites to blacks in several places, all crammed into a tiny box that we thought only controlled one measly light. Our volt meter read 6 volts with the circuit on (6?!). We were stumped.
Time to call in the professionals. Or actually, time to email the above picture to our dear friend, who is also a trained electrician. He's made an appearance in our blog before so let's finally name him, P. Being the kind person he is and realizing that we were working on a deadline, P and his wife L came over that very afternoon to help.

The proceedings were pretty much over my head (literally and figuratively) but it basically turned out that the wiring in our house is totally screwed up and some of the power was going down to the mystery switch in the hallway. Once P put the black wires and white wires in the right pairings, he noticed that when the switch was on, the breaker would get tripped. It seems that someone without a good understanding of electricity put a switch to the bedroom down at the bottom of the stairwell.
P worked some more magic, deactivated the mystery switch, and somehow got our light to work. Pretty glowing sun! And, more importantly, a room that could actually contribute to the value of our house, rather than look like a work in progress.
While D and P were playing with electricity, L and I was outside spreading compost on the lawn, finally using up a pile of a cubic yard that we had delivered months ago and gaining full use of our driveway again. Where would we be without good friends?! In the dark and stuck with a pile of compost in the driveway, that's where.

Sunday, July 8, 2012

Sewing Dresser Steal

My furniture craze has reached its conclusion. Here's the last post for a while on my adventures in refinishing. I recently scored this cute little sewing dresser for $30 at a garage sale. I seem to have an inability to pass up cheap, good-quality wood furniture. I bought it without the slightest idea of where it will go when it's done, because it looked like it wouldn't take too much work to make it look beautiful again.

The piece is a rich mahogany (with an equally rich and very stubborn high-gloss stain). It had water rings, scratches, and weird discolored lines on it that looked like candle wax but was more permanent. But in all, these were only surface problems that could be sanded out. I was up for the challenge.
First I took all the hardware off to make it easier to sand. Unfortunately, somewhere between this step and finishing, I lost one of the little drawer knobs. It's probably sitting out in our yard somewhere, getting cracked and swollen from the heat and rain. Oops!
I started sanding with the orbital sander but noticed that it was starting to make circular patterns in the wood that I didn't like. It also couldn't get near the edges without wearing them down. So I switched to elbow grease, first in a rough 80 grit and then a finer 220. It became evident pretty quickly that I wasn't going to be able to remove the stain evenly (not with sand paper, anyway--I'd have to switch to chemicals for that and I wasn't willing to go that far). Instead, I sanded deep enough to remove the damages and create a nice antiqued, uneven look.
Unfortunately, the elbow grease brought another problem to light that I didn't notice when I bought the dresser. One leg must have fallen off and the previous owners had just used some glue to reattach it. It didn't last long with the aggressive sanding. So we smoothed the two edges, drilled a hole, and used a dowel* and wood glue to help create a stronger bond.

*Actually, funny story--we couldn't find an actual dowel stick and I didn't feel like running to Home Depot. We raided our stash of utensils and found some Chinese take-out wooden chopsticks that worked perfectly when cut into a 3'' segment.
The piece is a little wobbly now, so I might have to tweak the level by slipping something under the feet until it's steady. However, we don't think this is going somewhere that's going to see heavy traffic and use, so I'm not sure the wobble will really matter.

In that same vein, because this isn't going to be in heavy use, I decided I wanted to keep the more natural, sanded down look as much as possible and opted to use Minwax Paste Finishing Wax instead of the more water-resistant polycrylic. It gets rubbed on with a cloth and dries quickly. It's not actually just a wax and has a lot of VOCs and chemicals, so I made sure to wear a mask and opened the windows, since I did this step inside. You can see the difference a little bit from this picture--I put the wax on the right but not yet on the left. It basically makes it look a little damp and richer colored.
Here's the finished piece, minus one knob. Hopefully I can find some cute glass ones and replace all of them, since I doubt I'll ever find the missing one.
 I love the amount of storage space--3 drawers (including one that has metal rods to string up spools of thread) plus 2 deep bins. Not sure exactly where this guy is going, but I think he was well worth the price and time.

Wednesday, July 4, 2012

Happy Independence Day!

Hope you are having a great day. We'll probably fire up the grill and cook up some burgers and corn on the cob.

A few weeks ago we got to try out our s'mores maker, which I originally planned to use on our fireplace. Works much better on a grill when the coals are starting to cool down. They were tasty and charred without being burnt. Yum!

Stay cool and enjoy the holiday!

Sunday, July 1, 2012

Foot rest, dinner table, drink table

We don't drink much coffee but we use our so-called "coffee table" for just about everything else. And we really missed having a table once we sold our old one and hadn't quite finished the new one. I told you last month about how bad my first attempt  at refinishing the table went--the sheen was uneven and splotchy and was rough in some spots and smooth in others (despite a lot of sanding).

I had no idea what to try next and after soliciting everyone for advice, decided to go with applying a regular oil-based primer with a brush to see if that would even out the texture of the spray paint. Time to tape the edges yet again (this makes 3 times). By that time, I was far too frustrated with the project to remember to take step-by-step pictures. After a coat of Sherwin Williams oil-based primer (which I bought 2 years ago for an as-yet-uncompleted project...), the texture was much more even.  We applied a second coat which I think was unnecessary, but between all of it, the table was looking much better..

To give credit where it's due, this idea can from the same friends who gave me the table--they'll figure into the blog more in an upcoming post too! Just like our parents, they are becoming regular, indispensable helpers here.

So two coats of oil-based primer and one night of drying later, I was ready to try again. Immediately it looked like the red was going to go on just as unevenly as the last two attempts. But then I tried something--I started spraying a thicker layer. Not so much that it dripped, but so that it accumulated into an actual coat of paint in one go, rather than the many thin passes I had been doing. It seemed to work. It took more spray paint than I predicted (and entailed a rather frantic run to Home Depot between coats for more), but the texture vanished.

Time for the fast forward: After three rather heavy coats, a couple days of drying, some lightly applied gray stain to match the legs (which, remember, looked fine from day one), some distressing and some polycrylic,  we got our table!!!

You can see how the light shines much more softly and evenly than in our previous attempts. My guess is that the paint-brush primer helped reset our previous failures better and the thicker spray helped even it out. It would seem all my problems can be attributed to my poor spray paint technique on such a large surface (I was fine on the legs and have previously spray painted hardware with no problem). I'm glad I decided to try spray paint, especially on such a used and abused surface like a coffee table. It will be more durable by far than regular latex paint.

But it might be a really long time before I try to do it again.

Monday, June 25, 2012

Gray Glaze

Fortunately the red table spray paint mess didn't mean I'd lost my touch completely on refinishing furniture. I forgot to take a "before" picture of this table from a distance, but just imagine a honey pine, boring old end table with a drawer. We got it right when bought our house, when I was trying to fill the space with whatever cheap craigslist furniture I could find. The shape and size suited us for our corner table, but the color was boring, so I always knew it was destined for something more.

First, I filled in the scrapes with wood filler. This was my first try with wood filler on furniture and I must say I need practice. The scratches got shallower but are still evident on the finished piece. I'll do a better job next time of putting in extra and then sanding it flat.

No spray paint this time, just a quick brush coat of Kilz Clean Start primer:
Then two coats of Sherwin William's Blue Mosque. Bonus points to anyone who knows where this paint came from. Anyone? OK, well I'll just tell you and save you the suspense: it was the first color we tried in our bathroom back in 2009. You can find the post here. Turns out it was too bright for a bathroom but the perfect turquoise for an accent table in our living room, almost 3 years later.
This project was more than just an ordinary paint one. I wanted to branch out into special effect glazing. I already had the Martha Stewart Painting Tool Kit and decided I wanted to try herringbone texture.


To start, I used 2'' tape to make even strips across the top surface.
Then I removed every other strip--instant stripes! I did this on the drawer as well.
I mixed the glaze with Sherwin Williams Peppercorn paint (the same color I used on this). The ratios is 4 parts glaze to 1 part paint. For some reason, I lost all concept of how much glaze I would need on the project, and mixed a whole jar full. I used probably about a quarter cup, so I have a lot of extra.
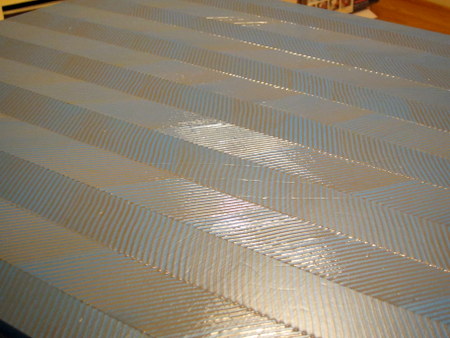
I applied the paint one row at a time and used the herringbone tool (the bottom-most right one in the kit above) to make lots of angled stripes. The glaze is basically thick and slow-drying paint, so I could manipulate it and wipe it away as much as needed for about 10-15 minutes.

When that side was totally dry, I switched which row had tape and then applied the glaze angled in the other direction (so that it would make the "v" of a herringbone pattern). These pictures show the difference between the wet and dry glaze:

I didn't bother to show you the part where I coated it with polycrylic. For that, I did use spray--it's much faster than applying with a brush or a sponge. I did three or four really thin coats to seal the paint and (hopefully) prevent chipping.

Here it is, all done! I hope to find a quirky drawer nob, but until I do, I just painted the old one gray. You can see from the varying thickness of the gray on the surface that the glaze isn't as even as maybe it should be. But I kinda like it--gives it character and creates almost an optical illusion look.

I was surprised by how little effort this cool effect took. I would definitely do it again. It definitely has more character now than it did before.

Monday, June 18, 2012

Things that go growl in the night

Here's a tale of two hopefully not unrelated episodes--

The first is that every once in a while, usually in the evening, I have been hearing scurrying behind our kitchen cabinets. I know I'm not imagining it, because the cats also seem to respond to the noise, looking around curiously like they know something is there, but they're not quite sure exactly where or how to get at it.

The sounds was coming from this set of cabinets:
This is an exterior wall, so when I couldn't find any kind of mouse/rat/bird/bat/crazy big insect activity coming from inside the cabinets, we checked the gutters on the other side of the brick, but also saw nothing. We did a quick inspection for any holes nearby, but besides the microwave vent, which is tiny and louvered, nothing is an obvious entrance. We never did figure out what's going on behind there...

But then a couple of nights ago, we woke up to the sound of one of our cats yowling and growling (yes, growling--it was a spooky sound coming out of a cat). He would come in and growl at me in the bedroom and then when I tried to see what was the matter, he would run to the stairs. I wanted to ignore him, since it was 5am, but the sound actually made me scared we had some emergency health issue. D finally went to investigate and let the cat lead him downstairs. Then I heard him shout, so of course by then my adrenaline was racing and I went down too.

A mouse, very dead and partially devoured, was stuck in kitty's teeth. As we ran for paper towels, gloves, etc, I obviously was too busy to get a picture. But let's pretend it was something like this:
Because seriously the real picture would be much much more disturbing.

D pulled it out of the cat's mouth finally (after a brief moment where it looked like the cat was going to try to swallow it whole and had just its behind and tail hanging out and I had visions of how we might have to do the kitty Heimlich) and threw it outside in the garbage.

Since then, I haven't heard any noises. Now I'm not saying the two incidents are related, but it sure would be nice to have that loose end tied up.

(Even if the sound I was hearing was that mouse and it is now in mousy heaven, that still doesn't really solve the question of how it got in to begin with. But I'm trying not to think of that right now.)

Sunday, June 10, 2012

Refinish Fail

I really wanted to wait to post this project until it was done. But if I did that, at this rate I might never post again. So here goes--you get all the sad details about how hard we are working to transform this table into our new coffee table.

It all started when my friend bought a house complete with furniture, since the previous owners were retiring to Florida and didn't want their things. One of the pieces was a coffee table that they handed over to us. It was the perfect shape and size (no drawers, but hey, can't complain about free furniture).
 Not so much the perfect color or design. Check out those flowers and that awful golden beige.

Obviously we were going to have to refinish it. My first plan was to paint the legs brick red and strip the surface down to bare wood. First interesting set-back (and probably the root of all the other set-backs): I sanded and sanded and sanded but never got to wood. I got through the paint to white primer and then just reached more beige. It turned out that the top was some kind of artificial fiberboard. By the time I figured it out, I was left with a top surface sanded to varying depths--some exposed fiberboard, some primer, and some spots that were just scuffed up. I figured that would be sufficient for the primer.

I decided that for this project, I would try spray paint. It sounded more durable, which is important for a coffee table where we put our feet, our dinners, our late-night snacks, etc. It also sounded faster, with quick dry times.

First, I put on the primer--heavy-duty Zinsser Primer/Sealer to try to even out the different finishes of the surface. After two coats, it looked ready for the next step.
We used Rustoleum in Claret Wine. We noticed it was spraying unevenly, but figured that was just the first coat:
Coats two and three removed the white but still didn't look even.

We finally decided to try to disguise the uneven finish on the top (the legs came out just fine). I used gray stain and some sand paper to distress it. I liked the way it looked overall but was still unhappy with the top, which continued to look uneven:
Fast forward two weeks. I tried to get used to it but still didn't like it. So I decided to redo the top, sanding it lightly to rough it up and then taping it off from the rest, because I liked the way the legs came out.
 This time we propped it up to see if spray at that angle would help:
OK, primer looked okay...This time we tried Kilz oil-based primer.
 Redid the red. One coat, then two. Verdict: Still uneven!!!
Back to the drawing board, I guess. Our plan now is to try to paint brush on a primer, so we can get a thicker application. I can definitely conclude that spray paint is not faster, though I don't know if I can judge from this one project alone. It certainly seems durable--if only I could make it look nice! If you have any suggestions, please send them my way.