Fortunately the
red table spray paint mess didn't mean I'd lost my touch completely on refinishing furniture. I forgot to take a "before" picture of this table from a distance, but just imagine a honey pine, boring old end table with a drawer. We got it right when bought our house, when I was trying to fill the space with whatever cheap craigslist furniture I could find. The shape and size suited us for our corner table, but the color was boring, so I always knew it was destined for something more.
First, I filled in the scrapes with wood filler. This was my first try with wood filler on furniture and I must say I need practice. The scratches got shallower but are still evident on the finished piece. I'll do a better job next time of putting in extra and then sanding it flat.
No spray paint this time, just a quick brush coat of
Kilz Clean Start primer:
Then two coats of Sherwin William's Blue Mosque. Bonus points to anyone who knows where this paint came from. Anyone? OK, well I'll just tell you and save you the suspense: it was the first color we tried in our bathroom back in 2009. You can find the post
here. Turns out it was too bright for a bathroom but the perfect turquoise for an accent table in our living room, almost 3 years later.
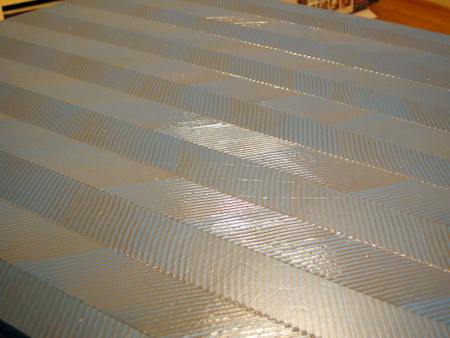
This project was more than just an ordinary paint one. I wanted to branch out into special effect glazing. I already had the
Martha Stewart Painting Tool Kit and decided I wanted to try herringbone texture.
To start, I used 2'' tape to make even strips across the top surface.
Then I removed every other strip--instant stripes! I did this on the drawer as well.
I mixed the glaze with Sherwin Williams Peppercorn paint (the same color I used on
this). The ratios is 4 parts glaze to 1 part paint. For some reason, I lost all concept of how much glaze I would need on the project, and mixed a whole jar full. I used probably about a quarter cup, so I have a lot of extra.
I applied the paint one row at a time and used the herringbone tool (the bottom-most right one in the kit above) to make lots of angled stripes. The glaze is basically thick and slow-drying paint, so I could manipulate it and wipe it away as much as needed for about 10-15 minutes.
When that side was totally dry, I switched which row had tape and then applied the glaze angled in the other direction (so that it would make the "v" of a herringbone pattern). These pictures show the difference between the wet and dry glaze:
I didn't bother to show you the part where I coated it with polycrylic. For that, I did use spray--it's much faster than applying with a brush or a sponge. I did three or four really thin coats to seal the paint and (hopefully) prevent chipping.
Here it is, all done! I hope to find a quirky drawer nob, but until I do, I just painted the old one gray. You can see from the varying thickness of the gray on the surface that the glaze isn't as even as maybe it should be. But I kinda like it--gives it character and creates almost an optical illusion look.
I was surprised by how little effort this cool effect took. I would definitely do it again. It definitely has more character now than it did before.


No comments:
Post a Comment