Please share your opinions and expertise since we need all the help we can get!

Sunday, August 28, 2022

New Ceiling

We really haven't been left a whole month with a big hole in our ceiling, I just didn't get around to posting an update. You may recall that when last we visited the bathroom, the pipe was fixed but the ceiling looked like this. We were understandably eager to get rid of the giant hole.

Well it was definitely one of those instances where things have to get worse before they get better. So much of the drywall was damp and swollen that the handyman said it made more sense to just remove the whole ceiling. It's not a very big room, after all. He also did the ceiling inside the shower stall as well, It didn't suffer any damage from the leak but it had always had a strange paint bubble that couldn't really be fixed, potentially due to some old water damage. So one day into the repair (and after removing everything from the room like curtains, towels, shelves, wall hangings, etc, here was the view:
The next day, it already looked much better:
After that came four days of quick visits by the handyman for layer upon layer of skim coating and priming. It was good confirmation that no matter how skilled you are at drywall installation, there are no ways to take shortcuts on this step Also based on the time each layer took, it confirmed for me that we made the right choice in hiring someone else.

The progress made through al the skim coating days seemed so negligible that we didn't take incremental photos. After a few days of that and two layers of paint, we were back in business. Well, sort of. Not pictured is the full 2-3 hours I spent in that tiny room cleaning all the drywall dust and debris from every ledge, crevice, and grout line. But then it was finally time to move the things back in. As good as new. Kind of crazy that after all that, the best we could hope for was that it looked the same as it did before. Guess that's the nature of a repair compared to a remodel. The paint bubbles are gone at least, and the ceiling is nice and smooth.
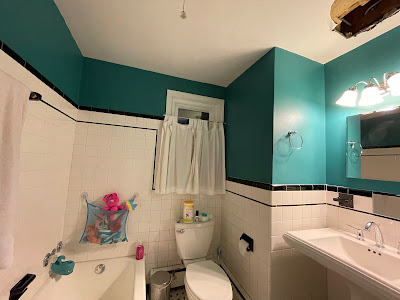
I never did get a before picture, but above this light is where the paint bubble has been since we first painted in 2009.
And here is the view inside the shower stall, also bubble-free.
A note about the paint. When we painted, we used Sherwin Williams in Grand Canal. We still had some of the original can. Our handyman preferred Benjamin Moore so he took our can, with the color composition, over to be paint matched. It really does look the same, so either he did an excellent job painting, or they truly were mostly identical (at least enough to cover one up with the other invisibly).


As I'm writing this post, I'm realizing that he never told us what the ceiling paint was. When he asked for our preferences, we simply said we didn't want optic white out of the can (like we mistakenly had used the previous time). But he didn't leave us the can so I probably ought to send him a message and find out what it was, just in case.

Edited to add in the paint color for the ceiling: Benjamin Moore Regal Select, eggshell finish in Brilliant White (if I'm reading the label correctly).


Hopefully that's the last we hear from our pipes for a while...

Tuesday, August 2, 2022

Two pinholes for the price of...two

A couple of weeks ago, on a Thursday, I came home to find some moisture on the wall outside the access door where our main water line comes into the house. That didn't seem good. Fortunately, it also wasn't bad, just a little damp

If you look at the lower edge of the door, you can see the water stain. Whatever was causing the problem, I'd obviously caught it shortly after it started. I couldn't see an obvious problem, so I put out some bowls to see if they would gather water.
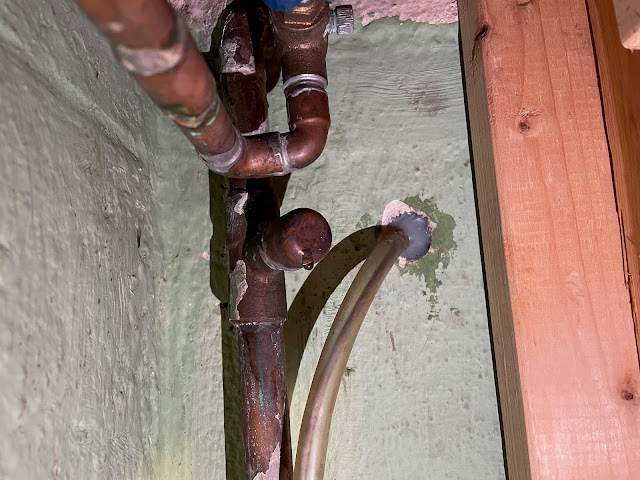
They didn't. The problem was even smaller than we thought. A tiny pinhole in this cap--sometimes it dripped, and sometimes it sprayed a very fine spray. Minor but annoying problem.
A plumber was able to come the next day, Friday, to replace the cap. He said it was slightly too big and had been filled up with solder to seal. It managed for years, apparently, but the stress of being the wrong size--he thought--probably finally caused it to leak. Easy fix.

Fast forward to later that night, as we were about to brush teeth and go to bed. We entered the bathroom and:
Yeah....it was going to be a long weekend. Not picture is the part where we stabbed this giant water-filled paint bubble with a knitting needle and let it drain into a bucket. You can see in this picture above that while most of the water collected in what was already an annoying air bubble in the paint from literally when we first moved in, it also had seeped into other areas where two drywall pieces met, near the upper right corner of the picture.

So instead of going to bed on time, we started pulling off pieces of paint and drywall from the ceiling. Totally normal Friday night--isn't this how you spend yours?

We couldn't see much up there, but there were clearly older and stickier areas to both the electrical wiring and the copper pipes. By this time, we'd gone back down to the water main and turned off the water to the house as well.


For some reason, there was a LOT of insulation in our ceiling. Since this is the area between the first and second floors, it doesn't seem particularly helpful for energy efficiency. The only thing we can think of is that the contractors put it in when doing the second floor bathroom. We had said to insulate everything, but I guess we assumed "outer wall" was implied.
Once everything was cleared away, we were fortunately able to find the leak quickly--ANOTHER pinhole leak. The hole this time was on the top of the pipe and dripping out everywhere, but D was able to use some plumbers tape to reduce the leak and at least direct it down. For the rest of the weekend, we were able to catch the drips in a pyrex measuring cup on one of the wooden crossbeams. We turned off the water to the house when we went to bed, but could run it, under supervision, during the day. Of course we failed to get a picture of that phase.

Then the following Monday, the plumber came and charged us a lot of money to replace about a 4-inch piece of copper pipe. He had to cut the beam to get to it, but that beam seemed to just be there to help hold up drywall.
And so this has been our view now for just over a week, with a hole over the sink. I'm so glad the leak is fixed but this is not the most lovely sight. Someone came out to give us estimates on the drywall replacement and thought that quite a lot of it is soggy and needs to be replaced. So we're going to redo the whole ceiling. The silver lining here is that the ceiling in the shower stall is going to get replaced too, which means we'll finally be rid of those annoying bubbles in the ceiling from over a decade ago. So...yay? I guess.

Work starts tomorrow. Fingers crossed for a smooth repair. We're also trying not to think too much about how we just had two pinhole leaks in 24 hours because well what's the point in that?

Thursday, July 21, 2022

Summer Garden

Last fall we uprooted a lot of plants from our front garden to fill it with native pollinators. We had two goals. The first, of course, was to get rid of invasive species and plant things that will attract and nourish birds, bees, and butterflies. The second was to plant things that could thrive in our native soil and with our local weather. So it seems like a good idea to check in, now when our garden should be in full bloom.  Let's compare:

Last fall, we planted cardinal flower

Now, with lots more color!

Let's break it down. Starting at the leftmost edge, near our troublesome downspout, here's the view last fall:

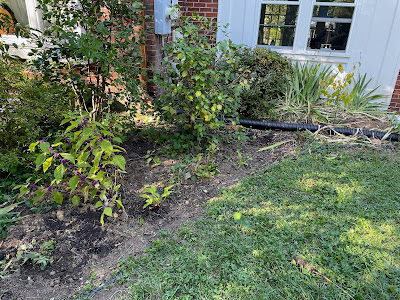
And here it is now (the angle is a little different to highlight some of our less successful areas):
Visible here should be a few different varieties of milkweed but our "Red Butterfly" Asclepius doesn't seem to have come back, just the swamp milkweed. The American Beautyberry is also looking pretty sad:
Just some spindly twigs. We tried loosening up the earth last weekend (it was packed down, maybe due to some of the water drainage issues) and are wondering if there is simply too much sun here to grow certain types of plants. It's clear this corner still needs some work, we're just not sure exactly what.

Moving along, here's the fall view:
You can scroll back up to see the first summer picture for a good overall scene of this, but here are my favorite images to capture this section:


Coneflower (echinacea), Black-eyed Susans (Rudbeckia), and cardinal flowers (Lobelia cardinalis) all came back, as did some of the Russian sage. The bee balm (monarda) "Jacob Cline" came back too--about a month before the rest so it's already on the way out. 

Moving to the garden on the other side of the house, here's fall:
And here's summer. It's not particularly exciting because the deer seem to have gotten to the yellow Black-eyed Susan flowers but at least the plants themselves seem to have survived.
Then further down, we planted more Black-eyed Susans, another Beautyberry bush, and a Linder Benzoin "spicebush":
Many of the Black-eyed Susans have come back and this Beautyberry bush is looking very happy, unlike the one on the other side of the house. No little purple berries yet, but that's to be expected. It blooms in June and July and grows berries in August and September, so we're right on track.
Here's the spicebush--not particularly exciting at the moment. It's not even taller than our iris greens. But on the other hand, it is green and not wilting or anything so I'l call that a win. I do hope it gets bigger though, since a quick google search suggests that it can grow 1-2' a year and this little guy has barely budged.
Given our track record, I'd call this a success so far. One corner of the garden really seems to be struggling as is the Hawthorn tree nearby (more on that later), so maybe that side of the house just doesn't have enough...something (not sure what that something is). But the rest seems relatively happy and full of native pollinators.
Saturday, July 16, 2022

Drinking Problem

We have a problem with our alcohol. No, it's not what you think. We don't drink enough of it. Or we don't drink enough of it based on the rate we buy it. Our liquor, a modest selection, has lived in our pantry closet since we bought this house. But thanks to maturing taste buds and a pandemic that led us to become our own fancy bartenders, we've accumulated more than we can fit. It's starting to become an issue of survival. I recently found myself asking: "Do we really need that rice cooker? I need to make space for these bottles."

We decided that the best solution would be to buy a liquor cabinet or something like that to store at least some of these, but exactly what to buy and where to put it is a challenge. We have filled up nearly all available space in our house for furniture, and it wouldn't really. make sense to move this far from the kitchen/dining area anyway.

This is pretty much the only wall available to us in the area. 
I really love our sideboard and the pictures above it, so we're trying to avoid adding a whole china cabinet-style thing here, or stacking something above the sideboard. That only leaves space on both sides (the small rolling open storage our instant pot lives on can definitely get moved out, especially if said cabinet solution offers some hidden storage for the water bottles and lunch boxes that live on the bottom shelves). The cat water fountain (yes, our cat only drinks from a fountain) could move to the other side of the sideboard, freeing up the corner on the left. And...that's pretty much it for space options.

So I've started exploring our options. As always, I started with IKEA and found I really liked this option, the BILLY/OXBERG:


Or the GODMORGON (I guess this technically is a bathroom cabinet but I think it could look good anywhere):

D is worried that these would look awkward right next to our sideboard, since the styles don't really match and the sideboard has elaborate scrolling and trim that wouldn't let us push this cabinet right up next to it. So he's thinking a corner cabinet might be better, so that we don't have to try to line them up together. Summon good old HEMNES:


This would take some work because we both agree we'd like a glass door to display the prettier bottles, along with maybe some lighting, like a much smaller version of this hack we found on the internet (if you haven't guess already this post is really just my "mood board" and an invitation for you to make suggestions):
I'm also not sure that the HEMNES could hold more than a few bottles, which makes it feel sort of pointless.

Then we departed from IKEA's choices to see what is out there. And oh boy things got expensive quickly. This cabinet, from a furniture company I've never heard of--Ballard Designs--immediately seemed like it was exactly what we wanted:

Over $1,000...great....Maybe I should get back to that $100 BILLY bookshelf and door.

Here's another random internet picture for what I think I want:
Now that we've seen it, D and I both think that a rounded front looks elegant and that having trim would help it blend more into the corner almost like it was part of the house (we've even talked about potentially painting something to match our walls so it looked more like a built-in).

We're not even close to a solution but I thought it would be fun to post this and see if anyone else has ideas. We need something that won't take up much room and offers some storage behind clear glass doors (because some of those bottles are really pretty) and some closed storage, but minimal open storage where things can get really dusty. It can't take up much space and ideally has to go next to the existing sideboard at the edge of our kitchen (either alongside it or caddy corner with it if it's a corner unit). If we can find the time, this is probably a good time to go antiquing...Leave a comment with your ideas (besides the obvious one to buy less liquor--we're too far gone for that one)!


Tuesday, July 12, 2022

Our Minds are in the Gutters

It was pretty obvious that our front gutters had a problem. This was the way the water was flowing during our last summer thunderstorm:

Isn't the water supposed to go INTO the downspout?

The gutter is a little bent up from when a tree branch fell into it years ago, but it has always worked just fine despite that. We thought this was an installation issue after we got new siding. The siding company had had to come back and tighten the new back gutters, so it was possible the blockages was related to re-installing the front. But since these were our original copper gutters and downspout, we didn't want to drag them back out if it wasn't due to their installation. We figured we'd see what we could do first.

Cue a very long morning that involved attempting to send water down--and a plumbing snake up--the downspout. Here we are trying to fill the downspout with a hose to see how quickly it filled up. It seemed like the clog was at the bottom, based on what we could hear. We also couldn't push the hose all the way through to the bottom, so something was likely in the way.

Time for the snake (well, first, time to spend 10 minutes trying to *find* the snake in the basement, shed, and garage...). After detaching the downspout from the corrugated pipe, D spent quite a while trying to unclog everything, since it seemed like our best option. The snake did make it all the way up the downspout and barely dislodged anything, but repeated attempts to send water down it made it clear the clog was still there. He spent a while doing this over and over again, each time pulling out only a small amount of debris.
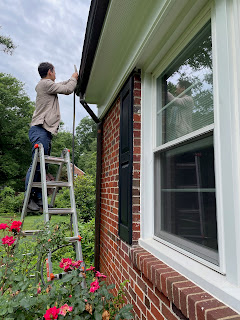
We hesitated to move on to the next step but reluctantly decided to cut the copper pipe. From knocking on the downspout and listening to the sound, we were pretty confident the clog was just past the bend. We didn't want to lose the angle though, so we cut to where we figured we'd be able to reach up and get it. We figured we could always cut higher if we had to.
And there it was! So much debris. Lots of leaves and decaying gunk. Fortunately no squirrel bodies this time (you think I'm kidding but note there's a link to an old post so...). I guess the plumber's snake was just too thin and flexible to break up all the debris.
This time we could send the hose all the way through. 
Obviously we couldn't reattach the copper part that D had sawed off (we have a lot of fancy toys but not a heavy duty soldering iron). So we just used more corrugated pipe to bridge the gap.
The next step, obviously, is buying some gutter guards. Our gutters are narrow (the siding folks said they don't usually install this width anymore, opting for greater capacity) but it does seem like a few options are available for sale. We're just trying to figure out what to purchase. Hopefully we get the guards on before everything clogs again.

Monday, June 20, 2022

All Charged Up

We recently got an electric vehicle--good timing as gas prices climb. We could charge it from the outlet in our garage with the included charger cable, but only at a rate of something like a 1-2% every hour. Fortunately, we had planned for this. Years ago, when we converted the breezeway to our sunroom and created and ran electricity to the attic, D--knowing that one day he would convince me to get an EV--had our contractors run a 240V line from the circuit box to the garage. It wasn't connected to anything, but the electrician at the time confirmed we have enough room in the circuit box to eventually activate it.

Fast forward almost six years and we had our E vehicle. We had an electrician come out and connect everything. He was impressed by our prescient decision to have that wired run back in 2016, now that copper wiring has quadrupled in price. He tied the cable into the circuit box and to our wallbox charging management system, a friendly looking glowing box that now lives just inside our garage door.

Next, we hd to get the cable outside, since our garage is really more of a workshop and certainly not a place to park our car. We laid out a garage door strip, cut out a channel, and ran the cable along it.
D created a cute little wooden guide with a copper bracket to keep the cable in place. The seal keeps the garage door about a half inch from the concrete floor and gives us exactly enough clearance for our cable.
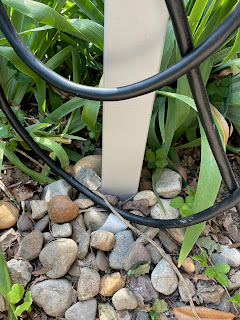
Then D primed and painted a 4'' fence post to match the new pearl gray siding and topped with an adorable copper top. He also treated the bottom with something to protect it from the constant moisture of being buried in the ground.
I think it looks pretty nice, given that it's just there to hold up our charging cable.

For now at least, it's just sitting in probably a one-foot hole filled with gravel. This will apparently also help to keep the bottom from rotting by helping to drain rain water out into the dirt rather than sitting next to the post.
A clever and aesthetically pleasing solution to our new charging unit.