Please share your opinions and expertise since we need all the help we can get!

Thursday, July 21, 2022

Summer Garden

Last fall we uprooted a lot of plants from our front garden to fill it with native pollinators. We had two goals. The first, of course, was to get rid of invasive species and plant things that will attract and nourish birds, bees, and butterflies. The second was to plant things that could thrive in our native soil and with our local weather. So it seems like a good idea to check in, now when our garden should be in full bloom.  Let's compare:

Last fall, we planted cardinal flower

Now, with lots more color!

Let's break it down. Starting at the leftmost edge, near our troublesome downspout, here's the view last fall:

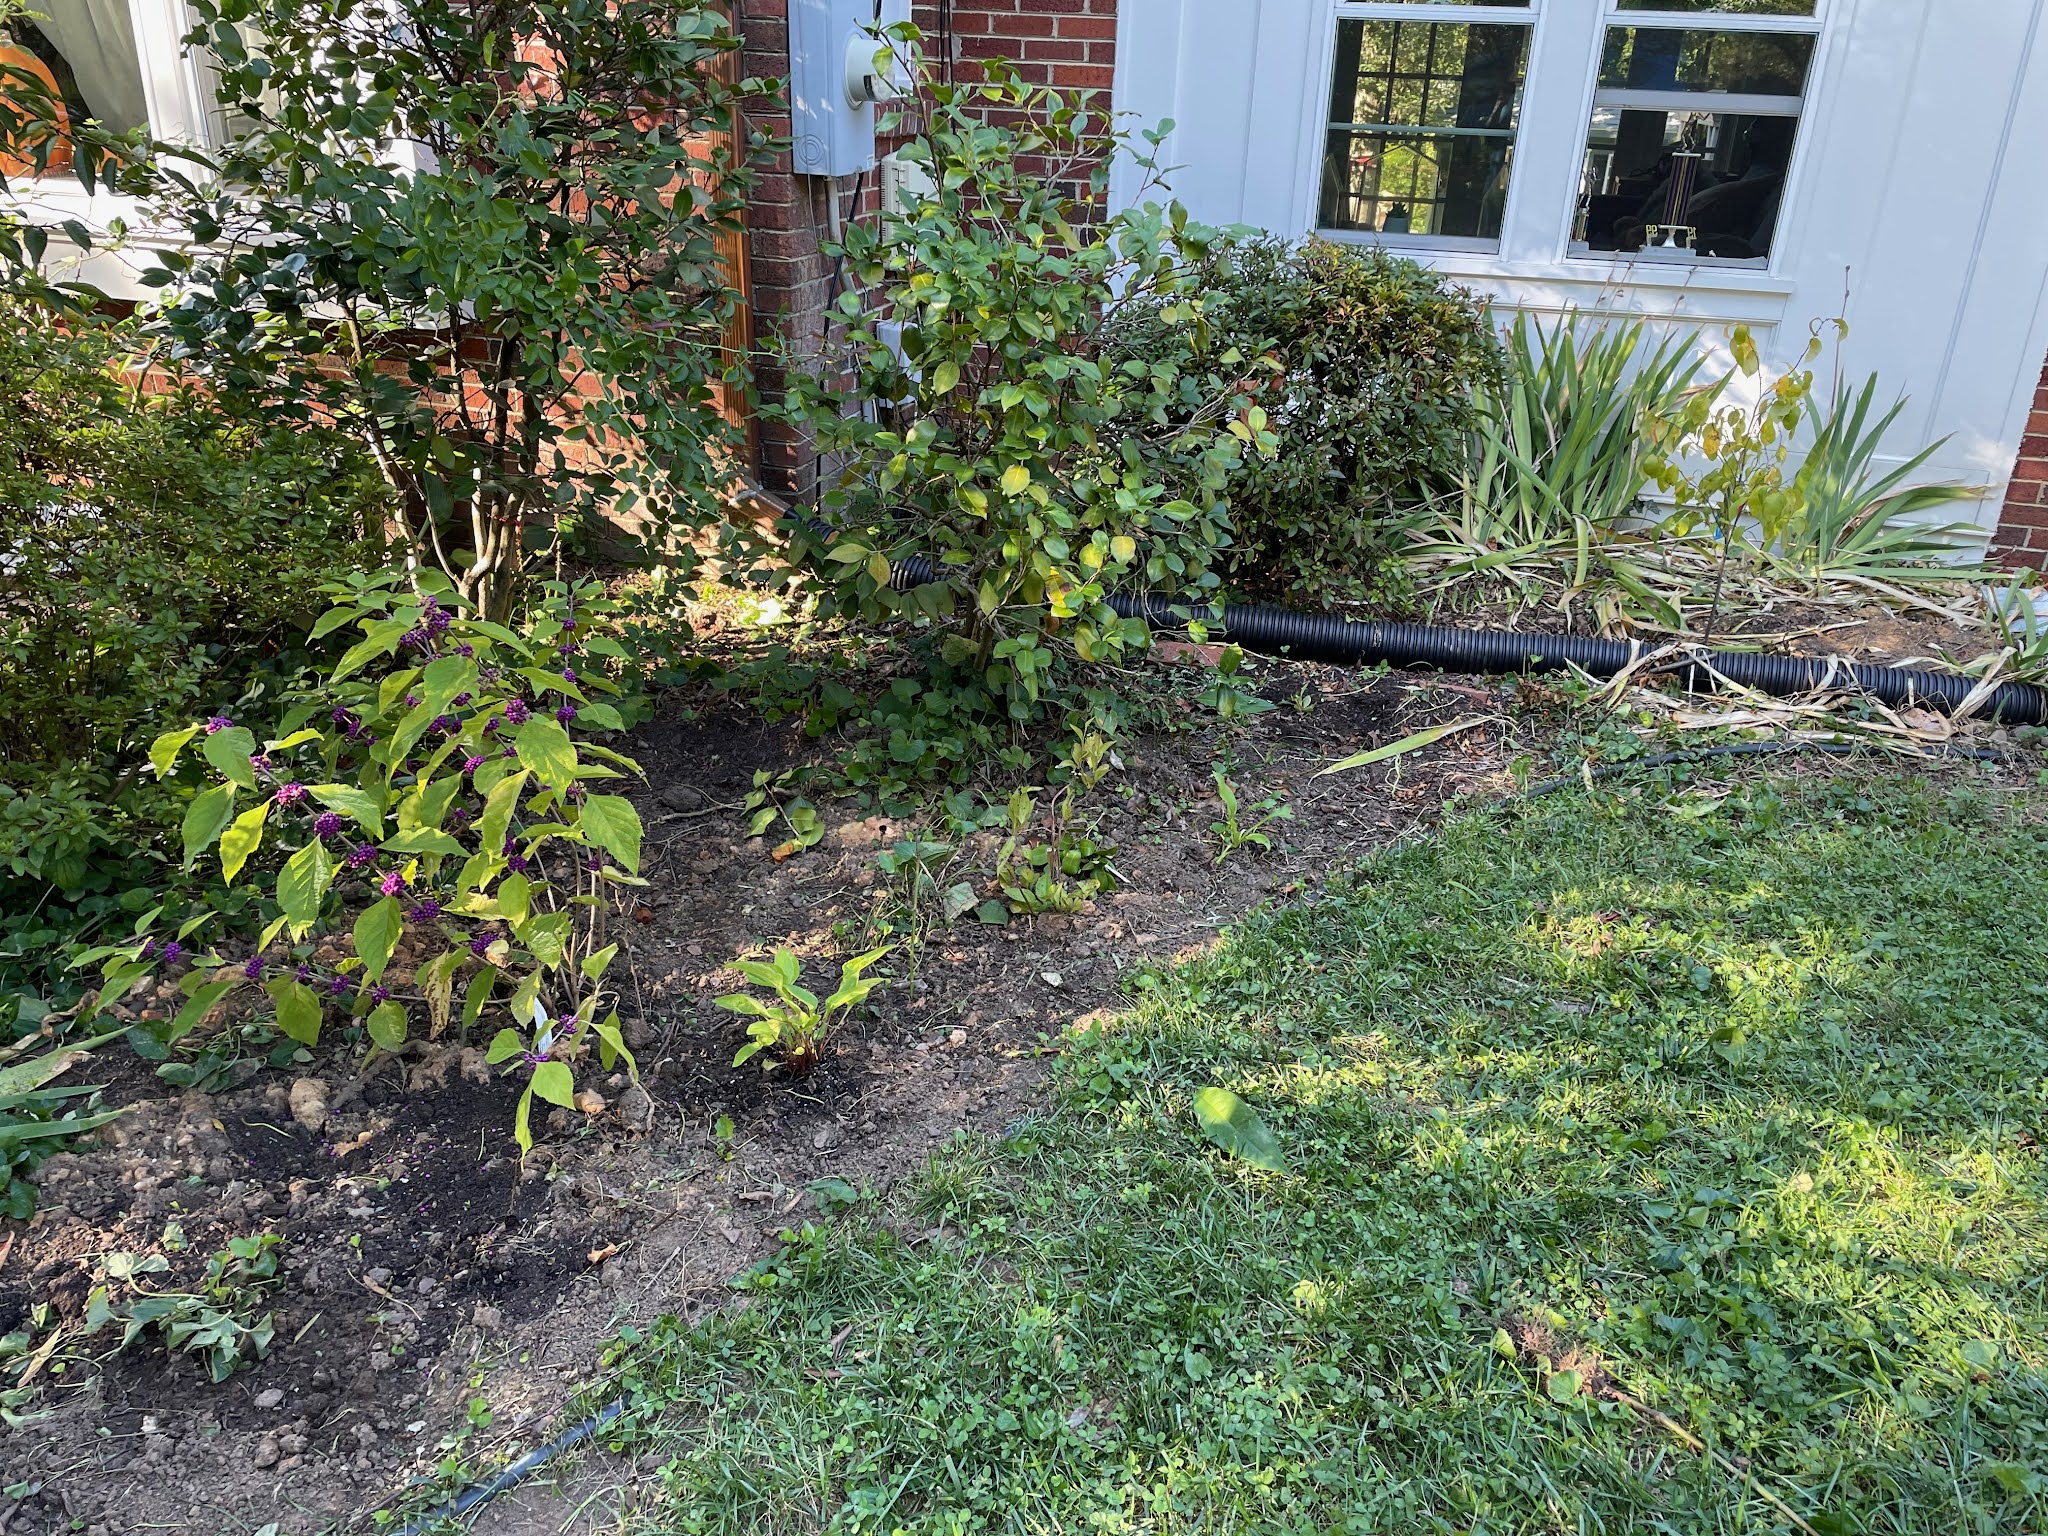
And here it is now (the angle is a little different to highlight some of our less successful areas):
Visible here should be a few different varieties of milkweed but our "Red Butterfly" Asclepius doesn't seem to have come back, just the swamp milkweed. The American Beautyberry is also looking pretty sad:
Just some spindly twigs. We tried loosening up the earth last weekend (it was packed down, maybe due to some of the water drainage issues) and are wondering if there is simply too much sun here to grow certain types of plants. It's clear this corner still needs some work, we're just not sure exactly what.

Moving along, here's the fall view:
You can scroll back up to see the first summer picture for a good overall scene of this, but here are my favorite images to capture this section:


Coneflower (echinacea), Black-eyed Susans (Rudbeckia), and cardinal flowers (Lobelia cardinalis) all came back, as did some of the Russian sage. The bee balm (monarda) "Jacob Cline" came back too--about a month before the rest so it's already on the way out. 

Moving to the garden on the other side of the house, here's fall:
And here's summer. It's not particularly exciting because the deer seem to have gotten to the yellow Black-eyed Susan flowers but at least the plants themselves seem to have survived.
Then further down, we planted more Black-eyed Susans, another Beautyberry bush, and a Linder Benzoin "spicebush":
Many of the Black-eyed Susans have come back and this Beautyberry bush is looking very happy, unlike the one on the other side of the house. No little purple berries yet, but that's to be expected. It blooms in June and July and grows berries in August and September, so we're right on track.
Here's the spicebush--not particularly exciting at the moment. It's not even taller than our iris greens. But on the other hand, it is green and not wilting or anything so I'l call that a win. I do hope it gets bigger though, since a quick google search suggests that it can grow 1-2' a year and this little guy has barely budged.
Given our track record, I'd call this a success so far. One corner of the garden really seems to be struggling as is the Hawthorn tree nearby (more on that later), so maybe that side of the house just doesn't have enough...something (not sure what that something is). But the rest seems relatively happy and full of native pollinators.

Saturday, July 16, 2022

Drinking Problem

We have a problem with our alcohol. No, it's not what you think. We don't drink enough of it. Or we don't drink enough of it based on the rate we buy it. Our liquor, a modest selection, has lived in our pantry closet since we bought this house. But thanks to maturing taste buds and a pandemic that led us to become our own fancy bartenders, we've accumulated more than we can fit. It's starting to become an issue of survival. I recently found myself asking: "Do we really need that rice cooker? I need to make space for these bottles."

We decided that the best solution would be to buy a liquor cabinet or something like that to store at least some of these, but exactly what to buy and where to put it is a challenge. We have filled up nearly all available space in our house for furniture, and it wouldn't really. make sense to move this far from the kitchen/dining area anyway.

This is pretty much the only wall available to us in the area. 
I really love our sideboard and the pictures above it, so we're trying to avoid adding a whole china cabinet-style thing here, or stacking something above the sideboard. That only leaves space on both sides (the small rolling open storage our instant pot lives on can definitely get moved out, especially if said cabinet solution offers some hidden storage for the water bottles and lunch boxes that live on the bottom shelves). The cat water fountain (yes, our cat only drinks from a fountain) could move to the other side of the sideboard, freeing up the corner on the left. And...that's pretty much it for space options.

So I've started exploring our options. As always, I started with IKEA and found I really liked this option, the BILLY/OXBERG:


Or the GODMORGON (I guess this technically is a bathroom cabinet but I think it could look good anywhere):

D is worried that these would look awkward right next to our sideboard, since the styles don't really match and the sideboard has elaborate scrolling and trim that wouldn't let us push this cabinet right up next to it. So he's thinking a corner cabinet might be better, so that we don't have to try to line them up together. Summon good old HEMNES:


This would take some work because we both agree we'd like a glass door to display the prettier bottles, along with maybe some lighting, like a much smaller version of this hack we found on the internet (if you haven't guess already this post is really just my "mood board" and an invitation for you to make suggestions):
I'm also not sure that the HEMNES could hold more than a few bottles, which makes it feel sort of pointless.

Then we departed from IKEA's choices to see what is out there. And oh boy things got expensive quickly. This cabinet, from a furniture company I've never heard of--Ballard Designs--immediately seemed like it was exactly what we wanted:

Over $1,000...great....Maybe I should get back to that $100 BILLY bookshelf and door.

Here's another random internet picture for what I think I want:
Now that we've seen it, D and I both think that a rounded front looks elegant and that having trim would help it blend more into the corner almost like it was part of the house (we've even talked about potentially painting something to match our walls so it looked more like a built-in).

We're not even close to a solution but I thought it would be fun to post this and see if anyone else has ideas. We need something that won't take up much room and offers some storage behind clear glass doors (because some of those bottles are really pretty) and some closed storage, but minimal open storage where things can get really dusty. It can't take up much space and ideally has to go next to the existing sideboard at the edge of our kitchen (either alongside it or caddy corner with it if it's a corner unit). If we can find the time, this is probably a good time to go antiquing...Leave a comment with your ideas (besides the obvious one to buy less liquor--we're too far gone for that one)!


Tuesday, July 12, 2022

Our Minds are in the Gutters

It was pretty obvious that our front gutters had a problem. This was the way the water was flowing during our last summer thunderstorm:

Isn't the water supposed to go INTO the downspout?

The gutter is a little bent up from when a tree branch fell into it years ago, but it has always worked just fine despite that. We thought this was an installation issue after we got new siding. The siding company had had to come back and tighten the new back gutters, so it was possible the blockages was related to re-installing the front. But since these were our original copper gutters and downspout, we didn't want to drag them back out if it wasn't due to their installation. We figured we'd see what we could do first.

Cue a very long morning that involved attempting to send water down--and a plumbing snake up--the downspout. Here we are trying to fill the downspout with a hose to see how quickly it filled up. It seemed like the clog was at the bottom, based on what we could hear. We also couldn't push the hose all the way through to the bottom, so something was likely in the way.

Time for the snake (well, first, time to spend 10 minutes trying to *find* the snake in the basement, shed, and garage...). After detaching the downspout from the corrugated pipe, D spent quite a while trying to unclog everything, since it seemed like our best option. The snake did make it all the way up the downspout and barely dislodged anything, but repeated attempts to send water down it made it clear the clog was still there. He spent a while doing this over and over again, each time pulling out only a small amount of debris.
We hesitated to move on to the next step but reluctantly decided to cut the copper pipe. From knocking on the downspout and listening to the sound, we were pretty confident the clog was just past the bend. We didn't want to lose the angle though, so we cut to where we figured we'd be able to reach up and get it. We figured we could always cut higher if we had to.
And there it was! So much debris. Lots of leaves and decaying gunk. Fortunately no squirrel bodies this time (you think I'm kidding but note there's a link to an old post so...). I guess the plumber's snake was just too thin and flexible to break up all the debris.
This time we could send the hose all the way through. 
Obviously we couldn't reattach the copper part that D had sawed off (we have a lot of fancy toys but not a heavy duty soldering iron). So we just used more corrugated pipe to bridge the gap.
The next step, obviously, is buying some gutter guards. Our gutters are narrow (the siding folks said they don't usually install this width anymore, opting for greater capacity) but it does seem like a few options are available for sale. We're just trying to figure out what to purchase. Hopefully we get the guards on before everything clogs again.

Monday, June 20, 2022

All Charged Up

We recently got an electric vehicle--good timing as gas prices climb. We could charge it from the outlet in our garage with the included charger cable, but only at a rate of something like a 1-2% every hour. Fortunately, we had planned for this. Years ago, when we converted the breezeway to our sunroom and created and ran electricity to the attic, D--knowing that one day he would convince me to get an EV--had our contractors run a 240V line from the circuit box to the garage. It wasn't connected to anything, but the electrician at the time confirmed we have enough room in the circuit box to eventually activate it.

Fast forward almost six years and we had our E vehicle. We had an electrician come out and connect everything. He was impressed by our prescient decision to have that wired run back in 2016, now that copper wiring has quadrupled in price. He tied the cable into the circuit box and to our wallbox charging management system, a friendly looking glowing box that now lives just inside our garage door.

Next, we hd to get the cable outside, since our garage is really more of a workshop and certainly not a place to park our car. We laid out a garage door strip, cut out a channel, and ran the cable along it.
D created a cute little wooden guide with a copper bracket to keep the cable in place. The seal keeps the garage door about a half inch from the concrete floor and gives us exactly enough clearance for our cable.
Then D primed and painted a 4'' fence post to match the new pearl gray siding and topped with an adorable copper top. He also treated the bottom with something to protect it from the constant moisture of being buried in the ground.
I think it looks pretty nice, given that it's just there to hold up our charging cable.

For now at least, it's just sitting in probably a one-foot hole filled with gravel. This will apparently also help to keep the bottom from rotting by helping to drain rain water out into the dirt rather than sitting next to the post.
A clever and aesthetically pleasing solution to our new charging unit. 

Sunday, June 5, 2022

Sad Trees

 Late last summer into last fall, we started to realize there was something seriously wrong with some of our trees. The leaves of some of our newer trees, volunteer tulip poplars we planted at the curb and a purchased maple, were all turning black. At first, we thought it was damage related to having a banner cicada year, since we knew that cicadas can temporarily stress trees. Many were also sticky and attracting a lot of insects, and we knew that cicadas poop honeydew (yup, that's an actual thing) So we ignored the problem, thinking it would resolve on its own.

Tulip Poplar Leaf
Maple Leaf

But it got so sticky and gross looking that we did eventually decide to consult a tree expert. And it's good we did, since it turned out cicadas were not to blame. The real culprit was a pest called scale. Leucanium scale, to be specific, which feeds on the sap from shade trees, and tuliptree scale, which feeds on--yup, tulip poplars. We had not one variety of scale, but TWO. Once an expert pointed them out to us, we couldn't NOT see them. They are the bumpy knobby things on the bark, which we had just thought WAS bark. Nope--they are gross little pests that suck at the bark. And they also poop honeydew.


They aren't very firmly attached--they can be scraped off with a finger nail (ew!). We were advised that one way to remove the scales was to pick them off and dump them in a bucket of soapy water. But of course they were ALL over the trees, out of reach in many instances. So that wasn't a realistic option. The other option, according to the tree experts, was to apply a "horticultural oil" to the tree at the "dormant rate" once the trees had dropped their leaves. This meant we should apply more of the liquid, since the tree was dormant for winter. 
As the bottle says, it "kills insects by smothering." More ew. But the point is that it is thick and oily and basically stops airflow to whatever it touches (thus why you would not want to apply a heavy coat to the tree when it was still relying on its leaves for photosynthesis).

This post is a long time coming because I wanted to wait and be able to say whether it worked. Over the winter, it was hard to guess. One problem with killing through smothering is that the scale remained on the tree, but were desiccated and dead. Much easier to scrape off and, hopefully no longer a threat. There it is on my fingernail.
As spring buds emerged, there were clearly fewer scale on the tree--many probably fell off on their own or washed off with rain/snow. I could still see some, but they were obviously flattened and dead.
Now as we enter into late spring, I think it's safe to say that we stopped the scale damage--from last year, at least. It doesn't seem like scale can be prevented, just treated. So we'll have to hope they don't come back but at least we can be ready if they do. But at least the trees seem healthy and happy (judging by all the new growth) so far! 
Happy Maple Leaves


Happy Poplar Leaves


Tuesday, May 10, 2022

Exterior Makeover

Almost three months have gone by and most of that time was just waiting for work to begin (and doing other, unrelated, very bloggable projects) and then, a couples of weeks ago, the new siding makeover took place almost overnight. Well within a week, to be precise. A week of a crew of at least 6 people working 10 or more hours each day. It was quite a project. Let's go angle by angle, to walk through the process.

First the most important and changed view, in our opinion. D, who was the brainchild behind this project, was particularly annoyed by this approach to our house, which became all the more visible five years ago when the owners of the empty lot next to us cut down all their trees. With the trees cleared, we lost both our shade to that side of the house and any hope of hiding our white vinyl siding. Despite pressure washing it yearly, it just looked dingy. And even when it was clean, D hated it.

Here are some pictures in progress, which at the time, I intended to post as they went. But they moved so quickly it was hard to keep up.
Bye bye vinyl

In wrapping the house with whatever the pink and green layers are, we were also provided a little bit of additional insulation. Obviously that's not why we made the upgrade, but it doesn't hurt.
And here's the beautiful finished look. You can see in this picture below that the dormers had been updated by this point as well, but I'll talk about them in a moment. Though I was not so excited about this project as D, I have to admit even I get a little jolt of happiness when I come drive this way towards the house.
One comment before we move on, while it's easy to scroll between the top picture and this one, is about our shutters. Part of this upgrade included replacing the shutters, simply because they were old and because we preferred a panel design rather than the louvered style we had. But when they put these up, we immediately felt they were too small. The company will be giving us wider ones, but like everything else right now, there are supply chain issues and we'll get them when we get them. So we have too-skinny shutters for now. 

Now onto the back of the house. Here's our before picture. Everything white. Which, while boring, turned out to be very easy. You'll see what I mean in a moment.

Here's an in-progress shot. The team had to be very careful with the way they set up the scaffolding, since we have a slate roof. Usually, they can traipse all around the shingles. So our job was extra difficult and required much more careful set-ups, so that they could minimize the weight on our roof. We haven't had a slate person out yet to take a look, but we don't think more than a handful of slates got damaged, so that's pretty good. The siding company did warn us before beginning that they would do their best but that we had to accept some risk that slates would be damaged.

And...here we go for the final reveal in the back (complete with sun flare). A few things to note here--first, they replaced our brown metal gutters with white ones. It was a little jarring at first and not something we had discussed at all during the planning stage, but apparently gutters are supposed to match the trim and it really does blend right in. I'll have to get used to the very white downspouts (and, let's face it, they'll get dirty soon anyway--it's like white sneakers right out of the box).

Here's where we really started to question what should be gray and what should be white. It was easy before when EVERYTHING was white. But since we had white trim around the windows and doors, this wasn't as easy as just making everything gray, either. As we look at this, for example, we now think we probably ought to paint more gray around the patio door, like the border around the gray panels and the strip immediately above it. I'm interested to know if you agree. Fortunately, Hardie (the company that makes the siding) partners with Sherwin Williams so we can buy the paint easily (and, in fact, already have a can of it).

The side by the garage was also fully converted from vinyl to Hardie board, not that I usually even remember it's there with all the giant camellia bushes around it. It's pretty remarkable that they were able to get in there without disrupting the plants too much.

And we continue around to the front of our house, probably the most important view, despite my focus on the side. In addition to (obviously) focusing on the siding itself, one other thing we wanted to upgrade was the design surrounding the dormer windows. You can see in the "before" picture that it's just more horizontal siding. Oh horror! (I'm being sarcastic because honestly I did not care about this at all, but D hated it.)

The "after" picture shows how we changed up the design to create a cute little triangle top with white trim and solid gray sides. No horizontal lines for us (from the front view).

The front is where we really started to struggle with what should be white and what should be gray. My complaint was that we paid all this money to change the house color, and the front still was mostly white (we didn't pay for this upgrade specifically to change the color, but still...). As a result of my concern, we all agreed that the picture window should be gray--as it is in the above picture (my complain being before I took this picture). I lost the fight on making our entire frieze board (the wide board immediately above the brick) gray, since we established, after a long walk around our town, that the trim on most houses seems to match the windows.

So that still lives us with some question as to what should be gray and what should be white. I already asked about the back patio door. I thought we should perhaps paint the panel on our front door that is below the four glass windows, to mirror the gray panels in the sun room, here:
But now D thinks we should perhaps make that entire section around the windows gray, so that it's not a small gray panel framed in white but a gray panel (leaving only the window frames themselves white until you get to the frieze board). He's also considering whether to paint the panels of the garage gray, so that it looks like gray squares each framed in white. I think that might start to look a little weird and like a checkerboard.

And so, with the project mostly* done and with minimal hitches**, we still find ourselves wondering how it should look. Fortunately, this level of paint job is something we can do ourselves, so there's no pressure to decide and implement particularly quickly. Please let a comment and let me know your opinions about what, if anything, we should switch from white to gray.

*"Mostly" done because during a very rainy weekend, we noticed some issue with the back gutter, and we are still waiting on the shutters, as I mentioned above. 

**There was a dicey moment when the work crew arrived and thought they were trashing all of our gutters and giving us new ones (not in our contract anywhere, though they said it was--perhaps it was assumed since it's easier to just tear off old gutters than to carefully remove them). Thank goodness D was home to talk with them and emphasize that while we did not care a bit about the back gutters, our front gutters were copper and most definitely should not be replaced. Equally thank goodness, the gutters didn't wander off from our backyard for the 5 days or so that they were not attached to our house, copper prices being what they are.