Please share your opinions and expertise since we need all the help we can get!
Showing posts with label curtains. Show all posts

Sunday, August 26, 2018

The Kitchen, Finally

Let's cut to the chase, since I made you wait a few weeks, before I show you some process pictures. The bottom line is that we LOVE LOVE LOVE our new kitchen. We did not, however, love the process. I was too frustrated to blog about the progress while it was going on, after the initial few days. Communication issues, scheduling delays, etc. But it's all done now and we couldn't be happier with the final outcome. So without further ado, kitchen money shots:


So to backtrack a bit from where we left off earlier this month, here are some installation pictures for the counters. They set the join between the two pieces just to the left of the sink, using giant clamps to hold it in place.

I wasn't thrilled with the join. I had suggested going to the right of the sink (which is usually under the drying rack or at least a little more hidden) or at the sink itself, but our installer preferred to do it away from spots that are constantly wet and I think also wanted smaller pieces to work with, though he didn't admit it. The two sides weren't entirely smooth and I could feel a little edge, which was very annoying when wiping things like, say, messy peanut butter, from the counter. He argued that up to 1/16'' was acceptable but agreed to come back and try to smooth it, especially since he had to even something else out as well, and I was much happier with the result the second time.
For paint color, we ended up with Halcyon Green, which if you look at the paint chart from the previous post, is in the second column from the right, second one down. We are thrilled with it - bold but also muted, decidedly cool-toned, and somewhere in between blue and green.
Here it is, with our old light fixture and old (now dreadful) olive-colored blinds. If you scroll back up, you'll note that D mostly won the light fixture contest from our mood board and we went with the Pottery Barn McCarthy 3-Light Pendant. Though I don't dislike it, the finger prints may quite possibly drive me crazy. Though I think back to the original light when we first moved in (the first one we replaced, our first foray into do-it-yourself), and I think of how far we've come.
When the kitchen job was finally done, we did the finishing touches, like swapping out the annoying corded olive roman shades with some beautiful cordless gray ones from Home Depot. I don't remember having such pretty options years ago when we settled for the last ones. Obviously cordless and affordable shades have made huge strides in 9 years. Who knew?
I may delve into some of the smaller details of our kitchen in future updates (the under-cabinet lighting deserves its own post, it is so awesome) but I'll leave it there for now. One more upgrade off the to-do list.

Wednesday, December 16, 2015

Holiday Cheer

It feels like October but the holidays are upon us. This year the decorating is similar to previous ones, but we made a few tweaks.

Like last year (when, apparently, I forgot to take a picture) our tree is nestled between both sofas, tucking it a bit more out of the way so that the toddler can't do too much damage and it can't get knocked over by cat or child. We've now had the tree in all 3 available corners of the living room over the last few years - I like that we have some choice on where to put it.
We bought new lights this year, too, based on a review on The Wirecutter, our go-to place before we shop these days. and bought GE Colorite LED lights. I know they're energy efficient but no, they still don't look as nice as the old fashioned kind. Also we found it weird that there is so much purple in there, a color they don't usually include in colored lights. But as it's our toddler's favorite color, that's not necessarily a bad thing.

The fireplace looks mostly the same except this year we used live greenery we bought at a fundraiser, instead of the plastic one (ugh look at all those toys!)
Now I remember why we use artificial - needles everywhere!!
I went all Martha Stewart and made a felt tree for the toddler to decorate, though mostly she just wants to tear off the gingerbread man's eyes...
We skipped the outdoor lights this year - it seems I only have the energy for them alternating years (I did it last year. But we do have a new wreath and some more greenery.
After looking around our neighborhood, I decided I want to put wreaths in both upstairs windows. Of course my new front door wreath (that I bought last year on sale) does not seem to be for sale anymore, so I won't be able to create a matching set - or even anything complimentary, from at least a quick glance at all my usual stores. So I might need to start fresh next year. If I do, I'll have to remember to buy a thinner wreath - this one is so fat that we had to put it on our storm door since putting it on our front door pushed the storm door out a few inches.

Now we just need a little snow to add the real finishing touches on the making the house feel Christmasy.

Sunday, October 4, 2015

Small Cost Big Change

You know you're in for a trip down memory lane when you link to one of the first ever posts on the blog.

We inherited the burgundy in our guest bedroom from the decor in our old apartment, picture here, and even before that to our first apartment over 10 years ago, when we shopped exclusively the line of "What is the cheapest thing that will cover our windows/keep us warm/etc." It wasn't bad, and we made it work - the comforter cover, lamp shades, and curtains were a little worn and faded by now, but they were tolerable.

Still, we never particularly loved them. And when we finally re-installed the cordless blinds one year after taking them down to have new windows installed, I left the red curtains down and wondered whether it wasn't time to replace the outdated burgundy.

D and I decided on blue, to match so much of our house color scheme, and purple (since the accent wall already was) and I went to work. I found a really lovely organic cotton duvet cover that was so much better than the ripped-then-stitch-witchery sealed and stained burgundy cover. In perfect coincidence, they have pillow shams in a silk/cotton blend (remember, I'm weird - these things matter to me) that seemed like the perfect matched shade of blue despite being from a separate set. They have a cute tie-on look, too.

That sort of ate up our budget though, because we didn't really want to put too much money into room that we use so rarely. We tried buying a set of cheap curtains from Target but the color wasn't a good match and they looked cheap, which was exactly what we were trying to avoid, so those went right back to the store. But to our surprise, we still had some purple sheers my mom gave us as temporary window covers from back when we moved. They might not be our "forever" curtains, but they were free, which is infinitely better than cheap. We also had some lamps in the basement that hadn't quite made it to the donation bin from our first apartment that worked in a pinch, after we saw how expensive lamps are.

Finally, we removed the sad, faded 2' x 4' rug that wasn't much better than a front door mat, and dug out the second flokati rug we bought after realizing how much we loved our first one and how much we feared it would wear out quickly (5 years later, still going strong).

So besides the bed linens, this was an upgrade from random stuff we had laying around the house. Though they still had their costs.

Cost the first - apparently cheap lamps with cheap bases disintegrate into a pile of concrete, sand , plastic, and...I don't even know what else when picked up for the first time in a long time. That was a fun clean-up. Without a base, the big stand-up lamp is very unstable, but it works wedged into the corner.
Cost the second - to make room for the big and cozy rug, I had to push the bed to the left, meaning that the frames are no longer centered. It bugs me. But not so much that I want to fix it. These frames are the kind that require a nail at both ends instead of the middle, so shifting them will leave me with a visible hole to fill AND the pain of having to recenter them and re-level them. It can only be seen from inside the room, so my plan is to ignore.
My view from the hallway is nothing but cozy:

Have you had any cheap decor upgrades lately?

Sunday, October 26, 2014

Some decorating challenges

We wanted to put some pretty new curtains in the office since the blinds (that were there when we bought the house) didn't fit with our new windows. We thought it would be easy. We wanted cafe curtains - the kind that go only about halfway up. So we needed the curtains and the rod. Well first after looking at lace in all price ranges, we decided to splurge for ones that seemed well-made and actual lace (and not plastic) so we bought these macrame ones from Country Curtains. We bought one panels per window because it said in the description that they panel should be spread wide. Well two problems with that. First, no way - it looked empty and we knew right away we needed two panels per window.

Second, the two 36'' curtains was actually about 35'' and 37''. So we couldn't pair them without it looking weird. Fortunately Country Curtains has good customer service and also fortunately, we planned to visit family that happened to live near a brick and mortar store, so they were able to set aside a few for us and let me open and compare them. They said the handmade nature of the lace makes that a fairly common problem and noted that perhaps they should at least start selling them in pairs.

Problem two - the rod. We wanted something a little more interesting than the usual cafe curtain rods with a boring metal finial at the end. We found them, of all places, online at Walmart. The screws included with the installation kit, however, were unnecessarily long (left). The ones we already had at home were jarringly shiny (right). So it was off to the hardware store to find something in the middle.
I'm glad we found a metal screw that matched better (the one on the left). The right one, in zinc, really stood out when the bracket was on the wall.
Installation almost complete:
After what seemed like a lot of hassle just to hang curtains, we're really pleased with our results:

They provide exactly the kind of coverage we want in the office - it gives us privacy without blocking any light. And we can see them from the hallway so they are a nice sight when headed to the basement or bathroom.
A few more challenges we're facing now in the decorating department. As we continue to baby proof, we realized this corner is an accident waiting to happen - flimsy furniture, glass lamp and vase, access to curtains and wires.

Add to that the fact that we still don't quite had enough seating in the living room for when we have a bunch of guests, and D decided that a large chair and floor lamp might be the solution. If the chair is big enough, it will mostly block access to the corner completely.

Do you know what this means? I get to shop for furniture again! We're not sure exactly what kind of chair we want. We both love chaise lounges but I can't think of a way something like that would fit. We'd like a bolder color since our other seating in the living room is brown and gray. So given the room colors that leaves teal or rust red (or something that would compliment those). Maybe another wing chair? I think a higher back would look better there to help it show up from in the corner. Send me suggestions!

And finally, another challenge that maybe I can stop from becoming a bigger problem. The teal rug that moved from our main seating area to our entry way is showing signs of wear in the corner. This was the beginning of the end for our red rug, because it was so hard to avoid when vacuuming and the suction pulled at the loose ends and tore everything up. Is there something I can do now to prevent the undone section from getting worse? I'm a knitter so I'm not afraid to get creative with yarn.
Lots of calls for help and suggestions in this post, so leave a comment if you had ideas!

Friday, December 6, 2013

The Nursery - In Use

You might have guessed from the long silence on this blog that we've been a little busy with baby! And indeed, our bundle of joy made an appearance just under two weeks ago. We're not quite ready to share pictures here, but we wanted to show you the finishing touches of the room that we made for her. She's not sleeping in there yet, but we are using the changing area to clean her up at night and are happy that it's such a cheerful place (which she probably doesn't care about yet, but it is nice for us at 2am...). Without further ado - the last decorating touches -

First the reading corner - grandma finished sewing the curtains and sent them to us just in time to hang them before baby. Those of you that participated in our poll will recognize them as the winning fabric - white and yellow stripes. They are nice and heavy with a lining that blocks some, but not all, the light and are much better quality than anything we could find pre-made at a store. The rocking chair also looks cute in homemade flannel cushions covered with little zoo animals, also courtesy of grandma.
Because I can't have a whole post about a baby and not provide any baby pictures, here's one of me when I was a baby. Note the elephant - same one as in our nursery on the blue shelf. Washed and restuffed with fresh polyfill, but otherwise same guy that welcomed me home from the hospital.
On this wall, a lovely quilt from friends in Hawaii hangs on the wall on some quilt hangers from Etsy:
And on this wall - another curtained window plus some framed library posters from a school book campaign, courtesy of another friend. Here's the view we get to enjoy during late-night diaper changes, since she's sleeping in our room but getting changed here in the nursery.
We couldn't have done it without everyone's help. The room looks so much more finished and full - and the walls are much less intensely green thanks to the wall art.

Obviously we are going to be a little busy for a while, but don't give up on us. We'll continue updating this blog when we find a free moment. We still have a few projects to tell you about from before baby and a few more in the works.

Sunday, July 28, 2013

Curtain Poll: Your Turn to Play

My mom ("grandmom") offered to make us curtains for the nursery, which is really exciting since there are not too many curtain choices out there that we like. So we walked around the aisles of Joann Fabric to see what struck our fancy. I came back with a yard each of four different fabrics and now I'd like your help deciding which to choose. Time for my readers - all 5 of you - to give me your opinions! Take a look at the four choices below and then fill out the poll at the end of this post. If none of them speak to you, choose "other" and let me know a different design that you think would be perfect. The nice thing about using fabric instead of ready-made curtains is how many more choices there are. So if you can describe it, it probably exists.

We haven't begun to deal with style of curtain and whatever we choose will have a backing to block some of the light (but not all of the light - don't want baby to only be able to sleep in a pitch black room), so don't consider those two things when picking.

The choices:

1. Yellow with a very subtle white design on it (mostly invisible from far away)
2. Pink and brown elephants against a blue background
3. Blue and green elephants on a white background
4. Yellow and white stripes
Here they all are again, in close up:


See anything you like?

Which fabric for our nursery curtains?
Yellow with white pattern
Pink and brown elephants on blue
Green and blue elephants on white
Yellow and white stripes
Other (please leave a comment)
free poll

Monday, January 16, 2012

We Have a Bathroom!

Thank you all for your patience! Our bathroom guys came on Saturday for some retouching and they finished so late into the night that the light for pictures was all wrong. And then yesterday I thought it would probably be better if I actually used the shower before I wrote a blog post about it, so that delayed me a bit as well. But at long last--three weeks, to be exact--I can show you our finished bathroom.

Just a quick note--we have a shower curtain on order but we still have no idea what to do about window treatments (we're leaning towards sheer white cafe curtains) and definitely have no idea what kind of pictures to hang on the wall, so even though it's "done" it looks a little empty and lacks character. Feel free to make suggestions in the comments on what we can do to really own it (besides leave dirty towels around, dirty the sink with dried toothpaste, etc.).

First stop on our bathroom tour, the sink and toilet area. We now have a toilet that doesn't leak--after redoing the whole bathroom to replace the awful leaky pink toilet, we got a defective one right out of the box and had to return it to Home Depot and get another. Thankfully, because it's a two-part toilet, our contractors didn't  have to unseal the base part, just replace the tank, so it wasn't too much trouble to fix. (All details on brands and models for those who care are down below.)
For a teeny tiny bathroom, we now have a fair amount of storage space. The medicine cabinet is particularly spacious. I am definitely putting liners in those lovely, wood, dove-tailed drawers before loading them up with supplies, so we can keep them in nice condition.
Now that we have two lighting choices (this scone below, plus the light/fan combo on the ceiling), we realized that our paint choice isn't as purple as we first thought. The bulb on the ceiling is a very cold light, bringing out the cooler purple tones in the paint. These bulbs are warmer, making the walls look appropriately blue-gray. I guess it all depends on the lighting.
 Our fancy switch controls both lights independently of the fan, which is on a timer:
And now the tub area, with all the fixtures in place. It will take some getting used to, because our low-flow shower head in our main floor bathroom seems to have a lot more pressure than this one (even though it is much much cheaper both in price and quality). We are trying to figure out if that is at least partly related to being upstairs, because the water pressure from old shower head in this room, as I recall from the few times we used it, was pretty weak. Our company had recommended a much more forceful shower fixture, the Kohler Flipside. But at 2.5 gallons per minute (rpm), we turned it down and opted for this one at 1.75 gpm. Maybe we miscalculated? We're currently trying to decide if we will get used to it or not. In any case, it's certainly not the remodelers' fault.
I'm not sure if you can tell from these pictures, but we have one of those curved shower bars to give us a little more space. I think I'm glad that we went for an actual attached bar instead of a tension rod, even though it means that we will have holes in our tiles if we ever want to take it down.
Other than some concerns over water pressure, we enjoyed our showers in the new spaces (though we will feel much better with a curtain on the window--toweling off inside the shower was a little tight...).

Last view is of our doorway. Our only space issue is where to hang our bath towels. We have this tiny hook on the door but even with the fan, I'm not sure it will do a good job of drying out everything. We will probably have to rely on the shower curtain bar too, just to spread everything out.

A nice detail they installed is the door stop, to keep the door from slamming into the tub. We didn't ask for it, but once we saw it installed we realized it was a necessary addition. Oh, and I love that they used new door hardware--brushed nickel everywhere!
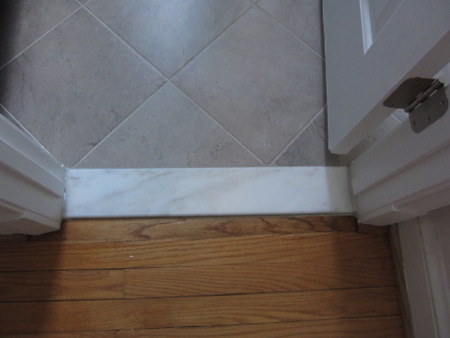
And now the threshold in front of the door. Looks great! The bathroom floor is lower by at least an inch, so they needed to put in a new threshold and paint and blend all the surrounding trim.

I committed a blogger sin by forgetting to take a "before" picture but trust me when I say that last week, this view did not make me very happy--the wood plank just outside the bathroom looked incredibly damaged and gray. We complained and they sent a guy over who spent over an hour sanding and treating the area and then staining it to the warm honey color of the rest of our floors. It's not an exact match but it's not noticeably different, especially given the variety in some of the planks on our landing.
Because of the height difference between the old and new floors, we have a large clearance under the door. D was not a fan but actually, I'm glad it's there. The bathroom is so small that the door has to clear any bathmat or rug we set out. With this added space, it can actually do that--any lower and it would get stuck.
Now the nitty gritty details for potential shoppers. First the stuff we bought--toilet is Kohler Cimarronsink faucets and tub spigot are Kohler Forte from Home Depot, toilet paper holdertowel ringtoilet flusher, and towel hook are all Moen Banbury. Home Depot didn't carry the Kohler Forte line for these small details and from a design store, they would have cost at least 3 times what the Home Depot Moen line cost. They're pretty similar, so we didn't think the price was worth ordering the Forte just to match minor trim details. Tile is Marazzi Ghiberti. The accent glass is something from the Tile Shop.

Next, the "exclusive" design store stuff--shower head, hose, and slide bar are fancy Kohler products not available in places like Home Depot (the hose at HD is plastic and this one is metal, for example). Same with the sconce (too many plastic, cheap parts for the HD version). The granite is from a local stone place and it's called "Blue Pearl." The vanity is Merillat. The soap dish, shelf, and towel bar inside the shower are Lenape. The vent fan is Panasonic.

Psst...they're not quite done. Back when they demolished the plaster bathtub walls, they did some damage to the adjacent walls in our bedroom. They made good on their promise to patch it up, so they plastered everything on Saturday and are coming back tomorrow to sand, prime, and paint.