Please share your opinions and expertise since we need all the help we can get!
Showing posts with label how-to. Show all posts

Saturday, December 7, 2019

Winter-Ready Playground

At two-year's old, the kids' playground was starting to show its age. It's holding up very well and remains a sturdy, amusing addition to our backyard. But the roof and a few other surfaces had lost their finish in a way that made us worry that it was bad for the wood.
After a little research, we opted to use a spray can of Olympic Waterguard seal, rather than the paint-on polyurethane or deck stain. We weren't trying to do anything too dramatic, just protect it from the weather and give it back a little of its cedar color.
D grabbed the ladder and started lightly sanding the damaged surfaces on a rare weekend day this fall that looked like it would stay dry for a few hours.

It took really minimal prep work, compared to a more dramatic refinish. The results were pretty much immediate. This is beam on the other side of the set. The left picture is the "before," and the right is "after." The color was a bit redder than we expected, but it does seem to be blending in ok to our...let's call it "aged cedar."
Here is the roof, after the treatment. You can see it's a little redder than the untreated places, like the vertical wall below it, but it no longer has that scaley, weathered look that made me think it would become susceptible to rot. Besides the annoyance of having to wait for a dry, not-too-windy day and of having to bring out the ladder, this project took minimal work. For once, a job that took exactly as much effort as we though (maybe even less!). And we have enough sealer in the can that we can probably do it next year with no new supplies needed. Our playground is winter-ready!


Friday, May 24, 2019

Tick Tubes

In our constant quest to rid our yard of unpleasant biting things, we have used a service to spray our yard (despite my misgivings about it affecting other bugs we want to keep around, like bees and butterflies). For the last two summers, we also used two GAT devices, though we sometimes forget to maintain them throughout the season. This year, we added something else to our arsenal: tick tubes.

We opted to try homemade ones, though we failed to plan ahead and save the dozens of toilet paper/paper towel tubes that would have been necessary. We worked with what we had available within the span of a weekend and decided to give it a try. It seemed silly to spend $50 or more when we had all the ingredients so readily available. When we set out new ones later in the year, we will plan better.

Cardboard tubes, dryer lint (and some additional cotton balls, because - again - we didn't plan ahead very well) and permethrin and BAM, tick killers. There are lots of online instructions to find. The basic idea is to soak the lint in a permethrin solution of about 7-8% strength (so dilution depends on how strong the solution is that you have in the bottle already). Let them dry out and then stuff them in toilet paper tubes. In theory, mice will use the lint for building nests and the permethrin, which is harmless for mammals, will infect the ticks that also settle there.
Again, because we waited until it was "go time" to do this, we didn't realize that it required far more tubes than we expected (they're supposed to be every 10-15 ft, around the edge of the property). But we tried with what we could. Timing seemed more important here than getting it perfect, because th aim is to do it right around tick breeding season in late April. In fact, we may have been a week too late even then, because we found a tick a couple of weeks earlier. But again, it's our first time - we'll do better next round (which I guess is in July some time).

Our tick tubes are gently buried in the leaves, hopefully where the mice will find them. The one in this picture is practically invisible, and pretty near our GAT, in fact. This picture kills two biting insects with one shot...And that weak play on words probably makes you want to groan.
Fingers crossed that these efforts actually help. It would be so nice to go in the yard and not feel like I'm a feast to all sorts of disease-carrying critters.

Tuesday, March 17, 2015

Cold and Wet

About a year after our washing machine stopped washing, our old Kenmore electric dryer (110.62972101) stopped drying (with a full load of wet laundry, of course, because how else do you find out a dryer isn't working...). The motor and drum were still working - but the heating element was not doing anything. Fortunately we have lots of drying racks (and our house is very dry in the winter) so we were not immediately screwed. But with a very messy baby, the laundry pile grew very fast.

So we were left with three choices: buy a new dryer, call in a repairman, or fix it ourself. It would take a week to deliver a new one and over a week to get a repairman. A replacement would cost over $800 and the repairman was $65 to show up and $20 for every 15 minutes after that. Parts extra. I would guess at least an hour to fix. So with parts, approaching $200 for repairing a very old machine.

So we decided to spend a day or two trying to Google-fix the dryer and if that failed, we would order a new one.

Googling suggested a few things that were easy to check: first that the fuse partially blew and second was that the exhaust vent was clogged. Dryers have a thermal fuse sensor that stops the dryer if the heat gets too high. But the vent was flowing just fine (which we expected, since we'd recently cleaned it out). Next we opened up the bottom front panel to check a series of fuses and sensors that control the temperature of heating element and when it turns on. Opening it up was easy to do since I had done it a couple of times already.


There were a couple of sensors immediately visible after removing the shield.

I believe the left sensor is the aforementioned thermal fuse, which tests whether the exhaust air is getting too hot (i.e. the vent may be clogged). I think the right sensor is a cycling thermostat which controls how long the heating element is left on. After pulling the plug on the dryer (220 volts!), I disconnected one wire each from the sensors and checked for continuity with my multimeter. But these two and the two I found jammed way on the inside next to the heating coil were all fine. So next I checked the heating coil, which was hidden behind an annoying-to-remove metal panel. After a fair amount of swearing I had it visible.


Unfortunately this was also working just fine. I was left with a series of difficult to check things: maybe the motor was not sending power to the heating element. Or perhaps one of the electric panel switches was not sending the right signal. Checking the motor would be really hard because it is located behind the ducting for the exhaust. Checking the switches at the top of the dryer would be scary because they would require the power to be connected. I made one brief attempt to check continuity at the heat switch, but quickly gave that up after a live wire accidentally brushed another piece of metal (nowhere near me!) and gave off a huge spark.
Mess of wires underneath the controls
I was resigned to order a new dryer when I realized that the switch that controls the heat is identical to the switch that controls whether the dryer should run or not.

So I just swapped the two switches and was happy to find out that now the dryer would only run if you held down the "Start" button. After holding the button down for a few seconds it was obvious that the heat was working! So I overnighted a new switch from Amazon and after a few minutes of swapping wires, we had a functional dryer again.
The culprit
2 hours and $20, not bad!

Monday, September 1, 2014

Day of Labor

Even though I'm not usually someone who makes lists, that to-do list we made a couple of weeks ago made me realize how many smallish things needed to get done around here and pushed me to accomplish some of them. We replaced the light in the office last weekend and now this weekend crossed another off our list (and got started on a different one, but that's a post for another time). 

This Labor Day (and boy, does labor mean something different to me now that I have a baby...), we cleaned out the dryer! It had been about three and a half years and especially given how much more laundry we've been doing these days with a baby, we figured it was probably become quite the fire hazard. We actually had completely forgotten how to do it but fortunately took very good notes on the blog last time and followed them. Step one, of course, was that we unplugged the dryer. Next we had a little trouble getting the bottom of the dryer off, but eventually got it unhinged.
Then we unscrewed the black covering inside, vacuumed, and then unattached it from the vent hose. D dragged out the shop vac and sucked up the dust while using the drill attachment from both ends to send the brush through the vent.
I'm happy to report that it wasn't really all that bad. So we cleaned it the first time a year and a half after moving in, but it had obviously been a lot longer than that since the previous owners cleaned it out (or they never ever cleaned the lint trap?). I think ever three years should definitely be plenty in the future.

The only other unexpected find from this little project? A very very very dead and desiccated mouse stuck to a sticky trap behind the dryer. Don't worry, there'll be no pictures for this one. The trap wasn't even for mice, it was for spider crickets. Poor little thing. Wrong place, wrong time. Though of course if he'd made it upstairs our cat would have been waiting...

Monday, February 10, 2014

Agitator Dogs

The inserts of our pocket diapers haven't been getting cleaned as well recently. We assumed it was because we were being lazy and not removing the pee and poop-ridden inserts by hand. The inserts were coming out by the end of the wash cycle, but they may have been only coming out in the last spin cycle. After I started another wash cycle this morning, I found another potential reason - the agitator wasn't agitating. After some quick Googling, I found a lot of videos which explained the probable cause: agitator dog wear. Below is the agitator.

After pulling the top off, we can see a (scummy) cap. The (scummy) cap can be pulled off.

Now we can see the mechanism of the agitator. It's similar to a bicycle hub, where a ratchet-spline system is used to propel the shaft. After removing the 7/16 bolt in the center we can get at the individual parts.

After pulling out the inner section we can easily see the splines (tooth-looking things) of the agitator shell.

The agitator dogs are the yellow plastic bits on the photo below. On a bike hub, they'd be called ratchets. A local Sears appliance store had them in stock, so we didn't have to wait for an Amazon delivery. This must be a fairly popular product, since the women at the store knew what I was talking about when I asked if they had a "reservoir dog" in stock.

The new agitator dogs have three teeth on them - the older dogs have maybe one tooth left. Once I popped in the new dogs and put it all back together, the agitator was working very vigorously again. It was an easy fix and only cost about $20 in parts ($10 for an extender rod for the ratchet and the agitator dogs were another $10). I'm sure a service call would have cost a lot more money.


Friday, August 2, 2013

Happy Little Clouds

You'll have to bear with me as I continue to go on and on about the nursery. We actually have some fun yard pictures to share too, but I'm on a roll here and excited to show you all our progress.

First an update on the Curtain Poll - if you haven't voted yet, please do. I have to admit I went into the whole thing almost sure of which fabric I liked best. And it isn't the fabric you like best. And while I reserve the right to choose mine over yours, your convincing arguments are changing my mind (for the record, I like the blue and green elephants, so it was still a popular choice). I think the simpler design of the yellow stripes might be the way to go.

Next onto the good stuff. My cloud dream has come true! After a few hours dragging the ladder around the room and dabbing on paint, I have a pretty sky ceiling.  I read a lot of how-to guides on the internet and it turns out there are about as many "how to paint cloud" websites and strategies as there are clouds. There is no standard set of colors, tools, or techniques. So I picked a few ideas I liked and got to work.

Step one, for me, was mixing white and the blue ceiling paint to make a subtle base layer. I put this on gently and sparingly with a large, very dry brush. It was so pale that I thought it would be helpful to mark the clouds with painters tape, but the tape kept falling down anyway, so I gave up on that strategy. Right away, I ran into the small problem of deciding which way to orient the clouds (most clouds in the sky are at last in part parallel with the horizon, but of course I had no horizon). I decided to have them all sort of face different directions, with a vague orientation towards the sun lamp in the middle of the room.

 After step one, this was the very subtle result. I let that dry for a little while.
An hour or so later, I was dabbing on pure white paint with a sponge, for the highlights (i.e. where the sun would hit the cloud). I think the fact that the ceiling is a flat paint and the white is a semi-gloss also helped the clouds stand out. I didn't take a picture of this step but basically it made it a lot easier to see the clouds and gave them some depth.

That took a little a little extra time to dry, since it was a little thicker than the first layer (but still not "three-dimensional" - I tried to apply very little paint so that there was no actual texture that would one day complicate an attempt to repaint the ceiling white).

Finally, the third layer was a little bit of gray mixed with white (I actually used Sherwin William's Knitting Needles, our living room paint, that has slightly warm undertones). I dabbed this below the white highlight areas for shadows.

Here's the final results, taken with D's much better camera and much better skill than the two pictures above:
Love love love it! The ceiling isn't as blue as I would have liked (this picture actually makes it look more vibrant than it is) but the whole effect is probably much better this way - much more subtle. Now that it's done, I find myself staring at my own bedroom ceiling thinking how boring it looks....maybe time to add a few happy little clouds?

Thursday, March 7, 2013

Bacon-flavored fire-starters

We use our fireplace a few times a year. It's always a little bit of pain to start the fire - lots of paper is needed. I've been saving the lint from the dryer for about a year, but it isn't that useful in starting the fire. It doesn't burn - it just smolders. I did a little reading and it seems that candle wax is needed. We don't have many spare candles - but we often have extra bacon grease! With an egg carton and some stash yarn, I had everything to make fire starters.

First, lint is stuffed tightly into an egg carton
Then a slice is cut off

Then cut further into individual cubes

Bacon grease is heated up to make it nice and liquidy

J provides some stash (extra) yarn

I pour the grease into the right-most lint-blob...

....then soak the rest and wound them up with the yarn

So, lint + egg carton + yarn + bacon grease = fire starters. Since I don't want to keep bacon grease at room temperature I stuck the starters in a plastic bag and stored them in the freezer. Even a few months later they work great, burning for over ten minutes.


Wednesday, January 9, 2013

Very Belated Holiday Wishes

This holiday season has been a rather hectic one for various personal reasons and we had so many home-related updates to share that I never quite got around to putting up a holiday post. I had nearly no time to reflect on the year and our goals for the next one.

I realized this weekend as I took down the Christmas decorations that I hadn't even bothered to photograph them first. We didn't put up a tree this year because I just couldn't face the task of moving all the furniture around and getting glitter everywhere. And since putting up the tree is supposed to be fun - if it wasn't going to be, then it wasn't worth doing (I know I sound like a bit of a Scrooge). But we still decorated the house with lots of ribbon, candles, and greenery. Here's one of the few pictures to come out of the season - our candy cane and ornament centerpiece.
As an aside, let me highlight the cool work that went into the glittery pedestal on the right. Mom had a few old brass candlesticks destined for the donation bin. She had read an article about how to spruce them up and we gave it a try on this one - a few hits with a spray primer and then a few with Krylon Glitter Blast in Silver Flash made it a festive piece indeed.
Still, I'm a purist and had a moment of sadness for the loss of the pretty brass color. She gave us a few extra sets to paint various glittery and festive colors, but I lost my nerve and they are still sitting in my drawer in their tarnished brassy glory.

To keep with the Bah-humbug holiday theme we took the easy way out and found that Amazon had an instant video of a crackling fire. But of course it was only a joke - on Christmas day D still built us a beautiful fire in the fireplace and, according to my own tradition, roasted marshmallows.

May your year be a happy one full of fun home projects and no unexpected, expensive repairs!

Thursday, September 13, 2012

Hot and Cold

We made good progress on last week's Honey-do list, though we didn't make it through quite all the way (that window pane is never getting replaced, is it?). Today I'll cover one repair that was pretty quick and easy (says the girl wielding the camera while everyone else was doing the heavy lifting): replacing the hoses on our washing machine.

The washer actually says that the hoses should be switched out every 5 years and the ones in place looked a lot older than that. We were ready with stainless steel hoses that don't need replacing, so now we can proceed with being lazy, a skill we are already very good at.
The hoses are conveniently laced with blue and red to keep them straight, and we made sure to only install one at a time to make sure we didn't mix them up on installation.
 Step one, move washer away from the wall (duh).
Step two, disconnect old hose, keeping a bucket ready since the hoses have water in them:
Step three, magically fast forward 5 minutes and voila! New hoses!
Only kidding--step three was to screw the new hoses back on with a wrench, but I'm sure smart people like you already figured that one out. Step four, not shown, is say a little prayer and do a load of laundry. We kept the washing machine pushed out for the first load, just so we could keep an eye on the connection and make sure we didn't spring a leak. All clear!

This one was so easy that I'm embarrassed it took so long to get around to doing. But it was easier having a few more big strong people around to help.

Monday, June 25, 2012

Gray Glaze

Fortunately the red table spray paint mess didn't mean I'd lost my touch completely on refinishing furniture. I forgot to take a "before" picture of this table from a distance, but just imagine a honey pine, boring old end table with a drawer. We got it right when bought our house, when I was trying to fill the space with whatever cheap craigslist furniture I could find. The shape and size suited us for our corner table, but the color was boring, so I always knew it was destined for something more.

First, I filled in the scrapes with wood filler. This was my first try with wood filler on furniture and I must say I need practice. The scratches got shallower but are still evident on the finished piece. I'll do a better job next time of putting in extra and then sanding it flat.

No spray paint this time, just a quick brush coat of Kilz Clean Start primer:
Then two coats of Sherwin William's Blue Mosque. Bonus points to anyone who knows where this paint came from. Anyone? OK, well I'll just tell you and save you the suspense: it was the first color we tried in our bathroom back in 2009. You can find the post here. Turns out it was too bright for a bathroom but the perfect turquoise for an accent table in our living room, almost 3 years later.
This project was more than just an ordinary paint one. I wanted to branch out into special effect glazing. I already had the Martha Stewart Painting Tool Kit and decided I wanted to try herringbone texture.


To start, I used 2'' tape to make even strips across the top surface.
Then I removed every other strip--instant stripes! I did this on the drawer as well.
I mixed the glaze with Sherwin Williams Peppercorn paint (the same color I used on this). The ratios is 4 parts glaze to 1 part paint. For some reason, I lost all concept of how much glaze I would need on the project, and mixed a whole jar full. I used probably about a quarter cup, so I have a lot of extra.
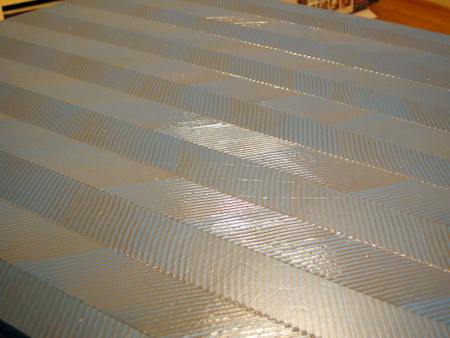
I applied the paint one row at a time and used the herringbone tool (the bottom-most right one in the kit above) to make lots of angled stripes. The glaze is basically thick and slow-drying paint, so I could manipulate it and wipe it away as much as needed for about 10-15 minutes.

When that side was totally dry, I switched which row had tape and then applied the glaze angled in the other direction (so that it would make the "v" of a herringbone pattern). These pictures show the difference between the wet and dry glaze:

I didn't bother to show you the part where I coated it with polycrylic. For that, I did use spray--it's much faster than applying with a brush or a sponge. I did three or four really thin coats to seal the paint and (hopefully) prevent chipping.

Here it is, all done! I hope to find a quirky drawer nob, but until I do, I just painted the old one gray. You can see from the varying thickness of the gray on the surface that the glaze isn't as even as maybe it should be. But I kinda like it--gives it character and creates almost an optical illusion look.

I was surprised by how little effort this cool effect took. I would definitely do it again. It definitely has more character now than it did before.