Please share your opinions and expertise since we need all the help we can get!
Showing posts with label furnace. Show all posts

Saturday, February 21, 2015

Not feeling the heat

Shortly after coming home from a trip our heat stopped working again. Naturally this happened on a Saturday morning. A Saturday with a high of 25 F. My first hope was that I could just hit the reset button on the motor. But the motor would not fire. I could hear the pumps pushing (cold) water around, but nothing else. I tried turning the boiler power on and off. It was like no power was getting to the motor.

Fortunately our furnace guy picked up his phone that and came over within a couple of hours. After about 10 minutes he had the diagnosis: dead aquastat.


The aquastat is the gray box with the power lines coming out in the above photo. What it does is route power around to the water boiling motor (black box at the bottom) and/or the pumps that push water through the house when asked. While it was sending power to the pumps it was unable to power the motor.

Back of aquastat. See the problem? Probably not.
One little spot was burned out. I asked whether I could just re-add some solder to it, but our technician said that it would probably quickly die again.

Closer in. See the burned out spot in the center?
So for about $250 we got a new one installed. Which was a fair price, since the aquastat alone costs around $150. Especially for a Saturday emergency repair. If you read the reviews in the Amazon link you will notice that most of the complaints are about the solder failing. If it dies again, I may just try slapping some on with my $15 RadioShack soldering kit and seeing what happens.

Wednesday, November 19, 2014

Heating woes, again....

Yesterday morning the house was 64 even though we have it set to be 68 by the time I wake up in the morning - and our good old Nest is usually smart enough to have the timing figured out. I thought maybe the cold front had it confused.

Then when I came home from work this evening the house was just shy of 60. But Nest said it was heating so I assumed it had really mis-estimated.

Until I realized the baseboards were cold...

Uh-oh...

Well it turns out there is a reset button:
I was afraid to hit it, but D was willing to take the chance.  Turns out, it worked better than this reset button at least. Unnerving, but at least it seemed to get everything running again.

We actually had already called our local heating guy, who lives nearby and was willing to come take a look. He fiddled with the pressure release valve which was leaking a little water. But otherwise, it seemed ok
I'm worried, though, because my super-sensitive nose has detected a smell of oil in the basement on and off for a few days. And finally D could just barely smell it too, today. We are going to call the person that serviced our furnace this year and ask if he had calibrated the burner because maybe it's not burning efficiently, or something.

I don't know, but it's definitely a scary sign as we begin the winter heating season.
The guy who came to look at our heater today didn't charge because, as D says, 1. he's nice and 2. he is trying to convince us to convert to natural gas (and have him do it). He mentioned today that converting to gas, which would include a water heater and furnace, would cost $11,300. D did the cost/benefit analysis a few years ago and decided it wasn't worth it with the savings in oil and electricity. We do use a lot more heat now, post-baby...Decisions decisions. Well at least when the heat is working, it works in every room of the house.

In other basement-related news, we took advantage of one long nap from the baby to rearrange our furniture. We really like it - it gives us some extra floor space that is more or less "baby-safe" and a good spot for taking photos. Our next goal for the room is to paint the accent wall and then buy new shelving. Maybe we can get it done before the New Year!
This is a really old "before" picture but it's the only one I could find - fast forward to where we have the extra storage shelving, a treadmill where that Nordic Track is, the Elliptical on the other side of the sofa, no TV, etc. But it gives you an idea of how we rearranged everything.


Saturday, October 11, 2014

The other plumbing project

I've been complaining about the faucet in our main bathroom sink for a while now (one of those links goes back to 2012...). The handles pointed in the wrong direction, the stopper didn't hold water in the sink, and then a few months ago, the faucet started dripping and our elegant solution was to put a plastic tub in the sink to collect the water for plants.  I was really ready to say goodbye to the fixture.

We'd heard it was easier to replace the faucet structure within the same brand. For a while, we couldn't even figure out what it was, until my mom was visiting and managed to see a tiny "GROHE" on the very back next to the plunger. Bad branding, if we can't figure out what it is when we were trying to!

So after trying to decide between Kohler and Moen, we decided to go with Grohe. Grohe Parkfield, to be specific - it was relatively cheap and relatively stylish. We stuck with chrome to go with the other finishes in the bathroom.

And it remained in this state for a few weeks as we tried to build up enough courage and find the time to take apart the pedestal sink. Until...
Until our garbage disposal broke. It pushed us over the edge to deciding to hire a handyman. And in retrospect, I think it was a sign. We definitely made the right decision by getting someone else to take care of this.

The garbage disposal repair took about 75 minutes. This one, however, took a professional about 3 hours to complete, including multiple trips out for a special tool to remove the bolts. Plus we bought a faucet kit that came in lots of tiny little parts instead of others that come partially preassembled. He actually had to charge us a little extra because of all the time it took to put together.


Yeah, I don't really think we would have had the time and know-how to have done this ourselves...

Apparently the sink wasn't bolted in to tension before and must have just hand-tightened it. The sink always felt a little wobbly. Now though, it's definitely attached.

Look how pretty! The handles point in the right direction! The stopper holds in the water! There's no drip! And the flow is so much better!

It is fabulous. I'm sad we didn't do it sooner. And I think it was worth every penny to have someone else do it for us.

Our new handyman spent almost a whole day here with these two projects. And it was a busy day. We didn't take pictures but we also had a furnace guy here to clean out the furnace. It had been over two years since we had it cleaned out last and wanted to make sure it was in good condition for this winter. The good news is that apparently it was still pretty clean and we could have gone one extra year before getting it cleaned out. Though there was a lot of cat hair inside that we should vacuum out. Good to know!

Thursday, October 25, 2012

Heating Conundrums (the end?)


The heating saga is now resolved. Not 100% to our satisfaction, but pretty close. 86%?

To quickly recap, the pipe loops that lead into and out of our bedroom were re-routed to run directly into (and out of) the boiler. The logic for the move was that since the pump on this loop appeared to be pulling so much water through the loop, the loop was to be moved to largely separate it from the rest of the system.

The problem was that after many hours of work, the bedroom still wasn't heating up. Even with its pump running. Also, the pump on this moved loop was very loud - it sounded like air was constantly flowing through. More on that later.

After the plumber left I spent about an hour bleeding all of the accessible bleeder valves. After pulling out a lot of air, the house was getting plenty warm, except for the bedroom.

What was strange was that the return pipe on the moved loop was getting warm while the feed was still ice cold. Which has two possible explanations: either this really isn't a loop or that the water is flowing the opposite direction we are expecting. I still don't know the answer.

What I did do was take advantage of a new lever.


This lever allows me to control whether the hot water flows vertically into the main loop (which feeds the entire house excluding the basement and master bedroom) or flows to the left, eventually into our bedroom. I ran the system for over an hour, the entire home was warm except the master bedroom. I left open the bedroom bleeder valves for several minutes to try and encourage the hot water, but was rewarded only with cold water.

I then went back to the basement boiler, turned the new lever, forcing water into the bedroom. I immediately heard water rushing into the feed, turning the feed pipes from cold to scalding hot. I turned the lever back to the original position. I went upstairs and our bedroom now had scalding hot water.

Thinking that this was just a temporary pulse I left the heat to run for another hour and periodically bled from the master bedroom valves. An hour later, still hot! So, I guess I fixed it?

I was hoping that the pump would stop being so loud after I got the water flowing into the feed. But it was still loud. I spoke with our plumber, who thought that the pump may be bad. He came over and replaced it with a new one - which made just as much noise. I tried disconnecting the pump to see whether it needed to be running to get hot water in the bedroom - it does.

So we are claiming victory now. It's a bit annoying to hear the raspy pump running, but it's only audible from the dining room/kitchen. It's worth the noise pollution to get heat EVERYWHERE. Winter, we are ready.

Old Bleeder Valves

Saturday, October 13, 2012

Heating Conundrums (part the third)

This is becoming quite the serialized mystery tale. Today we had a team of two repairmen out here for 6 hours (they estimated the job would take 4 hours) and we still have not solved the problem.

To recap, our heating system is not heating all the rooms of our house evenly. Some get no heat at all, others are just fine. We've tried bleeding the system completely, bleeding a little out of each baseboard, fixing the piping, turning on/off the pump to different loops--and nothing seems to help. After coming out twice for no charge just to take a look and make some suggestions, this plumber/heating guy proposed a solution that would involve moving the master bedroom loop so that it wasn't fed from a pipe that led to the whole house (thus taking water away from the rest of the system). He would connect that loop directly to the boiler. So that would result in two circuits both coming directly out of the boiler - both with pumps to keep the water moving. While he was at it, he also would install auto-bleeders on both, to reduce the number of air bubbles in the system.

You can see the difference between the left and right pictures how much pipe-work he did. It's easy to recognize what's new, because it's done in shiny copper.

Here's a close-up of the two pumps. He connected them in a way that we could shut the valves above and below them if they should ever need to be replaced.
Each one has a little black box on it to control how much oomph goes into moving the water. Hypothetically, this means we can alter the percentage of hot water to each section, if one side gets warmer than the other.
Here are the fancy new bleeders (you can't quite see them in the first picture, but they're there, hiding behind our service form):
Creating the new loop meant a lot of restructuring down in the basement. They closed off two connections - one each to the main outgoing and incoming/return pipes (circled in red). The new copper pipes represent the new outgoing and return pipes for the new bedroom loop. They aren't attached to the thick, black steel pipes - they go all the way back to the boiler.
They also fixed the little section of pipe that got leaky from our last heating experiment.
This all sounds impressive, right? Well it seemed like it to us. And we were pretty sure this would fix the problem, based on which pipes were hot and which were cold when the system was running. The problem is that after 6 hours of work, our workmen ran the system and........no improvement. SERIOUSLY! We couldn't believe it. They couldn't believe it. The master bedroom still gets no heat.

It was right about then that they realized they'd spent way longer at our house than they were expecting and one of the guy's brother-in-law called to ask for help because the water boiler in his restaurant stopped working. So they asked us to keep experimenting with bleeding the system, didn't charge us, and promised to be back in touch early next week to continue to figure out what to do.

We are starting to wonder if the loop they created never went to the bedroom at all. We all figured that it did, since it was the only cold pipe and the bedroom was the only cold room. The problem is that we are operating by process of elimination. We don't have a schematic for what pipes lead where behind the walls. It isn't really this company's fault, since we thought the same thing. Though we certainly won't be paying up until we get some resolution. I guess this problem remains "to be continued..."

Monday, March 19, 2012

To Pay Or Not To Pay?

In my Leap Day post, I hinted at a problem with our heat. We've known for a long time that our house heats unevenly. Half of the house barely gets any heat at all--the pipes carrying the hot water from the furnace to one side never get warm. We thought this problem would clear up when we insulated our house better, because the cold side is also the side over the crawl space. We figured that the reason the water was cold by the time it hit those rooms was because the pipes were uninsulated and basically outside, so the water cooled off by the time it got where it needed to go.

Having been through a winter post-insulation, we can now conclude that is not the case. So the problem is clearly in our actual heating system.

Now the whole system is unreliable at best--we have toasty warm rooms in our living room, dining room, and master bedroom usually but even these rooms (actually mostly just the master bedroom) have moments of chill. When that happens, D bleeds the pipes until he doesn't notice any more bubbles, and that usually clears up the problem.
But the bad rooms mostly don't work at all. D can bleed the pipes until there is no noticeable air but the water is always cold (sometimes on a good day, it is tepid). So this winter we finally called in our local heating company and asked them to solve the problem. They came out twice and still seem a little confused, but here's what they think will solve the problem:

After emptying our pressure tank, trying to bleed sections of the house, and after considering our furnace and pipe structure, the folks at our local mom and pop place believe the piping down near our furnace is wacky. They were unable to effectively bleed our system and believe there are bubbles trapped permanently in unreachable places. Now I might have the fundamentals wrong here, but what they seem to be saying is that the release valve (red arrow) is in a section that leads to the outside water source. But it should be in the section that goes from the furnace to the house (blue arrow). This bad placement is what is not allowing them to bleed our system. So they want to reroute some pipes to make a full system bleed possible.

They also want to install an auto-bleeder which would automatically pull out air bubbles from the water that passes through it.

The problem is that the company admits that they are guessing the solution. And there is no guarantee that they're right and that doing what they recommend will fix the problem. And it's not cheap ($800). But at least they are being completely up front with us.

This company has not charged us a dime to come out all these times and take a look. They also didn't charge us two years ago when we called them and asked for help when our heat wouldn't stop running (they serviced the heating system for the previous owner and we had his work records, so that's why we called them). This company is the kind of place where, if it where called Smith Heating, the people who came out to see us would be Bob Smith and Mike Smith. They are really nice and I don't think they are trying to rip us off.

However, that's enough money that we thought we should get a second opinion. We called a bunch of other places. All of them have either said that they don't service baseboard heating or that they would charge us about $200 just to come take a look (creditable, of course, towards follow-up service).

So this giant post all boils down to two questions: Do we pay for a second opinion (and possibly a third and a fourth opinion, if they all disagree)? Or do we pay to get the work done? (A third, off-the-wall question is do we pay even more for some crazy solution that involves replacing our entire heating system?)

(Either way we probably won't do anything until September, so that we won't have to wait months to turn the heat on and see if it worked...)

Sunday, July 31, 2011

Chimney capping complete

Partially thanks to our former uninvited house guest, we became aware that we needed some semi-serious chimney work. In short, we needed a new liner, new mortar on the top, some height adjustments on the three holes, and a couple of new caps.

After a few weeks, I managed to get our chimney guys to come out and do the work. On a 100+ degree Friday. I originally thought they would do just the indoor work (cutting a big hole in our wall and chimney to create a drip pan) and install part of the new liner. But I guess they were on a roll, so they proceeded to do the mortar and height adjustments along with installing the liner. I spent the day trying to do work and feeding the workers ice and water.

After day 1, our house had the following changes:

1. Shiny new pipe:
2. Tarp on our chimney (mortar is stronger when it cures at a slower pace):
3. Finally, a big gaping hole above our basement fireplace:

The following Monday they came back, pulled the tarp off, removed their ladders, added the chimney caps, and took a picture for us:


They adjusted the heights of the openings to improve the flow of air. In a strange coincidence(?) our master bedroom closet (right next to the chimney) got a lot cooler. (Around the same time, we also had to fix the AC intake pipe that ran next to the closet, so honestly we have no idea what is making the closet cooler. Not that we're complaining.)

Hopefully we can ignore the chimney (besides yearly-ish cleanings) for a LONG time.

Sunday, June 26, 2011

Rocky has left the building

Rocky, as my friends have affectionately names our little houseguest, seems to have moved on. We played loud rock music all day right into the fireplace where he'd taken up residence and that seemed to do it. However, that doesn't mean we're getting off cheap here. Ooooh no, not by a long shot.

We had two different chimney companies come out (and one more than once) and give us estimates for what needed doing. These were in addition to the guys who came last year and told us we needed a new liner.

For reference, our chimney has three different flues in it--the one to the front of the house goes to the basement fireplace, the middle one goes to the upstairs fireplace, and the back one goes to the oil burner. I had no idea they all fit in there like that! We have one cap installed on our upstairs fireplace (middle flue) but that was all. Rocky had settled into the lower fireplace, just above the damper. So here is the breakdown:

As a refresher, Chimney Company 1 said last summer that we need to immediately replace the liner in the furnace flue for about $2000. Masonry work around the top of the chimney was also necessary. We didn't really trust them and decided that we would look into getting some additional opinions this year. The raccoon was good pretext for having chimney folks come out.

Chimney Company 2 came out a little over a week ago to have a look. They said that we needed caps put on two flues and masonry work at the top, but didn't feel we needed the chimney relined. They quote a price of $800 to $1000, which also included spooking Rocky out if necessary.This company was recommended to us by some people who live in the neighborhood.

Chimney Company 3 said we did need to have our furnace flue relined, as well as the masonry work and caps. The guy even took a video with his phone:
The problems with all these videos and photos is that it is clear we need masonry work but totally dark down the flue, so it doesn't prove one way or another that we need a liner. But anyway, their estimate included relining one of the flues because they claimed the terra cotta liner was breaking off. Price? $2400. Ouch!

So now we were comparing apples to oranges between the two companies. We called Chimney Company 2 back and asked how confident they were that we didn't need a liner and were told that they only looked around the top and it didn't seem too bad. If we wanted, they could come back and run a camera down, so we said yes.

The owner himself showed up to take a look. While he was up there, he put some temporary caps on the chimney so the raccoon (which he confirmed had left) couldn't easily get back in. After some digging around on the top of the chimney as well as in our basement, here's what he had to say:

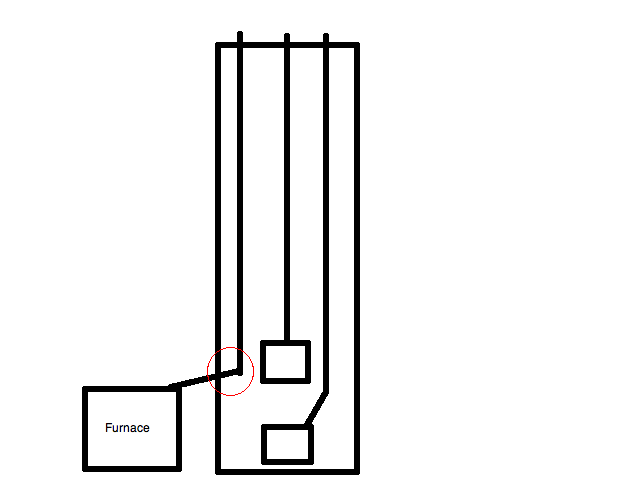
Yes, the chimney liner was cracking off and would need relining. BUT THERE'S MORE. Because the furnace flue makes almost a right-angle turn behind our wall to get between the furnace and the chimney, the chipping terra cotta was actually falling to the bottom and clogging the pipe. Here is my rudimentary drawing, reflecting the situation as described to me:
The red circle is where the clog is happening. The chimney guy explained that because of this clog, which he said was 2/3 (i.e. only 1/3 free), the carbon monoxide wasn't venting out the chimney fully. He said that in addition to the complicated job of cleaning out and relining the flue around that bend, they would need to install an access point from inside our house to that corner to catch oil drippings that would collect there over time (right now the oil is presumably absorbed into the terra cotta but the new liner would be steel). Yay, another hole in the wall... He hasn't emailed us the estimate yet but said the whole job would be aorund $3000. The price keeps crawling higher!

But boy let me tell you that is one way to scare someone into spending money! He wasn't pushy at all or unnecessarily scary, but mention carbon monoxide and you've got yourself a deal. Good thing this is summer so we don't need our heat on. This might also explain why our energy auditor noticed some higher ambient CO levels even though the furnace company, with less sophisticated tool that only tested immediately around the furnace, didn't. Fortunately these are not incredibly high levels. We have CO testers on every floor of the house and nothing went off, but still, not something we want to continue.

But here's the part that worries me a little: why didn't anyone else notice this problem? This guy seemed pretty trustworthy and comes recommended, but I hope he doesn't just figure that we're suckers just begging to spend money. I almost want to get yet another estimate, but I am sick of having people wandering around looking without doing. Just fix the darn problem already. So we will probably just hire this company to do all sorts of work we never even anticipated when we saw Rocky up there on that fateful day. Please, as always, share you thoughts--we're clueless on this one and $3000 is not something to take lightly