Please share your opinions and expertise since we need all the help we can get!
Showing posts with label basement. Show all posts

Sunday, August 2, 2026

The next thing

We always have a few projects in the back of our minds, vying for center stage. I think the next one up is revamping the finished part of our basement. It's been largely the same since we painted the fireplace wall purple and installed our pantry storage, way back in 2014. To everyone's surprise, the kids still play on that dome, and I still run on that treadmill. We rearrange the positioning of the treadmill to account for the fact that if I watch TV at all when I'm running, it's just on my tiny phone screen.

In 2015, we got rid of our tools from the basement and moved them in the garage and that wall has pretty much stayed full of just random large-format gymnastics-type toys.
We recently got rid of a large-ish indoor trampoline and that invited the question: what next?

We have a few goals for what we want the room to be. First, we plan to move the TV from over the fireplace to either the wall with the bullseye on it (D's choice) or the one with the backdrop and heating baseboard on it (my choice). We'll be moving the Switch down here so there's more room to have full family competitions of Just Dance (yes, we're THAT family).

We're owning the fact that this room is primarily used for fitness and physical play and D is designing stall bars/a Swedish ladder for the wall between the stairs and the basement closet.

I'm sure we'll have a whole post about it when we design our own and start building, but here's what we're generally going for:

The biggest thing we need to deal with (besides some decorating choices like wall paint, etc) is what to do about the floor. We appreciate the carpet because it is soft and padded, and between the kids constantly tumbling and playing "floor is lava" and my workouts, it's nice to have some cushion. But that carpet has been around since before we owned our house and has seen some things. It was already a little stained when we moved in, and unfortunately the cats have also made it their own. We had some unfortunate pee issues a few times (always treated with enzyme cleaner and we don't smell it anymore, but still, ew...) and we OFTEN have puke issues. How often? Often enough for D to 3D-print a sign a few months ago for us to keep track:

So far, our record is 12 days. It's usually under 5. This carpet is our cats' preferred place to hack up a hairball, and cleaning requires a multi-step process that still occasionally leaves a stain behind.

We want cushioned but also cleanable. We're still in the research phase and planning to order some samples of a few things. Here are some options we're considering, that all essentially fall into the category of rubber gym flooring:

1) gym tiles: pros - very cushioned, available in some not-totally-ugly colors, cat-claw-proof; cons - beveled edges would probably drive us crazy and potentially be hard to clean

2) high-density foam: pros - very cushioned; cons - ugly, possibly not strong enough for cat claws, possibly hard to clean

3) rubber gym flooring: pros - sturdy and easy to clean, some are available in not-totally-ugly colors, cat-claw-proof; cons - surprisingly dense and not cushiony

4) plyometric rubber: pros - claims to be very cushiony; cons - possibly hard to clean, only available in black

5) some combination that involves using a cushioned rubber underlayment under something less ugly, possibly luxury vinyl

Looks aren't a priority for us in the basement, though obviously we don't want to hate it. Hopefully we'll have some more clarity when the samples arrive. But in the meantime, if you have experience with any of these or have other suggestions, let us know your thoughts!


Sunday, September 12, 2021

Rain rain

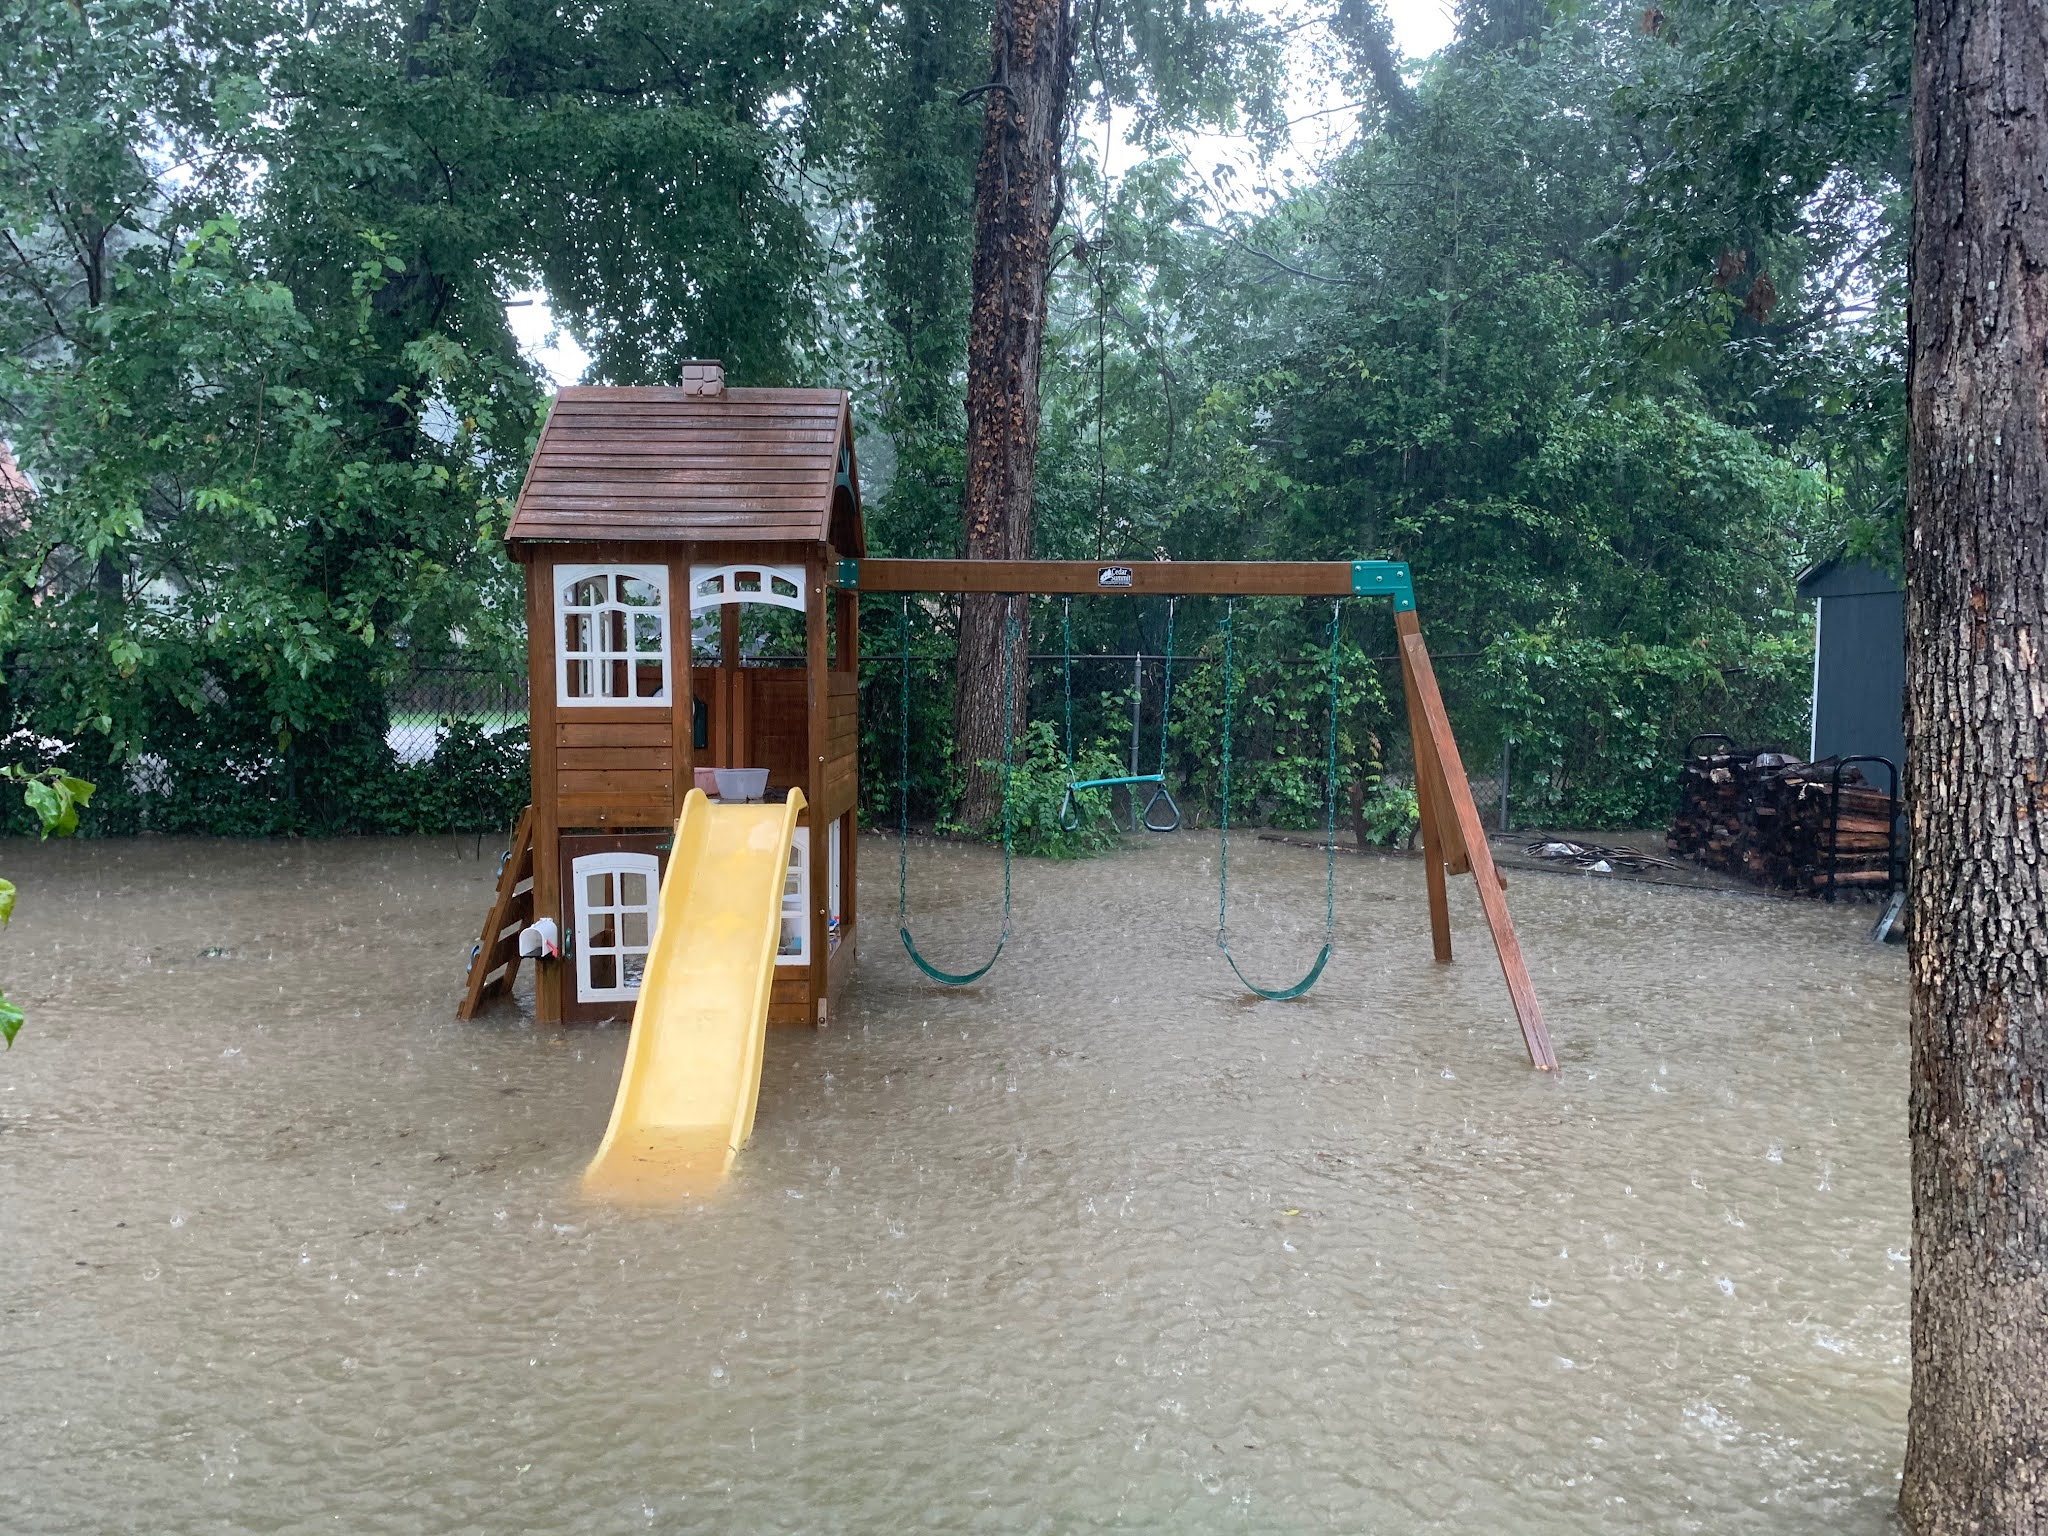
My to-do list keeps growing, but I'm getting no home or yard things accomplished. So I thought it would be a good time to look back on something that happened almost exactly a year ago. A big storm flooded our yard more than ever before. We were lucky that no lasting damage occurred, but it was scary to watch:

Another view of the swing set:
We had to dry out the shed and all the items that were on the floor of it:
It was clear that the gutters and downspouts couldn't handle the volume of water--which itself wasn't surprising given how much rained down. Rain gushed up backwards from the pipes, which was especially bad since many of them are right near the basement stairs. It's hard to see from this picture but water was flowing UP the pipe and back onto the rocks.
This caused water to pour under the door to the basement, thought fortunately we were able to wet vac it up before it spread to anything it could damage.
The downpour also showed us that there were holes in the part of the downspouts that were underground--and under the patio--where water belched up to the surface in weird places. It was one of the reasons we decided to get a new patio, to give us an opportunity to see what was underneath and also to re-level it, since all the soggy spots had produced a really uneven surface. What we found was a mishmash of different sized clay pipes, most of them clogged and some of them smashed or broken:

When we had the patio upgraded, the work crew paid attention to the pipes running under the patio, even identifying and repairing a giant hole in one. We knew this was our only chance to fix everything. They also installed a rock garden at the wettest part of our yard in the hopes that it would help move the water along. D then dug a trench though that rock garden for water to collect in when we get downpours.

So has it worked? Well we've had a few big storms since (but nothing that bad) and the yard does seem to drain better, mostly collecting in the rock garden at the far end of our backyard. And we've certainly had quite a lot of rain to test it out in:

But we know that one of our drainage pipes under the patio must have sprung a leak, because after our last heavy rain, we had a bunch of gravel on our patio, pushed up from water spurting out a pipe. It seems unlikely we'll be able to fix this so now that the new patio is installed, unfortunately.

So I guess we just brush off the gravel and hope it isn't so bad that it weakens the ground underneath it. Fingers crossed...


Wednesday, July 25, 2018

Asbestos Free

Today the air quality tests confirmed that our basement is now asbestos free. Three weeks and quite a bit more money later, a problem we never knew we had has now been fixed.

When the plumber identified the insulation that he believed was asbestos, we immediately called in a team to test it. The company took it off to the lab and said that it was 10-20% chrysotile asbestos. Apparently this stuff comes in different varieties. We had another company come out to do the abatement and they identified yet ANOTHER pipe covered in asbestos insulation, this time unwrapped (the first pipe had something like packing tape covering the insulation). Yippee. Fortunately it was in a corner of the basement that we rarely use, leading into the unfinished bathroom that I usually forget we have. Can you see it there, running parallel with the back wall and above the orange spray foam (seriously, even our energy efficiency company working right next to it didn't noticed?).
 Here is a picture of it from inside the unfinished bathroom:
So the day of the abatement, a team of three worked for about two hours. They shut themselves up in the unfinished part of the basement, ran this loud vacuum device, and did their thing. For obvious reasons, we left them alone.
Then a couple of days later after the dust had settled, they came back and ran a little fan for an hour that circulated air onto some sticky pads - apparently a more sophisticated and sensitive test than the industry default of using sticky tape to just pick up surface lint, or so they said (either way, it was included in the price - which was their minimum price anyway). So off it went to the lab and, as of today, we are officially clear:

Asbestos-free party anyone? I wonder if they sell theme decorations for that? I'm thinking Hazmat suit.

Monday, July 9, 2018

The Suspense is Killing Me (I hope not literally)

This isn't the post I planned to write next. I have some exciting kitchen ideas and some beautiful flowers that were all just waiting to be posted. But suddenly, a heating pipe in our basement started leaking. Not onto our heads, because it is wrapped with insulation, but leaking for sure. We could see some wet rusty stuff forming. Super slow, maybe a pinhole leak, and we're not using our heating right now. Not a big deal. D called our heating guy, who was out of town for a few days but promised he would come take a look.

He stopped by today. Here is the leaky pipe, from two angles. Can you guess the potential problem?

Asbestos.

Ughhhhhhhhh.

A mitigation company came and took a sample for testing. What was going to be a minor and cheap repair may turn into something much bigger and more annoying. Stay tuned - we should know for sure tomorrow.

Wednesday, December 20, 2017

Humidity or Fire Hazard?

In 2010, we bought a Frigidaire dehumidifier for the basement. We started using it in earnest for the last two summers, after realizing that running it constantly set to about 55-60 percent humidity really kept our basement from becoming damp. Add to that a cat that decided to make the entire basement carpet his litter box plus the necessary subsequent cleaning and the basement was damp and stinky without it.

We alternated between putting in the finished part of the basement and emptying the bin and putting it in the unfinished part of the basement and hooking up the hose so that it drained directly into the floor drain. Either way, it ran for a large chunk of the time and we watched our electric bill go from a rating of "great" in comparison to other similar homes to just "good." It was worth it for the fresher basement.

Until last month when a visiting friend happened to notice it and told us that our dehumidifier, which ran all the time including when we were out of town, had been recalled A YEAR AGO because it was a FIRE HAZARD.

Yikes.

So we cut the cord, literally:

The way to get either reimbursed a paltry $90 or so (we don't remember how much we paid but think it was closer to $250) or accept a new dehumidifier of their choice was to cut the cord, write our name and date on the thing with permanent market, and then send in a picture. We chose to take the dehumidifier because even if it's awful, it will probably last at least a couple of years.
It has a comparable tank size and is even energy star, so who knows - might even be an improvement.

We won't know for a while though, since now that it's winter, we're more in the season of humidifying than dehumidifying. Our two humidifiers in the bedroom are running all night trying to keep us from waking up with dry, scratchy throats and stuffy noses. So stay tuned for spring when we turn this bad boy on and see what it can do.

Sunday, November 19, 2017

And the dryer follows

A few days after our washer arrived, the dryer made an appearance. They were supposed to arrive at the same time but a day or two after we ordered our set fro Home Depot, we got a call from LG HQ to say that we had accidentally ordered a mis-matched set. Clicking through from thewirecutter (might as well support them by clicking through) was for the LG 7.4 cu feet dryer with steam, ENERGY STAR with an Energy Star rating. The trim around the door is light silver. 

The washing machine had darker trim, making this other LG 7.4 cu feet dryer with steam dryer, which cost $50 more, a better match.
D had a split second on the phone to decide what to do, and went with the closer match so they would look better beside each other. Unfortunately, we didn't realize the new one is not ENERGY STAR rated and therefore not eligible for a rebate, costing even more in real cost than the extra $50 (and also presumably using more energy). After reading the manual (which is the same for both), it is missing a button that turns on a more energy-saving drying. Otherwise they literally are identical, so I have no idea why they bother selling both models at all (and why ours was more expensive just for darker trim).

Anyway, that switch meant the dryer delivery was delayed so that's why it made its grand appearance a few days later. When they installed it, D did a quick sweep up the dryer vent as far as he could reach with a duster (but just to the first bend and without the whole snake contraption). The install took about 2 minutes. Here they are together.
Nothing much to say about it. The drum has a light (which, for some reason, photographs very strangely even though to the eye, the white balance for both lights is about the same). I haven't played with any of the steam settings yet, so basically the only thing to say about it is "yup, it dries."

Monday, November 13, 2017

The washer is dead, long live the washer

After two previous near-death experiences that would probably have cause most people to replace it, our washing machine became gravely ill again a couple of weeks ago. It wasn't technically dead, just agitating very poorly. We decided it was finally time to invest in a new one. D made a strong argument for a front loader despite my vow to never give up on top-loading. As almost always happens when we want to invest in an electronic, we turned to the wirecutter's recommendations (which also explained why top loaders are less than ideal as front-load technology has become so much better). We decided their reasoning was sound and proceeded to order the recommended pair, the eloquently named LG WM3770HWA and its mate. There was a complication over the drier (more on that later), staggering our delivery dates a bit. So for one weekend, we went from this:
 to this:
There are lots of fancy shmancy settings that, even after reading the manual, I have no idea how to use (seriously, I cannot figure out the difference between "extra rinse" and "rinse and spin" and still don't really know when to use the various sanitary/steam/"allergiene (TM)"settings. But it has lots of overrides so I can get exactly what I want, has a "cold" wash that adds extra time but is more energy efficient and equally as cleaning, and has its own water heater so that we can actually, for once, wash our cloth diapers in actual hot water (our old washer could only use the temperature out of the water heater, which for safety reasons we leave at 120 degrees). It spins out much more water than our old washer, which means things are almost dry before they ever touch the dryer. It's energy star too, which is good for saving power and also for the rebates we're eligible to claim.
One annoying negative is that the door opens with the hinges on the left, which is not changeable. It blocks the way to the dryer. The hoses are too short to switch the order (i.e. move the washer to the left). The only solution we've come up with is to buy another laundry basket, move the wet clothes to the basket, then drag it over and load from the basket into the dryer. I'm sure we'll get used to it, but it's pretty irritating.

The big win is the surprise at the bottom. I knew I wanted to put the unit on pedestals because the added height makes it a little easier to load/unload. For only $100 more than the cost of the pedestal, thanks to a sale, I got a "sidekick." It's a tiny washer under the big washer. It uses its own water and settings, so I can run a hot load above while running a cold load below (or just a load below - it doesn't need the top to be on in order to run). I have no idea if it will be worth it in the long run, but the novelty right now is huge. So far I've cautiously upped the ante on what I've tested, even venturing to some hand knits that I would never mix with regular laundry. This might save me from having to hand wash as much as I do now. I also plan to try it on cloth diapers for those times we have one or two and don't want to wait until we have a full load (like this morning when I discovered last night's diaper up in the girls' room after we did the full cloth diaper load last night). D's extra muddy bike clothes will also get the sidekick treatment.
I had planned to write this post up on Saturday, not Monday, so there would be more suspense before the dryer arrived but...
Stay tuned as I put it through its paces.

Saturday, May 13, 2017

Back from the Brink

This post has an alternate title of "My Husband is Awesome" which is maybe poorly timed for a *mothers day* weekend post. But yet again my husband has brought our laundry appliance back from near death. In 2014, the washing machine stopped agitating. In 2015, our dryer stopped heating. After apparently a year's hiatus, it was time for another problem. For a few weeks, the washing machine spun so aggressively and out of balance that I thought it would bounce its way across the basement floor. I went down several times a load to try to rearrange our wet laundry, but it never seemed to help. 

After a little reading and YouTube research, D was ready to take the whole thing apart and try to diagnose it himself. First, the top panel:
 Then all the rest:
At last, the problem! The hook (circled in red) that attached a spring between the drum and the frame had been attached at a spot that was totally rusted through (arrow) and was now freely hanging. So nothing was restraining the drum from banging all around when it was spinning.
What to do? Drill a new hole next to the hold one and reattach the spring, of course. And so in a half hour, with 0 cost, our washing machine is back in tip top shape.* Yay for handy husbands!
* I mean, as tip top as a rusty old washing machine can be. I know it's just a matter of time before there's something we can't fix. But I adore my totally dumb, manual mechanic appliance and will be so sad when we finally have to buy a new fangled "smart" one.

Monday, December 12, 2016

Empty (?) Basement

We briefly tried keeping tools in the garage, once. But separated from the house by 3 locks and a messy breezeway that required shoes to pass through, not to mention a coat, meant that we never wanted to go out there. So we would bring in what we needed - a screwdriver, hammer, etc. - and then it would in the kitchen or otherwise inappropriate spot for weeks before we finally put it back. That got old quick. So when we acquired a fancy tool chest, we agreed we would use it more if it went in the basement.

Now that the garage is so much more accessible to the rest of the house and separated by only a simple toggle lock, we wanted to start making more use of it. And thanks to our new attic over the garage, we've been able to clear out some space. That meant the tool chest could finally migrate to its rightful place.

We love it there, and it makes so much more sense. D even hopes that with better organizing and as we move more upstairs, he can really start to use the work bench area along the back wall. It's already been built, we just have to clear it out.

And that suddenly meant more room in the basement, too. We cleared out the additional drawers (and moved what we couldn't trash out to that oh-so-spacious attic) to create another totally empty basement wall. Plus not having a giant metal tool chest full of sharp tools made the room a lot more child friendly. So what did we do? Immediately buy a gigantic jungle gym.

We don't really intend to make the basement into "the playroom."  We'd rather have the kids playing up on the main floor and don't want the toys stored on a separate floor where we'd have to haul them up and down. But it is a really nice space right now to let her climb and run and spin and get out the energy that, this time of year, she might not be able to exhaust by playing at a playground.

Find new space, fill new space.

We really have to start clearing out from what feels like a massive accumulation phase.

Wednesday, June 1, 2016

A functional sump

In less than 60 minutes of professional help, we have a functional sump pump and several hundred fewer dollars.


The sump basin is now much cleaner. I wouldn't drink out of it, but we can see the bottom now. This new sump is quiet. So quiet we can only hear it if we are standing right next to it. Which is a problem, since we would have no idea if it stops working, until the basement gets really damp.

So I installed this:

It's powered by a 9V battery and the water sensor is attached to a wire - so it was pretty easy to drop it to the top of the basin. It does work....I dipped the sensor in water and it does make a super load beep. Hopefully it'll still work years later, should the sump ever fail. 

Saturday, May 21, 2016

That's how you get ants

This year has brought a new pest to the neighborhood - tiny black ants. We first saw them in the kitchen, walking along our stove to points unknown.


They seemed to be entering from the door to our breezeway. I first tried a combination of ant traps and generous amounts of cinnamon. It seemed moderately effective, but the ants soon found paths around the cinnamon, since it can't be applied to vertical surfaces.


Finally I got tired of wiping up ants every few hours, so I applied insecticide to the door frame, which mostly stopped them. I later found another trail of ants leading from the dishwasher, so I applied some around (not in) the appliance. As long as we don't leave any sticky food out, the ants seem largely under control.

Unfortunately ants keep appearing in other parts of the house. J found a trail of ants and their larvae swarming our door frame. Another application of bug spray around the door frame took care of them.


At this point, they were just an occasional nuisance.

Then they upped their horror level to max.


In case the videos don't work, here's a picture. The little jerks have built a nest. Inside the switch. In fact, they were so successful they ran out of space inside and started storing larvae outside the switch. After looking in horror at them for about 10 minutes, I figured out a course of action. I couldn't just nail them with insecticide because the switch and power plugs were mixed in with our pantry. Fortunately none of the food items were open, so the ants were just attracted to the electrical charge or something.


So, step 1: vacuum. It was pretty freaky to watch the ant population suddenly triple in size as they tried to flee when I started sucking them up. About 30 minutes later I had vacuumed up 95% of the ants. It was pretty satisfying. Especially since the Dyson suction is powerful enough to kill them by the time they got to the canister.
White is kitty litter. Black/cream is ants/larvae. About 1 inch worth.
The network switch was the most problematic, since most were inside. No matter how many times I hit it, more ants came out. I eventually put it in a zip lock and took it outside to disassemble it.
Contents of the switch after I cracked it open.

I think the ants were coming in from the fireplace trim in the basement, so I aggressively sprayed that and the entire fireplace. I also wiped the switch, power adapters, and power strip in insecticide. When I plugged everything back in (just a few things at a time, just in case they came back in force) I ran the cabling a few feet above the floor to make it harder for the ants to find it.

A week or so later, the ants haven't returned - but it is really nerve wracking because they apparently could swarm anything that is powered. Since we enjoy stuff like lights, internet, and TV, we have to keep the power on, which is a problem because that's how you get ants.

Tuesday, April 12, 2016

Make Basement Great Again: Dump the Pump

A few months ago J noticed that she hadn't heard the sump pump run in a while. I agreed to look at it, then forgot. We both did. A few weeks ago I noticed the basement seemed a bit damp. A few days ago I finally put it all together and opened up the sump basin.


Yuck. Full to the brim with oily water. At least it hadn't overflowed. I unplugged the pump. After removing about 8 gallons of water with the bilge pump, I had only reduced the water level a couple of inches.

I then took a flashlight to the basin and looked more carefully to see if anything looked amiss. There's supposed be a float switch that activates the pump. I whacked it a few times, but nothing happened. Then I realized that it was still unplugged.


Success!

Well, not quite. The float valve thing keeps getting stuck in the bottom of the sump basin. So it doesn't turn on when the water rises. I managed to wedge it in the 'up' position, so every few days I just plug it in and let it run for a few minutes.

Eventually we got a plumber out and he said the oily water was from the pump itself. The seals have degraded and oil is leaking out. He also said the check valve, which controls whether water goes in or out, also needed replacing. In a few days he'll get us a quote on replacing the pump and check valve. Hopefully it won't be much. In the meantime, I'll keep manually activating the pump to control the water.

Tuesday, December 29, 2015

The cup overflows

When J went to the basement, she heard some odd dripping noises. She asked me whether something was wrong with the dehumidifier. I headed into the basement and quickly saw the problem.

The drain at the base of the exterior stairs to the basement had clogged. With the endless rain we have been getting, water had gotten high enough to go over the sill and creep into the house. I took this photo after I spent a couple of minutes with the very useful bilge pump to get some water out. I did get sprayed several times before setting it up correctly. Crucially, I had to put a log over the hose so it wouldn't flop into my face.


After doing that I could get most of the water out in about five minutes. The problem was that in 10 minutes, the water filled back in again. Water apparently was seeping through the walls.


I was putting so much effort into the pumping because it was very uncomfortable to stand on the stairs while trying to manipulate the snake. I first tried the toilet auger, because the clog usually is in the first couple of feet. But I couldn't make any progress. I then moved onto the 25 foot snake. After I ran about 10 feet into the drain with no effect, I decided to call a plumber. I then tried the auger again. Not working. By now the water had filled up to the sill again, so I re-drained it with the bilge pump. Seriously, it is amazing. Buy one if you ever think you need to drain something quickly by hand. The plumber still had not shown up, so I decided to try the snake until he showed up. Well, I beat the plumber.


I have not measured it yet, but I think it took about 15 feet of snake to clear the clog. Ugh. I think I may buy a drill powered snake to speed the process up in the future. It's a huge pain to hand feed that much.