Please share your opinions and expertise since we need all the help we can get!

Thursday, September 26, 2019

Shed Tour

Time to take you inside our new shed and show you how we arranged things. At this point, we are pretty much done finding a home for our garden supplies out there, and the garage has exclusively become a zone for tools, bikes, and other non-yard-related things. Most significantly, there is no more dirt in our garage (topsoil, compost, potting soil, etc.), which were in giant containers and bags all over, contributing to a very dirty--literally--floor.

The left side of the shed has built-in shelves. We asked for three, though if I'd stopped and considered how they were attached to the wall (with giant triangular mounts), I probably would have only gotten two. Fortunately we can work within the spaces between the mounts. This wall of shelves has all our gardening supplies. You can see we have gardening tools, pots, trays, gloves, and seeds. Up high and definitely out of child reach (not that we're leaving them in the shed anyway unattended), are the chemicals, many of which we no longer use but are waiting for the right opportunity to through out. This includes Roundup, Weed and Feed, and other various pesticides and fungicides. It's funny, now that I see this photo I noticed that our poison ivy killer is on a much lower shelf. Time to go out and fix that...
Above the shelves is a loft, which gives us an attic space for longer things. Here is where we are storing our ladders, some garden edging, and things we do not use often like our grass seeder.
Moving to the opposite wall, we have all our longer garden/yard tools, neatly corralled in a stand. The kids have their matching sets there as well.
Then, above that, are the joists that we can put hooks into. Right now, we're not really in need of this space (besides the single hanging wagon you can see). This high ceiling also gives us the ceiling clearance we need to actually pull the rakes out of the stand.
We have our lawn mower easily accessible on the floor, as well as our little garden cart. In all, it's the perfect amount of space for the things we needed to put in it (which is good, since the size of our shed was all based on the size of the existing concrete pad).

Now if only the weather would cool off so we can go out and garden.


Sunday, September 15, 2019

Tin Anniversary

I owe you a tour of the inside of the shed and the garage and I have a surprise project to reveal that I've been working on since March. But today I want to write an update reflecting on our TEN YEAR anniversary in this house. On September 15, 2009, we closed on this place and became first-item home-owners. We walked into this place and started painting, decorating, organizing, and making it feel like home. And we haven't stopped since. D called this update "our blog clip show" so there's no new content, but tons of links and looks back to how far we've come in a decade. I hope you enjoy. I certainly had fun perusing old posts to find the appropriate links.

We started immediately by changing the locks and painting pretty much every room we intended to start living in except the kitchen. We painted the living room, guest room, office, and first floor bathroom. We put up new lighting fixtures everywhere, always at the mercy of whatever wiring existed in a 60-year-old house. We installed fancy shelving. After the main floor was mostly finished, we headed upstairs. We painted the hallway and what became our master bedroom. Much later, we painted the future kids' room. Our attempts at decorating and redecorating, as well as organizing and reorganizing, have been endless.

We got an energy audit and made changes to help our home conserve energy. We replaced our windows upstairs and down. We tweaked our heating (oh so many times), installed a nest, and replaced our air conditioner. We dealt with surprises like asbestos, leaks, failing sump pumps and, most dramatically, a tree falling on our house.

There was a robbery and also some stolen mail that prompted us to make our house more secure, with a ring doorbell, an auto lock, and other cameras.

Outdoors, we tackled major projects like removing unseemly amounts of liriope, cutting old trees and planting new ones, and creating a functional backyard from a land filled with ivy and overgrowth. We put up a swing set, planted a garden, and plants countless plants and flowers in the front and back yards.

And finally, let's look at the big projects. We redid our upstairs bathroom and our kitchen, added an attic, converted our sunroom to a family room, and now most recently, acquired a shed. Every year or two, it seems, we get bored enough to do something dramatic. I wonder what it will be next. I guess you'll have to stick around and see.

It's been quite a decade.

Saturday, August 31, 2019

How many people does it take to...deliver a shed?

One. The answer is an amazing "one." Seriously. Just watch.

First, here's the big reveal on D's amazing job clearing the pad and laying down pavers. You can see it's not quite done, but the rest can be completed any time because it's not under the shed and just there as decoration and to make the whole pad look even.
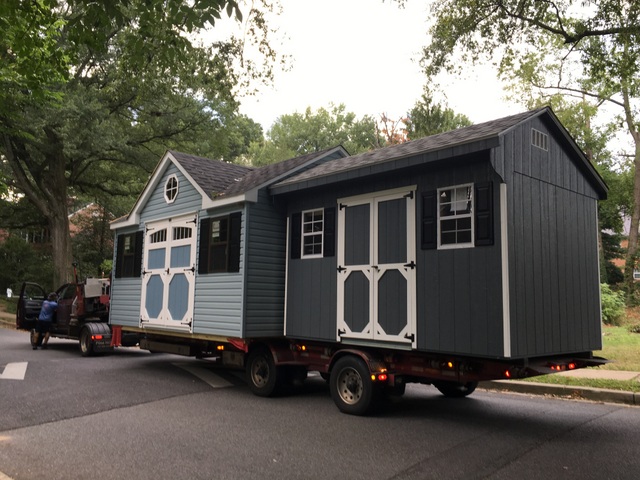
 Here it is, the big day! Can you guess which one is ours?
We chose a dark gray with no special dormer on top--or, if you're thinking logically, the one on the edge that can be unloaded. See that guy there? He was the only person on this delivery. We waited, expecting to see a small team emerge from the pick-up truck. But nope.
One person and a remote-controlled "mule" is apparently all it takes. It was pretty magical to watch. He started by picking up the side with the mule, fork-lift style, and bringing it off the flatbed slowly. The flatbed started rising so that it created an incline. Then he added wheels to the other side of the shed and eased it off the flatbed completely.
 After that, it was just like a video game, watching him maneuver the shed around various obstacles.
Here it is, going through the empty lot. I guess sometimes it's good that it's no longer full of beautiful old trees, sort of.
Then it was a tight fit between our Japanese snowbell and our patio. We had to move a pot of mint to make room as it made its descent from the patio. This thing really seemed to be able to turn on a dime.
 Here it is making the turn to the concrete pad.
Parallel parking this beast is apparently easier than parking a car. Despite us leaving almost NO extra clearance next to the log pile and sand box, he put it exactly in the right position between the crack in the concrete and the other edge. The poor guy was smooshed up against the sandbox when he removed the tires. Oops.
And here it is, in all its glory. Since it arrived earlier this week, we've been busy loading it up. Stay tuned for the tour inside our shed next time.
Edited to add this beautiful artistic rendering:

Spoiler alert--it holds everything perfectly and our garage is starting to look amazing as we clear out yard stuff and sweep out the dirt. Spoiler alert part two--we realized we forgot to take "before" pictures either inside the empty shed or inside our disastrous garage. Trust me, the garage looked awful.

Thursday, August 15, 2019

Getting Sheddy

We got our permit! So now it's time to get ready, or, as the title says, sheddy (it's really remarkable how much I hate puns in real life but seem to love using them in my blog titles). Here's where we are at in the process. First, to get our permit, we gathered our plat information and filled out the necessary forms and also created this super technical architectural drawing of our shed plan:
I know, it's beautiful. So given the fact that our concrete pad only extended 7.5', we needed to gain some extra space. We did that by planning to put 16''x16'' paver stones around the front edge. We also planned to put it on the exposed side to make it look even. Not much of floor support joists will actually rely on this paver stone, but it will extend a few inches past the shed and look much better. We are also limited by a big crack in the pad. Rather than have to deal with leveling it with a rebar--a process that looks awful--we went with a shed that will fit into the space before the crack. So with this plan approved by our permitting department, we were on our way.

Now we just had to actually implement the plan. D went to Home Depot for supplies and then spent the better part of a day putting pavers down along the long edge (the minimum we need to have done before we can have the shed installed). I did my part by watching the kids all day. He used an edger to mark his line:

Next he used a shovel to scoop out the grass and dirt from the area. He even managed to treat the grass like sod and move it to some bare patches in the yard.
Then he used a tamper (in the final picture), dirt, and sand to get a level and firm ground to put the pavers in, followed by more sand around it to help keep it in place.


I'm saving scene pictures until it's all done for a big reveal. In the meantime, we've also been selecting our shed and features and putting down our deposit. This is happening!

Wednesday, July 31, 2019

Ring! Ring! ...Hello?

In a few weeks, my doorbell will have been dead for 3 years. It doesn't seem like something worth keeping track of, but I miss it. I miss it every time I have to replace the piece of tape I put on top to discourage people from pressing the bell and waiting, assuming that we are on our way. I miss it in the evening when I come home and there's no little orange glowing button. I miss it every time I have to text or email someone: "Just knock, because the doorbell doesn't work."

Well no more. After 3 years of not wanting to pay for an electrician to come rewire it, we decided to take a different approach. We paid Jeff Bezos to fix the problem instead, recently adding a ring to our ever-increasing amount of Amazon products in our lives (we're not happy about it, but we've come to love our lord and master).

We'd been waffling for about a year on it (in part because of our reluctance to buy more Amazon products) but after seeing one at a friend's house, we decided it was the cheapest, easiest solution to my sad doorbell problem. And it was incredibly quick. D and the girls even managed to install it in the rain in about a half hour (it probably would have been quicker without the "help" of small children). The kit included an adorably small level and several inserts to angle the device. We didn't end up needing to tilt it, screwing it directly into the door frame. The only question really was whether to use the gray metallic faceplate or the black one.

We chose the black face plate instead of the gray metallic one since at least it matches our shutters. It is linked to our echo to tell us when "someone is at the door" and offers some motion detection as well, which is nice for when a package goes missing or to make sure the cat sitter remembered to pay us a visit. Most important for me, it makes an audible chime for the person at the other end pressing the doorbell. It's the little things, I guess. The kids find it hilarious and love to ring it every time they come in. We get a fun video on our phones.
Despite this unneeded extra use, we've been impressed with the battery life so far (you can hardwire it in but our original problem was that we don't have electricity to the doorbell). It's not totally flush with our door frame because it was a bit wider than the space between the trim, but it looks great. From above, you can still get a peek at our sad little doorbell. But at least now it isn't confusing visitors.

Tuesday, July 16, 2019

Dead wood

Last fall, we noticed that our one-year-old maple trees were being ripped apart by rutting deer. We took action quickly by wrapping them in plastic tubing. Well, sadly, we were too late, at least for the one in the back yard. After 18 months in its new home, it is dead as a doornail. Or a dead tree. We looked up about a week and a half ago and realized that it was not well:
 Yeah...that doesn't look right.

Here's another picture of the bark - I guess despite covering it up at this stage, too much of the infrastructure had been damaged. We are so bummed. That tree had such beautiful red fall foliage and was one we planted in the hopes of one day re-developing our tree canopy, after losing so many trees in our back yard.

It isn't helping that nearly every time the kids play outside, they find another pile of deer poop that we have to shovel up.

Fortunately the other maple in the front seems to have recovered:
And rather than dwell on our sad dead tree, here's our lovely summer garden at the moment. We have black-eyed susans (though sparser than last year on one side of the yard for some reason),  some echinacea/coneflowers and Russian sage.
Here are some surprisingly happy red and pink roses, despite my utter lack of effort:
And new this year, a hibiscus plant we bought last summer, probably as an impulse purchase at Home Depot or something. The flowers are huge - toddler hand for scale:

One tree, all things considered, is not too bad. But I'm still beginning to hate the deer fouling our yard.

Friday, July 5, 2019

Desk organization

My desk was a disaster. I didn't take a before picture of the whole thing because it had lots of stuff I would have to "fuzz" out, but trust me when I say there were just piles of papers - some that needed permanent filing, some that needed addressing (i.e. bills, summer kindergarten assignments), some that needed surreptitious trashing (children's art). I have still been using the mesh wall hanger that you can see in this picture from during our remodel. Except that because we now have a backsplash, I have been keeping it propped up against the wall, precariously balanced. All the papers theoretically go in there, but without a way to organize them and because the whole thing keeps falling, I also end up just stacking things in piles. I almost lost a gift card in the stack. I was constantly worried I would miss one of our few paper bills. It was getting bad.
I have shelves built in above the desk area, but the size of all the cubbies makes it hard to do anything practical with them. So filling the space I have, I stockpile folded up receipts, expired meds for the next give-back day, $1 bills for my daughter's allowance, old greeting cards, etc. But no full sized papers - which is the one thing that I seem to accumulate. It was time to make this a more usable space.
It was clear that these were assembled as two "H"-shaped units, so we thought (hoped!) that removing one of them would leave everything else unharmed. We used a keyhole saw and started sawing into one side of the structure.
 A little more, and then a little more than that, working in slow chunks:
When we got enough of the vertical pieces out, the rest came out pretty easily. Still the whole thing was slow going, since we didn't want to ruin any of the finish.
Then we were left with the nails sticking out from below. We managed to hammer a couple of them out from the top. D leveled the others with a dremel.
The shelf looks smooth and evenly stained without the inner structure, fortunately, as expected. You would never know the letter-holder-sized organizer was ever there.
Here it is now, with two document trays stacked inside, purchased after careful measuring. The shelf is about 11'' deep - an annoyingly precise depth that meant that while a paper could fit in there long-wise (so that the 8.5'' side faced out), an organizer slightly LARGER than a paper would stick out (most of the document trays were 12-14'' long). So I opted to buy trays that are open on the long side, though that meant less real estate inside the shelf. I was able to squeeze two in there, because while the clearance was only 4.5'' to the top lip, beyond that first half inch, inside was almost 6'' high.
It's not perfect of course - I'm still a victim of my own flawed organizational skills. But I have two distinct full-sized shelves, plus a couple of folders, to sort papers. It definitely makes the space more helpful for the types of things I actually need to store there.

Meanwhile (as you can see from the bottom right corner of the photo above), I'm still using the once-upon-a-time-wall-mounted organizer. I had purchased a version matching the document trays that would actually stand up on a flat base, but it turned out to be envelope-sized, rather than full-sized. And that was exactly the size that I *don't* actually need to help me organize. So I need a similar item that would hold normal 8.5x11'' paper. I haven't been able to find one - so please let me know if you come across something.
As usual, we've been so busy around the house that I've had trouble finding time to post. But I have a few projects lined up to talk about. AND we are filing our shed permit paperwork TODAY. So more on that soon as well.

Friday, June 21, 2019

And it was all yellow

It turns out that construction paper, when wet, is great at transferring dye. It makes sense, in retrospect, but definitely was not something I would have thought about when my kids went for a cup of water while coloring last weekend. But oh yes, there is quite a lot of dye in that paper. An hour after said coloring, we walked into the sunroom and see sopping wet construction paper on the wood floor. We life it and see...
Now this would be bad in any instance, but you may remember the saga over the floors in this room and how we fought hard to make it look perfect. And in an instant, two small children had ruined our efforts. OK, I'm being a bit melodramatic - I know it will sand out if we ever were to refinish the floors, but that is most definitely not on the horizon.

Various websites provide options of varying degrees of confidence. Both of us agree that Magic Eraser seems like a bad idea, since it actually sands away some of the finish. So we opt first for a vinegar solution and a cloth. That removes a lot of the blue and a small amount of the yellow. Next, it's on to a baking soda solution. I have to warn you, keeping a consistent white balance with these pictures was pretty much impossible, so you'll have to use your imagination a bit to compare between pictures.
Even with something as gentle as baking soda, instructions across several websites seem to suggest that gently rubbing it, rather than aggressively scrubbing it, was the way to go. Even baking soda could pull off some of the shine. So we put some elbow grease into it for a while.
 And in the end? Well, you tell me. What do you see? Here's the "finished" picture, from two angles (and evidently two very different light sources?).

Do you see it? We do. It's a lot better but the yellow is still there lurking. We're hoping that no one else will ever notice it and that, with time, neither will we. Our wood floors are generally a honey color, so maybe it will just look like variation in the wood. Or we might go back and take another stab at it with something more aggressive. Do you have any ideas? We've read so many things on the internet that we'd prefer to try something that one of you, dear reader(s) has actually successfully used in a similar situation.

We were surprised that a color as light as yellow lasted more than the blue, until D reminded me about the constant problems we're dealing with on our counter when I make my new favorite drink, a golden milk latte. Getting turmeric on the counters keeps requiring me to pull out the big guns of a countertop cleaner, rather than just our normal dish soap and water. I didn't take a picture because I didn't want to let the color sit for even a moment longer than I needed to, once I realized that I'd gotten some on the counter (I usually make my drink on the stove, AWAY from the new counter). Not that we think turmeric is the source for yellow in construction paper, but who knows...

Until then, well, we're feeling a little yellow.