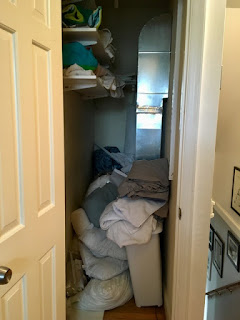
This is no exaggeration. Because of the extra duct on the right, we couldn't get to the back easily. We'd already pulled off a few of the shelves so that we could squeeze into the back if necessary, so we lost shelf space, and what we kept was so high that I could not reach it easily. So the things we use most just sat in huge piles in the front. And the rest of our extra towels, sheets, shower curtains, pillows, and blankets were just piled up any way they would fit. Even though I didn't have to go in there often, it really bothered me.
The obvious first step was just to move all the linens. It was no easy feat finding them a long-term temporary place while I slowly worked on this project, but we split it up into the two closets in the guest room. It quickly became evident that we had too many extra pillows:
We got rid of a few of the oldest, as well as some towels that were not really necessary. So we were left with this empty closet. You can see the extra shelves just sitting on the floor.
While we've used shelving systems like this before (the toy closet in the office and the shelves above our TV), it was a bad fit for such a tight space.
In the back, above the horizontal duct, was a closet rod and a wire shelf. After some discussion, we decided we should take it all down and start fresh.
This was a project that J (that's me) did almost all alone, taking hidden hours here and there. So I began removing shelving in March. A little elbow grease and then carefully carrying the shelves down the stairs, around some tight corners, and to the curb where I'm sure they found a new home.After a few days of removing hardware, the really slow part started. The walls were a MESS! The shelving screws were installed in molly bolts. The vertical rods left ridges in the paint. The duct work installation clearly had put a few extra holes in the drywall. The walls and ceiling were separating from each other. It was bad. So I spackled and sanded, sanded and spackled. I spread caulk in all the corners. It was slow going, between waiting for layers to dry and waiting for opportunities to sneak upstairs (but not when the kids were asleep because it's right outside their bedroom). This stage took literally months. In the end, what I got was not perfect because--let's face it--this is a closet, but at least moderately even walls that have no giant holes or dents.
Here's a before and after for the caulking. You'll have to trust me on the spackle--it was too hard to photograph.
Stayed tuned for the next installment, where we reveal paint colors and further plans. (Spoiler alert: I waited until this project was totally completed before blogging it, so if you're someone who likes to turn to the last page of the book then I'll tell you that we are very happy with the final outcome.)


No comments:
Post a Comment