Please share your opinions and expertise since we need all the help we can get!

Sunday, September 28, 2025

Disappearing Guest Room

You know you've been in your house for a while when your "before" pictures were "after" pictures not too long ago. In the cascading changes that started with our new addition and ended with the kids each getting their own bedroom, we redid the guest room after finding a new use for the furniture in there (more on that later). The biggest change: installing a Murphy bed, so now the room is so much more spacious for our crafting activities and still can transform into a guest room for the few times (seriously, just once or twice a year) that we have visitors.

After much research by D, we went with Wilding Wallbeds for our Murphy bed. They were a little pricy but we liked that they were made with all real hardwood, rather than plywood, MDF, and veneer. Specifically, we got the Remington in natural/alder finish.

The problem? The thing was SO hard to build. D is very handy (seriously, just wait a few posts and I'll show off his amazing carpentry skills) and I watched him struggle to put it together. And, in fact, there are some holes in the wrong spot. Because he had to DRILL HIS OWN HOLES. We knew this would be no IKEA assembly, but we still figured that holes would be predrilled, for example. It didn't help that we were up against a deadline because of course it would, in fact, be the once-to-twice-a-year time that we were having visitors. For a couple of weeks, the room looked like this:


Before I show you how great the finished product looked, let me dig up a picture from a 2021 post as our "before" picture.

And here it is now! We got a bookshelf on one side and the desk addition. The desk is so cool--you can leave things on the desk when the bed is open. Look at all that floor space!
And here is the bed extended. You can see that decor-wise, it looks very similar to how it did pre-Murphy bed. Same pictures, same bedspread, etc. But now we have a queen-sized bed and a much cushier mattress, instead the full-sized regular bed that had been there. And it folds right away for most of the year!

We also made a few updates on the other side of the room. Here was the "before" picture:

I chose to keep the vanity I had used in our pre-addition bedroom rather than the campaign desk (real wood antique-store find rather than a Target buy) and I lost the storage in the tall dresser and had to figure out where to store my craft supplies. 
You may recognize that tall piece from a very different place:
That's right. I moved around some doors and spray painted the bottom drawer (and the leg caps) gray and now it's blends right in! No more neon green, no more baby room. Just lots of beading, fabrics, and embroidery floss storage.

And it wasn't really worth photographing, but most of the closet storage we installed in the office here has now been relocated to this room. The door unit now contains most of our paints and glues and the mesh drawers holds playdoh, stamps, and knitting supplies. And most important, it's all contained and largely neat (or, at least, hidden away).

The hard part now is just remembering to call it the craft room and not the guest room!

Sunday, September 14, 2025

An office to work in

For years, the so-called "office" was anything but. Despite our best efforts at organization over many years (see: 2017 closet redo,  2018, and 2020), it was impossible to keep it looking like an office with toys in it. It always resembled a messy toy room with a desk in it. Here's a view two walls, a few weeks after we broke ground on the addition but way before they had to start coming in the house (and therefore also before our crown molding project):
The other side is no better (probably worse). You can see that we are still using the 2017 closet system, but really had trouble containing all the kids things.
In the end, there really wasn't a magical solution except adding more space. By building the addition, we were able to give each kid a bedroom (more on those updates in future posts) and that gave them the space to move the toys to their rooms. Are their bedrooms magically neater and better organized? Of course not! But now at least the mess is their problem. Admittedly their rooms ARE much neater than these office pictures, because they have more storage space and fewer toys (items are divided across two bedrooms and also they are just growing up and keeping fewer toys, *sob*). They also think twice now about accruing stuff--at one point, I almost shed tears of joy when one child said: "I want this, but I have nowhere to put it."

So with the toys out, how did we decorate? I'm so glad you asked! We knew we wanted to create a kind of hallway to divide the desk area from the path into the addition, and found a cute barrister bookcase in an antique shop with two layers. Because of the modular way it is constructed, it was easy to dismantle and bring home. The top needs resurfacing, but otherwise it is in pretty good condition and creates a room divider that doesn't leave either side too cramped, because it's only about chest-high.

With that purchased, we knew that the other piece, that would go on the now-empty wall across from the addition, ought to match and be a medium wood without too much trim. We perused a bunch of mid-century modern shops and set up keywords in various online marketplaces, but it was clear it was going to cost a lot to get something we liked. UNTIL we lucked out and found someone selling a piece on Craiglist for $50. True, it was almost an hour away and, true, it seemed impossible to get home, but D was up to the challenge. It was completely modular and D managed to tetris the whole thing--two bookcases with cabinets, into our SUV in a very impressive way:
The piece, made in Yugoslavia--apparently a popular place for "cheap" MCM furniture in the 1970s and 80s--is absolutely amazing. This might be one of my favorite pieces of furniture now, made especially sweet by the thrill of the hunt (I think that's also why I enjoy perusing antique shops). This is really the view from our bedroom now, so it's important to me that it looks nice, showing off books I enjoy without being overly cluttered.

We also bought a new filing cabinet (and printer stand). Nothing too exciting, but it's nicer than the cheap medal filing cabinet that was so flimsy that it dented if we opened it by pulling on the draw itself and CERTAINLY nicer than the milk crate stack holding the printer.

And that's our office!

Tuesday, August 5, 2025

Stair Repair

As the addition project was wrapping up, we had yet another project that came up, rather abruptly and unexpectedly. The steps to our backyard patio began collapsing, and it was clear we would have to take pretty immediate action to make sure we could exit (safely) from that door. And since that is how we let the dog out, among other things, we definitely could not ignore the problem. 

With the stair treads beginning to sag dramatically and everything feeling very "soft", we got down low to investigate. The wood was clearly rotting away and splitting. Here's the bottom of the stringer (did you know that piece is called a stringer? we didn't until last year). It was resting directly on the ground, which we have since learned is not correct because of said likelihood of rotting.

Yikes...
The top part of the stringer was splitting, probably because the rotten bottom made the whole thing move out of position, making the first step especially treacherous.
D did some research and decided this was a manageable do-it-yourself project (he and I have different ideas of DIY...). So he got to work, realizing that he could not take too long to leave us without back steps. He took apart the entire thing to remove the rotting stringers.

The old stringer went to the wood facing board just below the deck floor, but the new one was a little lower (even despite lifting it an inch, see below), so D had to add a bit more wood to having something to attach it to:
The biggest change from the old steps was making sure that the stringers did not rest on dirt, where they would rot more quickly. We bought some pavers to sit them on--which is why I mentioned that everything was about an inch higher now than it was before. We are pretty sure that this set of steps is really supposed to have one additional step on it, but obviously we did not have another stair tread to add, so we worked with what we had:
And voila! Steps that are not about to collapse. The decking material is still old and flimsy and we'd love to add this whole back exit to our list of things to remodel. We have ideas floating through our heads on how to build it out and add some screening to make it a walk-out screened in porch, but that's a project for another day. If we do any work, we'd also get materials to match the back desk of the new addition, in Trex pebble gray with white trim and matching handrails. So that was partly why it just wasn't worth trying to upgrade these while we were in emergency repair mode. Hopefully in a few years, it will look completely different anyway.


Saturday, July 19, 2025

While all that was going on

A side project we had going with the same team doing our addition was to give our existing main floor rooms a facelift. Two small details on the main level had been ones on our to-do list for a while.

D has been bothered by the fact that a few rooms on the main floor of our house have crown molding, which he really likes, while others do not. We made sure we added it to the sunroom when we had that remodel done, and he wanted to add it to the rest of the rooms too. And now the work crew was already tasked with matching the baseboard, door and window trim for the addition--so why not throw some crown molding in, too.

And I have forever wanted the doors in our house to match. Most of the first floor doors were plain doors, while the upstairs doors (and, randomly, the two closets in the guest room) had panels in them. The plain doors were beat-up and generally unattractive, and I'd occasionally try to find a handyman (what is the gender-neutral term for this? handy person does NOT sound right. maybe just a general contractor?) to install some, after doing some research to learn that door installation was no easy feat and not something we wanted to tackle ourselves. So while they were ordering custom doors for the addition (pocket doors, in that case), we added this to the pile.

You can guess this added up to a very expensive and very expansive side quest.

The molding:

A few "before" and "after" pictures in the two rooms we decided to trim: the office and the guest room:


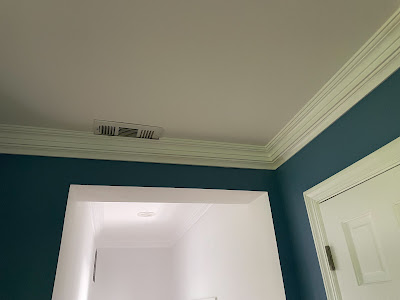
The crown molding was wide enough to interfere with our existing air vent (which, as a reminder, had been above a window but is now above the entry into the new addition) so they sort of carved out a little niche for it. I...don't love it. But I didn't have any better ideas and we certainly weren't about to cut the ceiling and move the vent an inch just for this. And honestly, I really never look up and see it.
Taking a closer look at the line where the ceiling meets the wall also made me hyper-aware that we didn't always do a great job with painting the edge. Yet another thing that crown molding solves (well at least if that crown molding is pre-painted).
Take a moment to admire all those corners!

More corners, no molding:

With molding!

To give you an idea of how very disruptive this felt, here's a "during" picture. You can see the lovely molding going up but also how all the furniture is in the middle of the floor covered in a tarp (at one point, I needed to get something in one of the dresser drawers, so that was fun).

In the end, we're very happy with the look. It makes the house feel more consistent across rooms. Much like with the doors, which now also all match. Onwards!

The new doors arrived, all custom ordered. And of course since we have an old house, each door had its own unique fit issues they had to deal with on-site. In total, we swapped out 6 doors (three doors off the hallway for the bathroom, guest bedroom, and office; the pantry closet; the bathroom closet; and the office closet). 

We got new doorknobs too, since the old ones weren't worth salvaging. Many had paint all over them and they felt light and cheap. We went with Schlage knobs, and the bedroom and bathroom ones have a lock on them. We have a few more to install, actually, in the doors that we did not replace. But that's a post for a different time.

Here's the teeny pantry door that is so narrow, it only became a three-panel door.

And here it is now! It's a heavier door (we didn't get fully solid doors, but we were upsold on a slightly heftier model from our original choice and we couldn't be happier--they're the perfect weight).
Here's the "before" view of our bathroom and office doors. You can see that they're not bad, but they are very plain. These doors were wood, so that was nice, but they were hollow and light and pretty beat-up. I felt that swapping them out was no huge loss to our home.
And here it is now. I think the panels look a lot better.
This picture above does depict how we did not quite get the right white. The white is Chantilly Lace, described as a "go-to" white, a decision supported by many blogs we had read in advance when trying to pick the best white for our addition trim (in semi-gloss) and hallway (no record of which finish we decided on and they didn't leave us extra, ugh). We were wary of "warm" white (whites with yellow undertones) since our home is all grays and blues. But yes, this white turned out to be quite white. TOO white. And yes, our new addition hallway is VERY bright. It showed us that most of the things we thought were white were actually white with yellow undertones. Oops. This is noticeable next to our IKEA liquor cabinets in the kitchen and in our main floor bathroom too. It's also doing our dingy towels no favors.
Nonetheless, we are happy with the result. The doors feel solid and look much better. The trim classes the house up a bit more. They had both been on our to-do list for a long time and we had just lacked the ability to find someone to do the upgrade. (Once we even came close, with a handshake deal that fell through.) So it feels good to have this done.

Thursday, July 10, 2025

A tale of two bathrooms

To continue the tour of the new addition, it's on to the bathroom. Or bathrooms, as the case is here. Remember that in order to keep the window in our existing bathroom and avoid having to move our AC unit, we split the bathroom up so that there are rooms on both sides of the hallway. You can get an idea of that here in our last post from 2024, in the first picture. We used the same decor on both sides (tiles, paint, finishes and fixtures, etc.) so that they look like one coherent whole. Or that was the goal at least. You'll notice from that post that the pictures don't look all that different than they did just before we moved into the space--bathrooms don't require the kind of filling in that a bedroom does. But still, we've accessorized and made it our own.

Here's the view "from the toilet" of our....powder room? We don't really have names for these split rooms. It's the one with the toilet in it. Still loving the wallpaper a year later and thrilled that we were able to find something to put on the shelves (with them being exposed and in the room with the toilet, we didn't really want to store towels there, and open storage for toiletries would get messy, so we went with pure decor--two samovars and two Asian vases--that had been calling out for a nice place to live. And the color complimented the room perfectly).

We were able to use the curtains that had been in the office, so that was a good repurposing. And a year into our Toto Washlet I can say it was definitely worth the splurge.
I don't think I really need to explain what all the buttons do but let me tell you it is great. The only problem is that even with the lid closed, it definitely makes noise sometimes in the middle of the night randomly.
And sometimes, it makes noises not-so-randomly. The cats are fascinated with this toilet (especially in the dark when the two sets of lights both on the side and in the bowl are lit. I believe they think the toilet is trying to communicate with them. It definitely makes using the bathroom...interesting.

The other half of the bathroom also looks a lot like it did a year ago. We are still living with our mismatched chrome medicine cabinets because buying new doors was too expensive. I barely notice them. Mostly. The heated towel rack, the second of our three bathroom splurges, also has proven to be a great feature. Even in the summer, I like coming out to a slightly warmed towel (that then continues to heat and dry up after my shower). It's also amazing for drying handwashing laundry.
Inside the shower, it's spacious and the bench makes shaving easy. It's dark, because the light is controlled by the steam shower and therefore can only be turned on when the steam shower is on. If we had known that was how it was going to work, we would have demanded a different set-up. But we can drop the steam shower temperature to something like 55 degrees F so that it doesn't produce steam to get the light on when we need it. Annoying, but workable.

Here's a picture of the steam shower panel, and our third and final splurge. I am not using it this time of year, but I turned it on most showers in the winter to supplement the water temperature (which seems to cool dramatically in the pipes, despite our attempts to insulate them--a future project, I suppose).
And with that, our addition tour is over. Next time, we'll start showing off all the other many projects we've spent the year working on!

Wednesday, July 2, 2025

Closets with a view

Time for a tour of the "closet" hallway of our bedroom--we really don't know what to call this space. As a reminder, it's behind the wallpapered wall that our bed is on. The whole section is made up of IKEA PAX units built into the wall. There are four in total: three along the main wall (seen here) and then a fourth on the side (where I'm standing to take this picture).

We put a slim sofa table along the opposite wall (Yamazaki Home). It was smaller than we imagined it to be, but it works pretty well and is low enough that we can hang relatively long things from the hooks we installed along the top of the wall. Plus of course I have my original IKEA step stool (no longer available, sadly) to help me reach the higher shelves in the closet. All of it is in the light wood we're sticking to in our bedroom.

A lot of thought went into choosing the blinds for the two windows in here after, all the drama the last time we bought and installed blinds. In that effort, the trade-off between terrible and cheap-looking ones vs. those that cost a small fortune was....not ideal. This time, we found options that were pricy but not overly so (and ordered swatches and then waited for a sale), and we're quite happy with the outcome.
 
They are Bali Blinds roller shades in the black-out fabric named Silver Fox. Funny enough, that was the color I picked without any swatches in hand, and it remained my favorite after seeing about a dozen little squares. It looks sort of like a linen or slub cotton and does a good job of blocking light. The west side of the house doesn't get a ton during the morning, of course, but every bit helps when trying to sleep in on weekends.

Both pieces of furniture tucked in under the window are ones we bought down from upstairs (my jewelry chest and a dresser). I would love to replace that dresser with one that looks very similar but has more functional drawers--these are cheap and hard to open. I've been on the lookout for another maple or birch piece with similar height. The mirror was one I bought for the guest room a few years ago. I think at some point we will replace it with one that rests on the wall and takes up less space, but this fits the decor for now and I'm glad we've been able to make-do with so few new furniture purchases (for cost reasons as well as sustainability). The kids have been using the hallway area with the mirror at the end as a runway for trying out new fashion!
Here's a glimpse inside the PAX closets for an idea of how we're using all the organizational features in the system. We're using the hanging bar, stationary selves, pull-out drawers with both opaque and clear fronts, the pull-out shoe shelf and the pants bar (hard to see, but it's on the right above my shoes). They do certainly make it easy to cram a lot of things in there. And yes, for the record, I have PAX units and D has just one. But he's making it work.
And of course it's all by the light of this cute little chandelier (and some can lights, but that's boring). I had to add a little glamor

Next time, the bathrooms, which look remarkably like they did last July because, well, they're bathrooms and don't require much furnishing. But I'll show them off anyway before moving on to the projects we've been keeping busy with in the rest of the house.