Please share your opinions and expertise since we need all the help we can get!

Sunday, April 26, 2015

Gardening successes and not

After spending two afternoons this weekend cleaning up our front gardens, I thought I'd show you how they're coming along. The cool wet spring is making everything very happy right now, and our plants and lawn look very happy.

The garden bed under the window is looking full:
In fact, I have to thin the irises and black-eyed Susans this fall (I planned to do it this spring and only just read that all splitting and thinning is supposed to happen in the fall - have to remember to do this come October):
Strawberries also seem to have taken over our garden. They started out in the red planter and escaped last summer. We transplanted some to the beige planter but the ones on the ground made a come-back this year as well (we were pretty sure they were dead). Our next invasive plant perhaps? I'd be glad if we actually got to eat the strawberries, but the squirrels and birds always get to them first.
The other side is doing well too, but isn't nearly as full. When I do split the irises, I plan to put a lot of them over here. I also want to split the hostas from the right garden and move them here. The ones on the right are short and variegated and come up earlier in the year. The ones on this side are solid green and higher and come up later. They're nice but I think I want to move them somewhere else so that both gardens match. Again, something to remember for the fall.
Our biggest work today was on the two front gardens. I weeded them yesterday and there were just so many weeds at the edge of the sidewalk that I decided I need to buy more hearty plants to crowd them out.

Can you see the difference between the two pictures? More creeping phlox, this time in "Emerald Blue":

Our pink phlox never took off as well as the Georgia Blue, and it's been 3 years so we tried the purple variety. Mostly because we see it more often, so thought that maybe it is heartier. Here is a picture of a neighbor's phlox, only 3 years after she planted it:
So yeah, obviously a lot of room for improvement.
We also added a strange, tiny ground-cover-style mint variety, "Corsican" behind the thyme (can you see the two clumps back there? We couldn't resist buying it and thought it might fill in behind the thyme (which, incidentally, I have to really trim down in the fall because, yet again, I learned spring is not the time to do that - it's really dead and twiggy right now below the healthy parts):

We also added some phlox closer to the light post, and some "Homestead Purple" verbena. We tried verbena before and I'm pretty sure it got eaten by squirrels or deer, but I love the color so we're trying again. 

I also threw a couple phlox plants on this side as well:

I know in all these cases, the before and after pictures aren't particularly dramatic, but it still took about an hour of planting. Now we need to remulch - at least these front sections - so that it too will help keep the weeds at bay.

Tuesday, April 21, 2015

Yard updates

We've been too busy enjoying the nice weather to do much around the house lately, but we have done some lawn and garden maintenance. I had a nice picture of 6 or 7 big containers filled with lawn waste and leaves, but I seem to have misplaced it. You can use your imagination.

This year we had some help over-seeding the backyard and picking up leaves and sticks:


The big change this year was removing most of the lilacs from the front garden. After 3 years, most of them never really took off.  So we got rid of them like we said we would. We kept the one closest to the front door and the new ones
In their place, we put two Knock-Out roses. If they grow happily, they'll become 3-4 feet high dense shrubs that bloom repeatedly late-spring through early fall. It probably won't happen, but I continue to be optimistic.
The vast, cleared area from last fall is looking good, though the grass is a little spotty where we didn't manage to clear away the wet leaves. We tried over-seeding but not much is happening yet. It's still a huge improvement - so much space now!
After spending a whole nap (I measure my time in toddler naps now) weeding a few weeks ago, I'm sorry to see that the dandelions and other weeds have proliferated, so I guess I know what I'm doing this weekend as well. I tried using weed inhibitors, but they don't seem to have done much. Well at least a lot of the plants have come back after a particularly harsh winter, so that's exciting.

Finally, we're being proactive and spraying our new hawthorn with fungicide weekly this year after it was infected with rust last summer. Hopefully this does the trick! We picked hawthorn of all trees because it is supposed to be foolproof, so I don't know what that says about us....

Sunday, April 5, 2015

Chair shopping makes me blue

This corner looks sad and empty. And definitely not baby proof (easy access to a very breakable lamp). We've had a plan for it for quite a while now - a comfy chair, with a standing lamp behind it.
However, it turns out that's much easier said than done.

Usually I like a furniture challenge. The thrill of the hunt. But apparently that doesn't really apply to upholstered things. That's because 1) Used upholstered furniture can be risky, so that means no Craigslist or thrift stores and 2) Ikea doesn't make particularly comfy upholstered furniture, so my go-to store is not a good choice.

The quality of upholstered furniture also seems to actually be reflected in the price. Hardwood frames, durable fabrics, and sturdy springs and foam cost money. And even "cheap" chairs start at $200. So I started out with my usual non-Ikea standbys, Crate and Barrel (and CB2), West Elm, and Pottery Barn. West Elm had the best choices for our style and price range (they were in the $600-900 range instead of CB's and Pottery Barn's $1100-$1400).

We were particularly partial to Sloan

and Victor:
We went to a store to try them out. Because, you know, we are going to pay a lot and spend some quality time sitting in them. So we want to make sure they're comfortable.

One problem: not in stores. Or at least not in our nearest store (which isn't even all that near). And no one could tell us if they were in ANY stores. The customer service rep I talked to said there is no central tracking of merchandise. Spending that kind of money for something we can't try first seems...reckless.

But we kept considering it, since no other store had a design we liked (at any price tag, even). So I ordered some free swatches. We already knew that since our other seating is brown and gray, that we wanted something bolder, in the bright turquoise blue that is our living room accent color.

Here's what we got, set against a pillow we were hoping to closely match:
It doesn't come across as much as I like but trust me when I say all the colors are blah. The linen weave set of three is our favorite texture. But the rightmost of the 3 is too green and the leftmost is too gray/boring. The closest match is the middle on the bottom row, but that is a strange microfiber suede that neither of us like.

So we are faced with deciding whether to order a chair we can't test in a color we don't love - and since the colors are custom orders, there are no returns. And thus the chair hunt continues.

Funny enough, when I went to West Elm today to add the links to this post, I noticed they are advertising "new colors" - and sure enough, there are a few more blues. Swatches are on the way!

Saturday, March 28, 2015

Smart lock locks smartly

When we were robbed a few months ago, we were left with two possible stories for how the burglar got in - we came home to find both a window and door unlocked. Since we are pretty convinced the window was locked from the inside, our suspicion is that this happened on one of the rare unlucky days that one of us left the house without locking the front door. It happens once every few months. We needed to take steps to make sure that couldn't happen any more, rare though it was.

And so, despite the relatively new keyless lock already installed on our front door, we decided to upgrade. Our first keyless lock had no motor - we had to manually turn the deadbolt. We selected it for that feature. Fewer moving parts meant less to break and longer battery life. Now however, we wanted something that would automatically lock if we forgot.

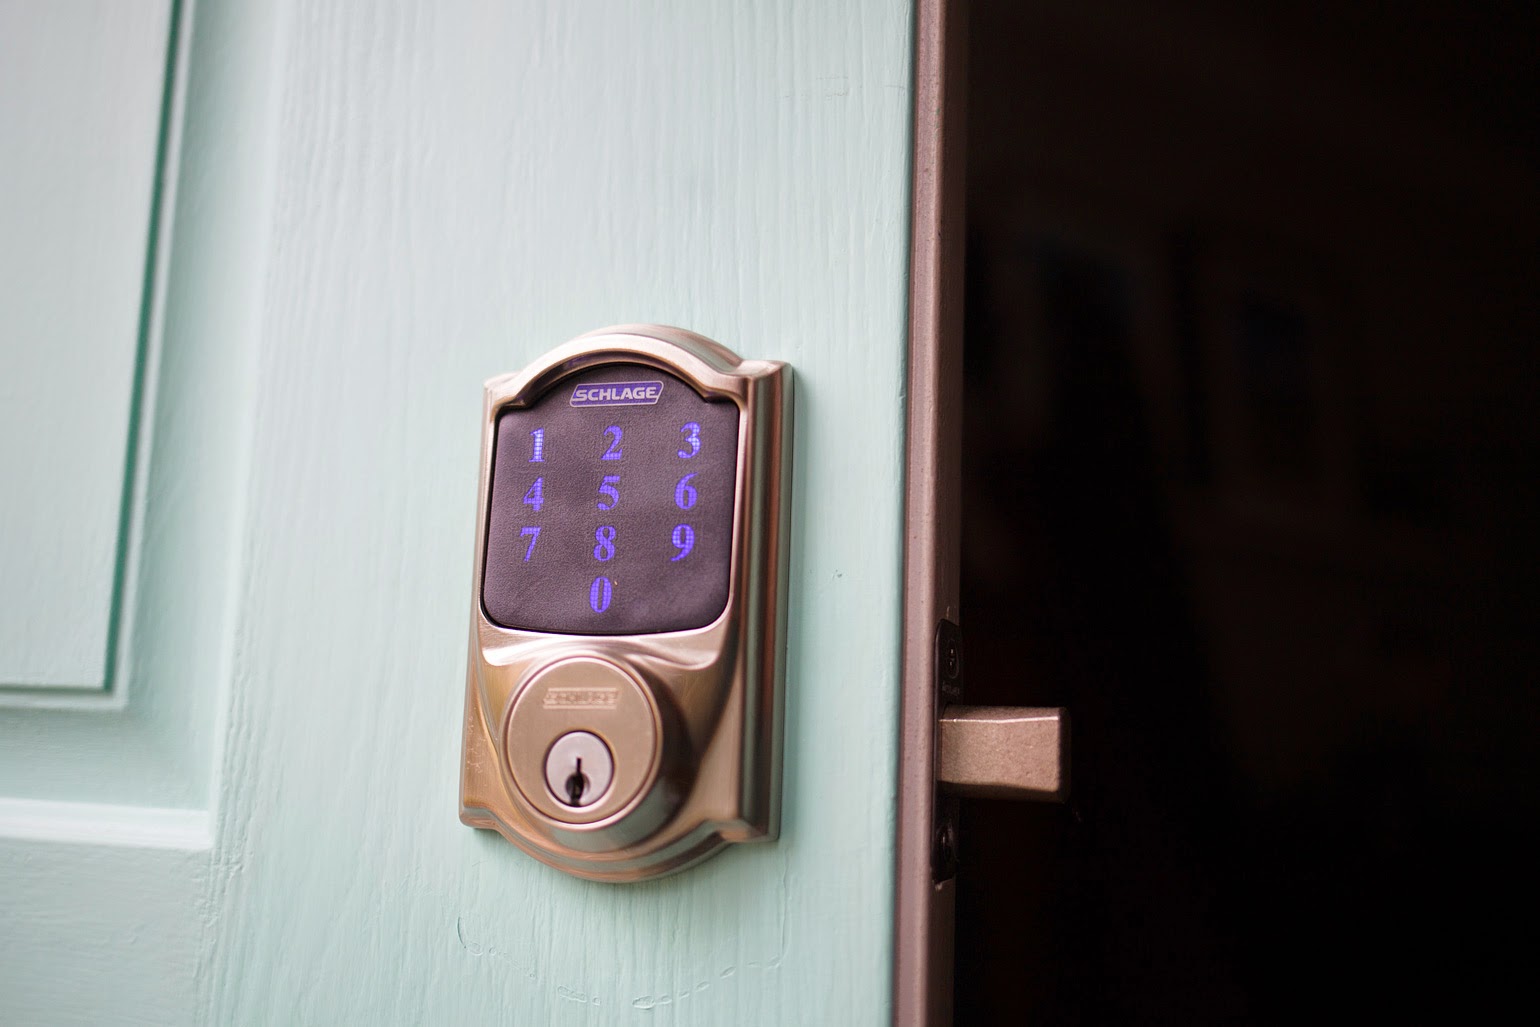
Schlage's touchscreen model will do that, and will sync with a home wireless hub, if we eventually decide to further turn our home into something out of the Jetsons (yay internet of things).

Not too many parts - by now we are pros at installing locks:

It also helped that the manual was very easy to understand, even providing "actual size" pictures of the parts to help distinguish between the various screws and bolts:
The outside number panel is smaller than our old one, which we had to install before the previous paint job on the door had fully set (because, you know, we needed to be able to lock the door) so it was time to pull out the paint:


I can still see the vague outlines of the old model about an inch below the new one, but I don't think it bothers me enough to get out the sand paper and really even it out. It's practically invisible in this picture:
Inside, the opposite is true. The new lock takes up much more space than the old one, because of the motor. Here's the old - a simple toggle:
 Then the new one, with the wire coming out, halfway through the installation:
 And finally, the finished look:
Not really thrilled about how it looks, but it works. We activated the option auto-lock feature, will turns the bolt after 30 seconds. As we expected we would, sometimes now we try to close the door after the deadbolt has been extended, i.e. if the door is open for more than 30 seconds. I'm sure we're going to create a nice gash in the wood trim until we get used to it. But it's worth it for the peace of mind knowing that the door is locked when we're away from home. We've also set an additional safety features by creating longer entry codes, to make it harder for someone trying to guess. As before, we have a few different codes that use all the numbers on the keypad, to prevent someone from being able to guess based on wear/finger prints over only a few digits. Anything to make our house less appealing as a target.

Some new wireless hubs are expected out later this year, better than the current models, so soon we might even be able to check our home's status on the internet.

Tuesday, March 17, 2015

Cold and Wet

About a year after our washing machine stopped washing, our old Kenmore electric dryer (110.62972101) stopped drying (with a full load of wet laundry, of course, because how else do you find out a dryer isn't working...). The motor and drum were still working - but the heating element was not doing anything. Fortunately we have lots of drying racks (and our house is very dry in the winter) so we were not immediately screwed. But with a very messy baby, the laundry pile grew very fast.

So we were left with three choices: buy a new dryer, call in a repairman, or fix it ourself. It would take a week to deliver a new one and over a week to get a repairman. A replacement would cost over $800 and the repairman was $65 to show up and $20 for every 15 minutes after that. Parts extra. I would guess at least an hour to fix. So with parts, approaching $200 for repairing a very old machine.

So we decided to spend a day or two trying to Google-fix the dryer and if that failed, we would order a new one.

Googling suggested a few things that were easy to check: first that the fuse partially blew and second was that the exhaust vent was clogged. Dryers have a thermal fuse sensor that stops the dryer if the heat gets too high. But the vent was flowing just fine (which we expected, since we'd recently cleaned it out). Next we opened up the bottom front panel to check a series of fuses and sensors that control the temperature of heating element and when it turns on. Opening it up was easy to do since I had done it a couple of times already.


There were a couple of sensors immediately visible after removing the shield.

I believe the left sensor is the aforementioned thermal fuse, which tests whether the exhaust air is getting too hot (i.e. the vent may be clogged). I think the right sensor is a cycling thermostat which controls how long the heating element is left on. After pulling the plug on the dryer (220 volts!), I disconnected one wire each from the sensors and checked for continuity with my multimeter. But these two and the two I found jammed way on the inside next to the heating coil were all fine. So next I checked the heating coil, which was hidden behind an annoying-to-remove metal panel. After a fair amount of swearing I had it visible.


Unfortunately this was also working just fine. I was left with a series of difficult to check things: maybe the motor was not sending power to the heating element. Or perhaps one of the electric panel switches was not sending the right signal. Checking the motor would be really hard because it is located behind the ducting for the exhaust. Checking the switches at the top of the dryer would be scary because they would require the power to be connected. I made one brief attempt to check continuity at the heat switch, but quickly gave that up after a live wire accidentally brushed another piece of metal (nowhere near me!) and gave off a huge spark.
Mess of wires underneath the controls
I was resigned to order a new dryer when I realized that the switch that controls the heat is identical to the switch that controls whether the dryer should run or not.

So I just swapped the two switches and was happy to find out that now the dryer would only run if you held down the "Start" button. After holding the button down for a few seconds it was obvious that the heat was working! So I overnighted a new switch from Amazon and after a few minutes of swapping wires, we had a functional dryer again.
The culprit
2 hours and $20, not bad!

Thursday, March 12, 2015

Data, feedback, and results

Back in December, I told you we got a real-time energy monitor, so I thought it might be useful now, 3 months later, to tell you how it's been working. Right away, we became more aware of what appliances used the most energy. We could tell when we could look at spikes on the graph and recall: "Oh yeah, that's when I did laundry." "Or oh right, that was the day the heat had to crank on a lot because it was so cold." It has gotten to the point where I can come home from work and ask D what was different that the morning, because our usage was higher than normal by $.20. This actually happened today - we usually use about $.65-.75 before I get home for the day. But today the monitor read $.92 cents - it turned out he started the dishwasher before he left.

We realized that the largest amounts of energy usage came from the dryer, by far, followed by the water heater. And even little things made a noticeable spike. The space heater we run in the bathroom 15 minutes before the little one's bath time cost money. Weekends, when were at home with lights on and the furnace churning, cost more. So we made some small adjustments.

First, we decided to stop drying her diaper liners. We use cloth diapers and wash them every third day. The hot water usage is unavoidable but the dryer was the real culprit for expenses. We have enough diapers that we could let them air dry. Especially in the winter when it's so dry out. So we did that and quickly noticed less energy usage. We still dry our regular laundry (well, we usually do, but our dryer just died...more on that next time, hopefully with good news) but just not the diapers.

Second, we realized we were spending a lot of money heating water. And while I certainly wasn't going to stop taking hot showers (hot, by the way, being about 115 degrees max), or buy a more efficient water heater, we decided to stop running the hot to wash our hands - mostly because the hot water very rarely made it to us in time anyway, and it was unnecessarily causing the water heater to crank up.

Finally, all of this added awareness has resulted in us being even better about turning off lights when we leave the room. We usually did it anyway, but now we see that each cent of electricity counts.

In all, we actually have managed to significantly lower our usage since we started. It's hard to compare figures across years because last year at this time, I was home all day with a newborn. And the year before that, we weren't doing tons of laundry and dishes and keeping the house heated more. But we definitely feel like the awareness has resulted in bills about 10% lower. And it's been fun. It will be interesting to see how our bill changes once we start having to turn on the AC...I'm a little scared to find out.

Thursday, March 5, 2015

Babyproofing, part 3

More babyproofing! These are a few small things we've done that were much easier than the gate installsWe also put a few bumpers onto some corners, but not many. Since my preference for furniture tends to be for rounded edges anyway, we didn't have that many corners we felt were particularly hazardous. I mean, she's a baby. They bounce and heal quickly, right? The only corners we protected are the ones on the piano that are just above eye level and seem to come out of nowhere if you're as short as a baby. In fact, I already witnessed that one in action the other day when she walked into it and ricocheted off with just a little grunt. Baby-proofing success!
We also padded the very sharp corner of my nightstand. We may have to do the dining room table once she's a little taller.
(For anyone wondering that is an Ikea Spoka night light.)

The gate in the basement is finally up - just tension mounted since we will always be down there with her, this is just to make sure she can't zip into the unfinished basement and eat bike chain grease, kitty litter, and tiny nuts and bolts while our back is turned. It has a cat door because we wanted to make sure the cats could enter and exit easily with a full bladder or whatever (they can jump a gate but we wanted to definitely ensure they would have no problems on their way to their bathroom). She is fascinated by the little door and likes to open and close it. Fortunately she can't latch it.

Another door that fascinated her? The one to the fireplace...Easy fix - we just used the locks we originally put in the kitchen. It's a much better use, since we obviously aren't opening that up very often.
Next we still have to attach her wardrobes to the wall, since they are so big and heavy. We are going to hold off mounting the rest of the furniture until we see if she's a climber or not. So far, she is pretty cautious and seems to want to keep both feet on the ground. The other baby-proofing we're pondering is something to keep her from squashing her fingers in her drawers. They are easy-glide and so quick to close if she leans into them that if her fingers are in the wrong place, they will get badly stuck.
One solution seems to be putting piping insulation on one or more edges to keep the drawers from closing completely. That just seems like an invitation for her to play with insulation foam, and I'm not sure I like that idea. Plus she would be able to pull them off easily (or we could apply them with adhesive but then they would possibly damage the furniture). The other, more cruel option, is just to let her do it a few time and learn not to. She already has managed to accidentally squash her fingers in the sliding doors of our bedroom closet and in the piano fall board (did you know that had a name? I didn't until I just looked it up). Maybe this is all part of the learning process?

Saturday, February 21, 2015

Not feeling the heat

Shortly after coming home from a trip our heat stopped working again. Naturally this happened on a Saturday morning. A Saturday with a high of 25 F. My first hope was that I could just hit the reset button on the motor. But the motor would not fire. I could hear the pumps pushing (cold) water around, but nothing else. I tried turning the boiler power on and off. It was like no power was getting to the motor.

Fortunately our furnace guy picked up his phone that and came over within a couple of hours. After about 10 minutes he had the diagnosis: dead aquastat.


The aquastat is the gray box with the power lines coming out in the above photo. What it does is route power around to the water boiling motor (black box at the bottom) and/or the pumps that push water through the house when asked. While it was sending power to the pumps it was unable to power the motor.

Back of aquastat. See the problem? Probably not.
One little spot was burned out. I asked whether I could just re-add some solder to it, but our technician said that it would probably quickly die again.

Closer in. See the burned out spot in the center?
So for about $250 we got a new one installed. Which was a fair price, since the aquastat alone costs around $150. Especially for a Saturday emergency repair. If you read the reviews in the Amazon link you will notice that most of the complaints are about the solder failing. If it dies again, I may just try slapping some on with my $15 RadioShack soldering kit and seeing what happens.

Saturday, February 14, 2015

Babyproofing, part 2

We've made a lot of progress on the baby-proofing front lately, as our little one has moved up to full-fledged mobile toddler. You may remember that last time, we put in a tension-mounted gate to separate the living room from the hallway, magnetic locks in the kitchen, and TV straps. The most important - and hardest - change to implement was the gate at the top of the stairs. Thanks to a recommendation, we went with the KidCo Angle Mount gate. Unlike the gate on our main floor, this one had to be attached to the wall (accidentally dislodging it on a level surface and falling to the ground is a big difference from accidentally dislodging it and plummeting down the stairs). It also couldn't have a threshold that we grown-ups could potentially trip over. This option seemed like the only one that we could use - especially since with the bannister and having to install into studs, we needed the option to install it at an angle (i.e. not perpendicular to the mounting walls).

This was definitely a two-person install so thank goodness grandpa and grandma were there to help watch the baby and assist. D had to be especially careful because one of the studs was also very close to wiring for our hall light. There was a lot of leveling and measuring and tweaking to get the sizing right. The gate width was just slightly too big at one setting and slightly too small at the other, so we had to try both more than once, and keep adjusting the bolt on the lock (4th picture) to see which fit was better.


It works, and after a week of struggling to get the hang of opening and closing it smoothly, I think I've got it (I sneak out in the morning while it's still dark, usually with things in my hands, so it was quite a challenge). It isn't as easy as our main floor gate that has an easy spring and automatically swings shut, but then again, it is a completely different design with a different purpose.

The annoyance for me is that when it is unlatched, it swings back and blocks the door to the nursery.
When it's closed, you can see that we installed it at an angle to get it under the bannister and into the corner stud on the other side. We installed it above the wood trim and made sure before we screwed it in that the cats can pass underneath (but the baby can't). We didn't want them having to jump a gate that was on the steps - they're pretty coordinated but I don't think they could handle that.
Now we can let her play upstairs while we get dressed and straighten up without fearing for her life. And if she should ever manage to figure out how to escape her crib, she can't get far. Huge sigh of relief.